 The Pacific War Online Encyclopedia
|
| Previous: Holland, U.S.Submarine Tender | Table of Contents | Next: Holtz Bay |
Today known as Jayapura, in 1941 Hollandia
(140.707E
2.543S) was the largest settlement in the Dutch
half of New Guinea. It was
located on the only really first-class natural harbor
on the north coast of Dutch New Guinea, Humboldt Bay, though it had
only primitive port facilities. There was also a small airstrip. To the west, the
Cyclops Mountains rise to over 7000 feet (2100 m). Lake Sentani is
located south of the Cyclops Mountains about six miles (10 km) from
Hollandia. A native track led from Lake Sentani to Tanahmerah Bay, 25
miles (40 km) west of Hollandia on the far side of the Cyclops
Mountains.
The town
was occupied by the Japanese on 20
April 1942. The Japanese constructed three airfields on the flat plain
between the Cyclops Mountains and Lake Sentani and began construction
of a fourth at Tami, five miles east of Hollandia on the coast of
Humboldt Bay.
In early 1944 the Allies decided to bypass Wewak, and it was determined that
Hollandia was the best site short of Geelvink Bay for developing a
major base. However, this would be the longest leap along the coast yet
attempted by 7 Fleet.
Pacific
Fleet carrier
support could be provided only for the first few days of the landings, and the nearest
Allied airfield was at Nadzab, 500
miles (800 km) away. MacArthur
therefore ordered a simultaneous landing at lightly-held Aitape, on the coast 125 miles (200
km) east of Hollandia, to capture the Tadji airstrip and establish a
blocking position for any movement westward by the encircled Japanese
army at Wewak (Operation PERSECUTION). The landings were
scheduled for 22 April 1944.
The Japanese meant to make western New Guinea an important link in their inner defense perimeter, and in December 1943 2 Army (Teshima) at Manokwari was assigned a new infantry division and 7 Air Division. In March 1944 two more divisions were ordered to 2 Army from China. Adachi's battered 18 Army in eastern New Guinea was put under Teshima's command at this time, and Teshima ordered Adachi to move west. Adachi ignored the order because he was convinced the Americans meant to land at Hansa Bay. The Americans carried out heavy bombing raids, ship bombardments, and patrols against Wewak in order to reinforce this impression. However, on 12 April Anami, who was senior over both Teshima and Adachi, sent his chief of staff to Wewak to build a fire under the recalcitrant general. As a result, two regiments of 18 Army were already headed west by 22 April.
Preparations for the landings at Hollandia began on 30 March - 2 April 1944 with a deep carrier raid against Palau, where Combined Fleet posed a threat to any move against Hollandia. This was successful at forcing Combined Fleet to retreat to bases further west. At the same time, 5 Air Force struck Hollandia with over 80 B-24 Liberators escorted by P-38 Lightnings modified for greater range. By mid-April Hollandia was finished as an air base complex, and over 340 wrecked Japanese aircraft were later found on the runways, with an estimated additional 50 aircraft shot down over dense jungle. As a result of this debacle, the commander of 6 Air Division, Itahana, was relieved in disgrace.
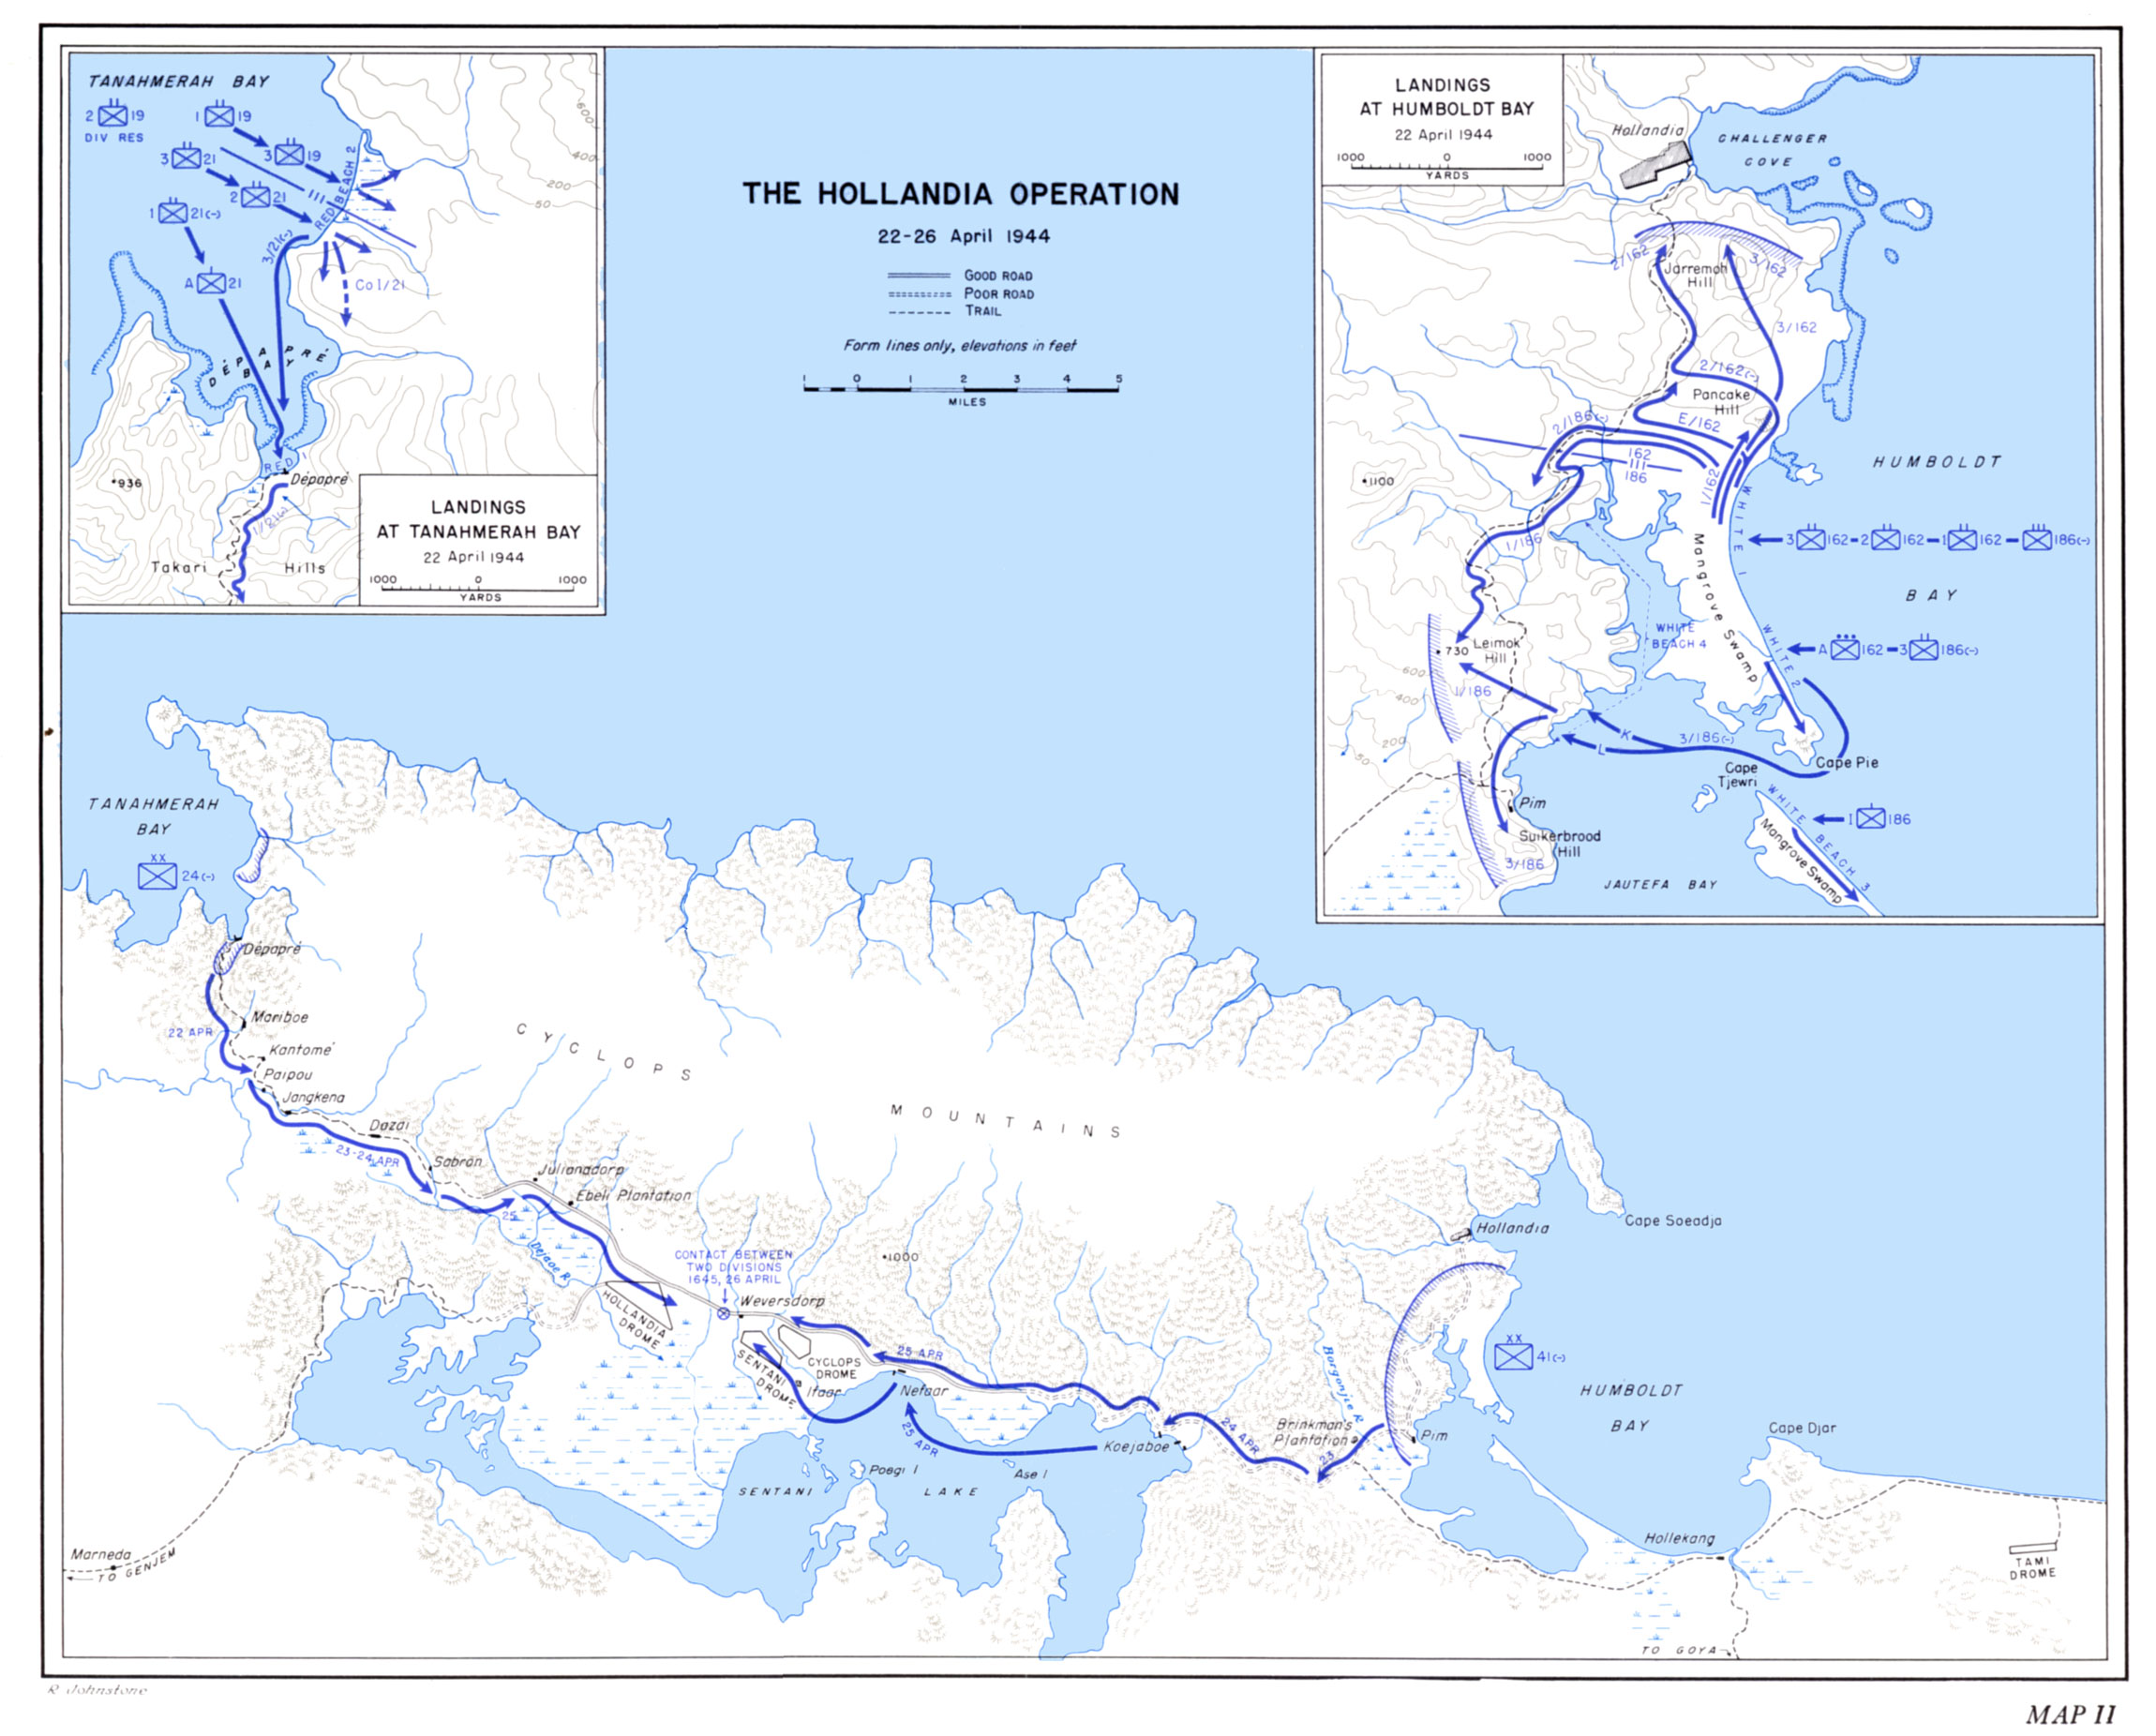
Landings. On 21 April 1944, Hollandia was worked over by
strikes from the twelve carriers of Mitscher's Task Force 58.
Mitscher's aviators also struck Wakde,
Sawar (138.756E 1.877S), and Sarmi, located about 120 miles (190 km) west of
Hollandia. There was virtually no resistance in the air. The next
day, elements of I
Corps under Eichelberger
began
their landings from Task Force 7 (Barbey). Two regiments of
24 Division
(Irving) were assigned to
land at Tanahmerah Bay while two regiments of 41 Division (Fuller) landed at Hollandia.
Simultaneously, 163 Regiment
of 41 Division (Doe) landed at
Aitape and was reinforced by 127 Regiment,
32 Division,
the next day. The third regiment from 24 Division, 34 Regiment, was the corps reserve. Barbey personally supervised the landings at Tanahmerah
Bay, the most exposed of the three landings, and assigned Fechteler to direct the
Hollandia landings and Barbey's chief of staff, Captain Alfred Noble,
to direct operations at Aitape.
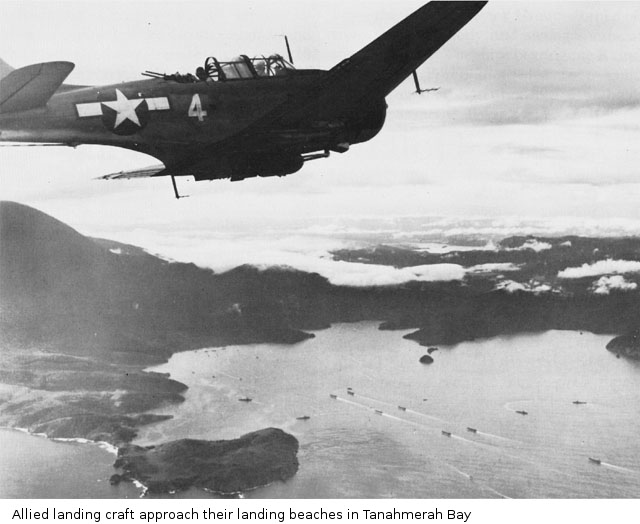
The weather was heavily overcast on the morning of the invasion, which hindered ground air support but also concealed the invasion convoy from Japanese searches. Over 84,000 Americans were put ashore against just 11,000 defenders, who were caught by surprise and put up only light resistance. Only about a thousand of the defenders were combat troops, mostly from 90 Guard Force. The remainder were service troops that fled into the hills when the preinvasion bombardment began. In addition, the Japanese command situation at Hollandia was badly confused. Adachi had sent Kitazono Toyozo from Wewak to take command of the defenses just ten days before the American landings. Kitazono's fate is uncertain, but apparently he escaped the area to survive the war, and Teshima ordered the new commander of 6 Air Division, Inada Masazumi, to take over command of the defenses.
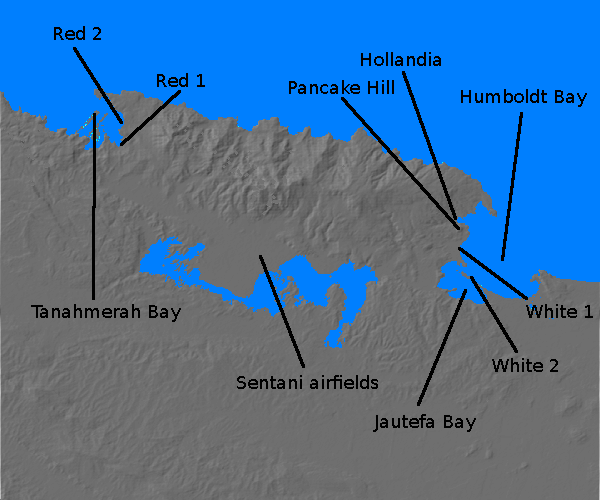
The landing at Tanahmerah Bay almost became a
fiasco. Allied intelligence
had incorrectly concluded that there was a partially completed road
from here to Lake Sentani left over from an abandoned Dutch colonizing
project. Aerial photographs seemed to show two good landing beaches. An
Australian scouting party sent to the area on 23 March was betrayed by
the local natives,
ambushed by the Japanese, and scattered into the jungle. Later aerial
photographs suggested the beaches were not as ideal as originally
thought, but by then planning had progressed so far that Krueger concluded it was too
late to change plans. When the landing force came ashore, it found that
one of the beaches, Red 2, while almost ideal for beaching landing
ships, lay in front of a completely impassable swamp. There was no way even for
infantrymen on foot to get off the beach, which quickly became
congested. The other beach, Red 1, was only a hundred yards (90 meters)
wide and was located in a cove full of coral heads that prevented
anything larger than an LVT or LCM from reaching the beach.
However, the terrain behind Red 1, while confused and steep, was at
least traversable. Men and supplies began to be shifted by boat
from Red 2 to Red 1 while a naval demolition party began blasting a
clear channel for landing ships
to approach Red 1 directly.
Meanwhile patrols had discovered that the supposed
partial road from Tanahmerah Bay to Lake Sentani was nothing more than
a narrow trail winding up the slope behind the beaches. This proved
impassable to any kind of vehicle. However, the Japanese bunkers were uncompleted and ideal defensive positions along the winding trail were unmanned. The advance was able to penetrate
eight miles (13 km) inland by nightfall, and a weak counterattack at midnight was the first significant resistance encountered. Nevertheless, it was clear that the main
landing could not continue at Tanahmerah Bay. Eichelberger ordered
34 Regiment along with all further landing
echelons to shift to Humboldt Bay, leaving the two regiments of 24 Division
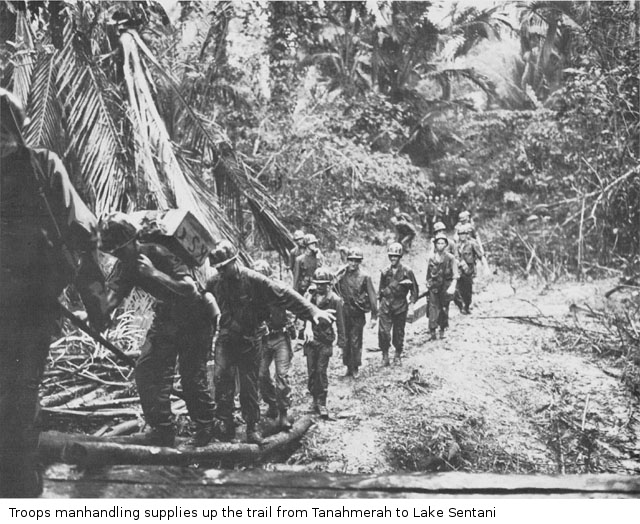
to continue to try to find a way up the trail to Lake Sentani. In spite of the
necessity of manhandling supplies up the trail (which diverted 3500 combat troops), and in spite of skillful rearguard
actions by small groups of Inada's men, the two regiments reached the
westernmost airfield at Setani on 26 April and established
contact with 41 Division advancing from Humboldt Bay. The weather also improved enough to permit badly needed supply drops by aircraft. It then took
three months for engineers to
complete a satisfactory road from Tanahmerah Bay to Sentani.
The landings at Humboldt Bay went
better than expected. The Allied commanders anticipated that the
Japanese would deploy most of their troops in the area, and there were
only two poor landing beaches. White 1 was a narrow sand beach
surrounded by swamp whose only exit was dominated by a high plateau to
the north, Pancake Hill, where the Japanese had emplaced a number of antiaircraft guns. White 2 was
on a narrow spit of land enclosing a small bay, Jautefa Bay, where the
Japanese had built a landing and a road to bring supplies in to their
airfields. The landings on White 2 were to be made by DUKWs and LVTs that would continue
across the spit and cross Jautefa Bay to seize the landing.
Here things went mostly according to plan. Two LCI(G)s flattened Pancake Hill with
a rocket barrage, and the
antiaircraft positions were seized within an hour of the landings. The
beach was found to be the location a Japanese supply dump, and it quickly became
congested with American supplies as well as engineers worked to
bulldoze a road past Pancake Hill. By nightfall, 4200 tons of supplies
had been unloaded and 300 vehicles were ashore. By the end of the next
day, 186
Regiment was halfway to Sentani and 162 Regiment
had taken Hollandia and the surrounding area. There was little
resistance.
The landings suffered a serious setback on the
night of 23-24 April 1944, when a lone Japanese aircraft dropped a
string of bombs across White 1. The
stacks of supplies caught fire, and soon exploding ammunition
devastated the area. Landing
craft were used to evacuate troops from the beach, but 24 were
killed and 100 wounded, and over 60% of the supplies landed on the
beach were destroyed. The fires did not die down enough to allow
engineers to return until 27 April, and for a time all supplies had to
come over White 2 to be transshipped across Jautefa bay by landing
craft. 186 Regiment was put on half rations for several days, but by
noon on 24 April it had reached Lake Sentani and encountered the first
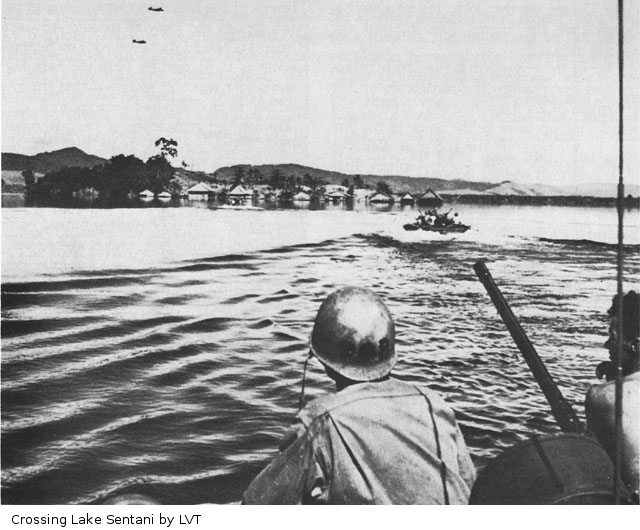
organized Japanese resistance. The next day, two companies of 1/186 Regiment crossed part of Lake Sentani by LVT to speed the advance. By nightfall on 26 April the Sentani
airfields were in Allied hands and 186 Regiment had made contact with
24 Division coming up from Tanahmerah Bay. The supply situation was
eased somewhat by seizing the airstrip at Tami on 1 May 1944 and
bringing in transport
aircraft from 3 May on to shuttle supplies from Humboldt Bay to the
Sentani airfields.
Teshima wanted to send two regiments from Wakde
against the landings, but Anami permitted him to send only two infantry
battalions and a battalion of artillery on the long overland
march. They were only halfway to Hollandia when the Americans landed at
Wakde and cut off their base, forcing them to turn back. Anami himself wanted to dispatch 36 Division from Sarmi to Hollandia, but this plan was vetoed by Southern Army.
Mopping up continued until 6 June, when the area
was declared secure. The Americans suffered casualties of 152 killed or
missing and 1057 wounded, while 3300 Japanese were killed. A
peculiarity of this operation for this stage of the war was that over
600 Japanese surrendered.
Inada
attempted to rally his shattered forces at Genjem (140.170E 2.595S), a point 15 miles (24
km)
west of Lake Sentani, where the Japanese had an agricultural project
from which Inada hoped to supplement his meager rations. Of the
7500 troops who
began the march from Genjem to Sarmi, perhaps 1000 survived. The two
divisions that had
been ordered to New Guinea from China in March 1944 lost nearly half
their numbers to submarine
attack while at sea, and the survivors were diverted to Halmahera.
Ironically, the Sentani airfield complex proved
unable to support heavy bombers
without extensive engineering
work.
| Southwest
Pacific Area (MacArthur)
|
||||||
| |
7 Fleet (Kinkaid) |
|||||
| |
Task
Force 77 (Barbey) |
|||||
| |
Task
Group 77.1 Western Attack Group (Barbey)
|
I Corps Headquarters (Eichelberger) |
||||
| DD Swenson | ||||||
| |
Transports |
24 Division (Irving) 542 Engineer Boat and Shore Regiment |
||||
| |
AP Henry T. Allen | |||||
| LSI Manoora | ||||||
| LSI Kanimbla | ||||||
| LSD Carter Hall | ||||||
| AK Triangulum |
||||||
| 16 LCI 7 LST |
||||||
| Screen |
||||||
| DD Hobby |
||||||
| DD Nicholson |
||||||
| DD Wilkes
|
||||||
| DD Grayson | ||||||
| DD Gillespie | ||||||
| DD Kalk | ||||||
| Special
Service Vessels |
||||||
| AT Reserve |
||||||
| 2 SC 1 LCI 2 YMS |
||||||
| Task
Group 77.2 Central Attack Group (Fechteler)
|
41 Division (Fuller) less one regimental combat team 532 Engineer Boat and Shore Regiment |
|||||
| DD Reid |
||||||
| Transports |
||||||
| LSI Westralia | ||||||
| LSD Gunston Hall |
||||||
| AK Ganymede | ||||||
| Destroyer
Transports |
||||||
| APD Humphreys |
||||||
| APD Brooks | ||||||
| APD Sands | ||||||
| APD Gilmer | ||||||
| APD Herbert |
||||||
| 16 LCI 7 LST |
||||||
| Destroyers |
||||||
| DD Stevenson | ||||||
| DD Stockton | ||||||
| DD Thorn | ||||||
| DD Roe |
||||||
| DD Welles | ||||||
| DD Radford |
||||||
| DD Taylor | ||||||
| Special
Service Vessels |
||||||
| DMS Hogan |
||||||
| DMS Hovey | ||||||
| AT Sonoma |
||||||
| 2 SC 2 LCI 2 YMS |
||||||
| Task
Group 77.3 Eastern Attack Group |
||||||
| DD La
Vallette |
||||||
| Transports |
163 Regimental
Combat Team (Doe) |
|||||
| APD Kilty | ||||||
| APD Ward | ||||||
| APD Crosby | ||||||
| APD Dickerson |
||||||
| APD Talbot | ||||||
| APD Schley | ||||||
| APD Kane | ||||||
| APD Dent |
||||||
| APD Noa | ||||||
| LSD Belle Grove |
||||||
| AK Etamin | ||||||
| Screen |
||||||
| DD Nicholas | ||||||
| DD O'Bannon | ||||||
| DD Jenkins | ||||||
| DD Hopewell | ||||||
| DD Howorth | ||||||
| 7 LST | ||||||
| Special
Service Vessels |
||||||
| DMS Hamilton | ||||||
| DMS Perry | ||||||
| AT Chetco |
||||||
| 4 SC 2 YMS |
||||||
| Task
Group 77.4 First Reinforcement Group |
||||||
| Western
Unit |
||||||
| AKA Virgo | ||||||
| DD Stevens |
||||||
| DD Harrison | ||||||
| PF Coronado |
||||||
| 6 LST | ||||||
| Central
Unit |
||||||
| DD McKee | ||||||
| DD John
Rodgers |
||||||
| PF San
Pedro |
||||||
| 5 LST | ||||||
| Eastern
Unit |
||||||
| AK Bootes | ||||||
| DD Fletcher | ||||||
| DD Murray | ||||||
| PF Glendale |
||||||
| PF Long
Beach |
||||||
| 6 LST | ||||||
| Task
Group 77.5 Second Reinforcement Group |
||||||
| Western
Unit |
||||||
| APA Zeilin |
||||||
| APA Windsor |
||||||
| DD Sigsbee | ||||||
| DD Dashiell | ||||||
| DE Lovelace |
||||||
| DE Manning | ||||||
| Central
Unit |
||||||
| DD Ringgold | ||||||
| DD Schroeder | ||||||
| 5 LST | ||||||
| Task
Group 77.6 Floating Reserve |
||||||
| APA Ormsby |
||||||
| APA Harry Lee |
||||||
| AKA Centaurus | ||||||
| Task
Force 78 Escort Carriers (Ragsdale) |
||||||
| Task
Group 78.1 |
||||||
| Carrier Division 22 (Ragsdale) | ||||||
| CVE Sangamon |
||||||
| CVE Suwannee | ||||||
| CVE Chenango | ||||||
| CVE Santee | ||||||
| Destroyer
Squadron 2 |
||||||
| DD Morris |
||||||
| DD Anderson | ||||||
| DD Hughes | ||||||
| DD Mustin | ||||||
| DD Russell | ||||||
| DD Ellet |
||||||
| DD Lansdowne |
||||||
| DD Lardner | ||||||
| Task Group 78.2 (Davison) | ||||||
| Carrier
Division 24 |
||||||
| CVE Natoma
Bay |
||||||
| CVE Coral
Sea |
||||||
| CVE Corregidor |
||||||
| CVE Manila
Bay |
||||||
| Destroyer
Squadron 48 |
||||||
| DD Erben | ||||||
| DD Walker | ||||||
| DD Hale | ||||||
| DD Abbot | ||||||
| DD Bullard | ||||||
| DD Kidd | ||||||
| DD Black | ||||||
| DD Chauncey | ||||||
| DD Stembel | ||||||
| Task
Force 74 Covering Group "A" (Crutchley) |
||||||
| CA Australia |
||||||
| CA Shropshire |
||||||
| DD Warramunga |
||||||
| DD Arunta | ||||||
| DD Ammen | ||||||
| DD Mullany | ||||||
| Task
Force 75 Covering Force "B" (Berkey) |
Rottman (2002) | |||||
| CL Phoenix |
||||||
| CL Nashville | ||||||
| CL Boise | ||||||
| Destroyer
Squadron 24 |
||||||
| DD Hutchins | ||||||
| DD Bache | ||||||
| DD Daly | ||||||
| DD Abner
Read |
||||||
| DD Bush | ||||||
| Task
Force 58 Fast Carrier Force |
As listed for Battle of the Philippine Sea |
|||||
| Task
Force 73 Aircraft Seventh Fleet |
||||||
| Task
Group 73.1 Seeadler Harbor
Group |
||||||
| AV Tangier |
||||||
| AVP Heron |
||||||
| AVP San
Pablo |
||||||
| VP-33 | 13 PBY-5 |
|||||
| VP-52 |
13 PBY-5 | |||||
| VB-106 |
11 PB4Y-1 Liberator |
|||||
| Task
Group 73.2 Langemak Bay Group |
||||||
| AVP Half Moon | ||||||
| VP-34 |
10 PBY-5 | |||||
 |
 |  |  |
References
Smith (1953; accessed 2013-5-18)
The Pacific War Online Encyclopedia © 2007, 2009-2010, 2013 by Kent G. Budge. Index