 The Pacific War Online Encyclopedia
|
| Previous: Bhusawal | Table of Contents | Next: Bibai |
 |
U.S. Army. Via ibiblio.org |
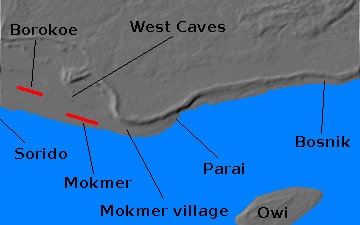
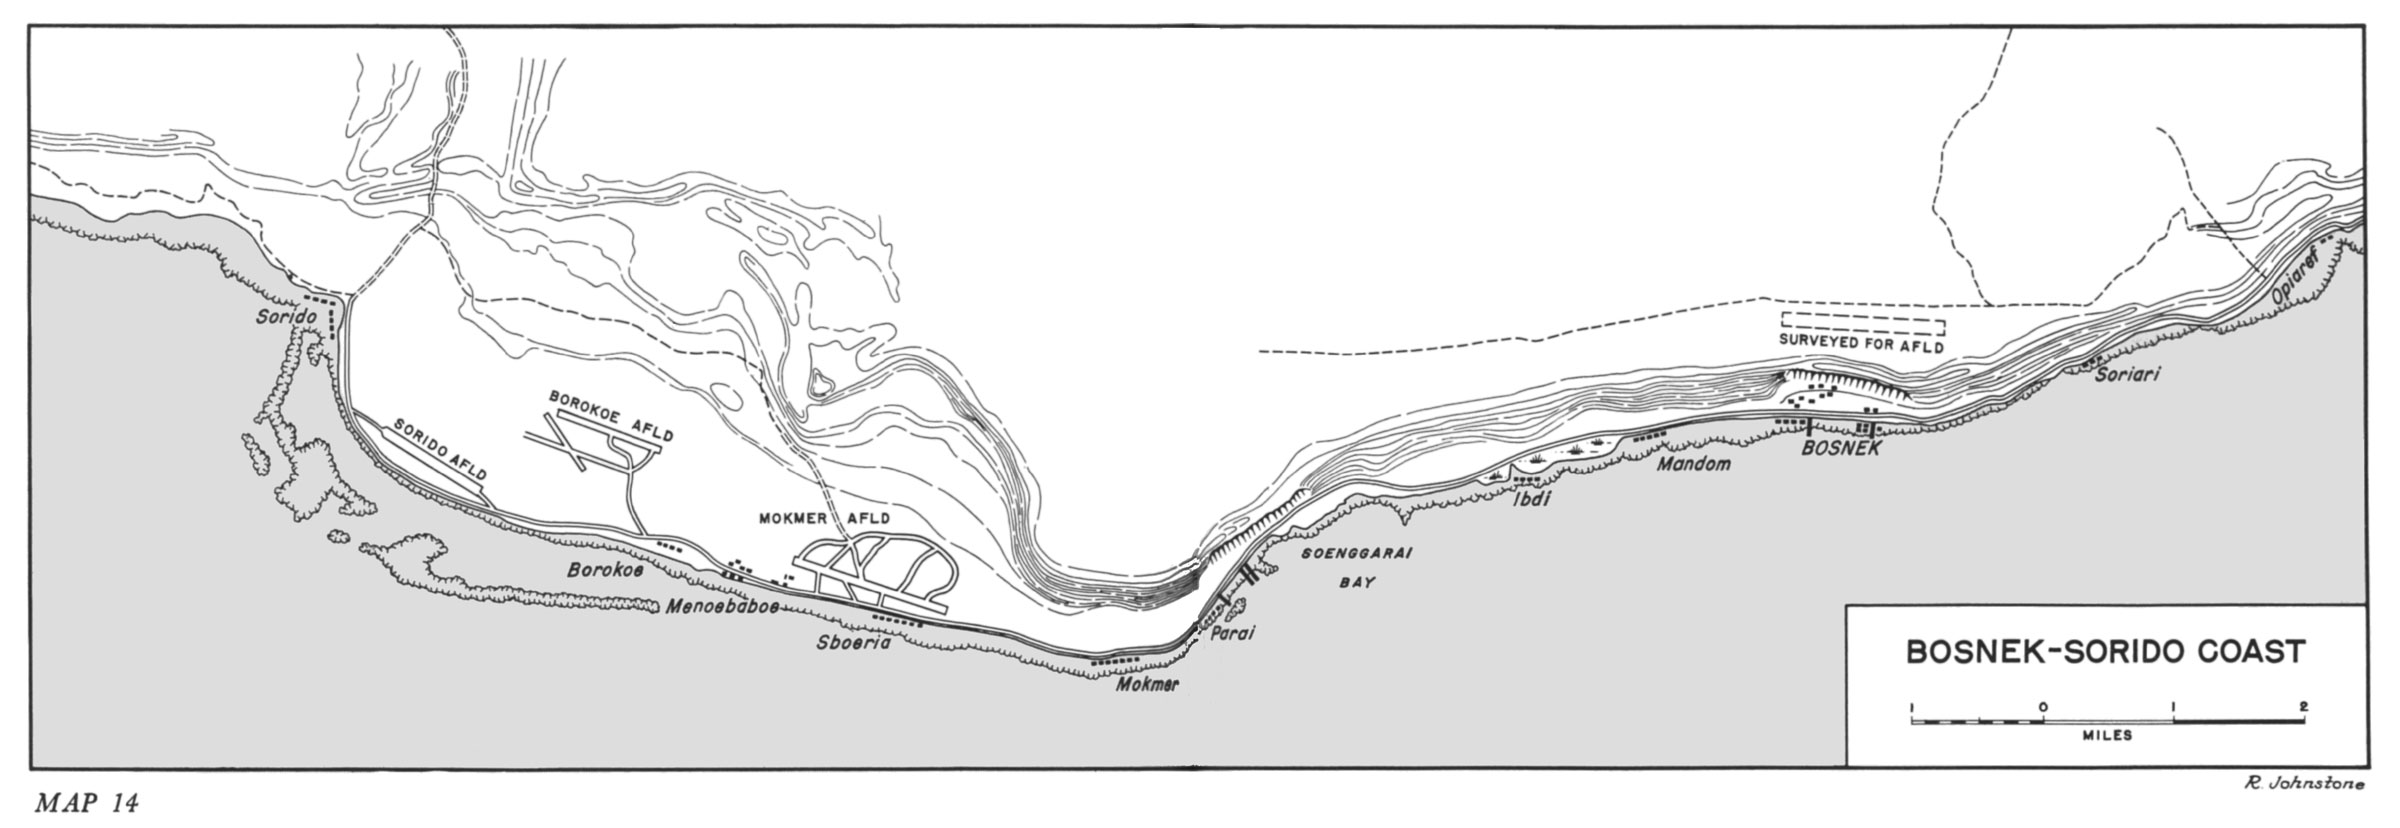
Biak is the largest of the Schouten Islands, located in Geelvink Bay (Cenderawasih Bay) on the north coast of western New Guinea. Biak is about 45 miles (72 km) long and 25 miles (40 km) wide. The somewhat smaller island of Soepiori is located to the northwest, across a very narrow strait, and the Padaido Islands are scattered to the southeast. Biak itself is mostly a low plateau covered with jungle and reaching to 2428' (740 meters) to the northwest, but there is a coastal plain on the south with considerable flat ground suitable for airfields. There are no natural anchorages and the island is almost completely surrounded by a formidable reef. The administrative center was Bosnik, on the southeast coast, where the reef was a bit narrower and was crossed by two stone jetties. The indigenous population numbered about 25,000 in 1944.
There is
a 200 foot (60 m) escarpment extending from east of Bosnik (136.236E
1.170S) to Mokmer village (136.136E
1.200S).
This escarpment is about 500 yards (460 m) inland along most of
its
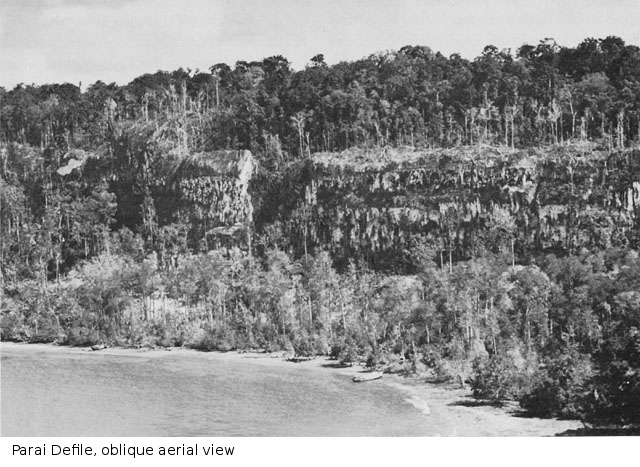
length, but comes close to the shore at Parai (136.155E
1.193S), leaving just enough room
for a road. Behind the escarpment, the terrain
drops to a plateau, about 100 feet (30 m) in elevation, which is
generally flat but locally rough ground. The plateau was covered
with
scrub,
transitioning to dense forest two or three miles (three to five
km)
inland. West of Mokmer village, the escarpment turns north and
runs
inland for about a mile and a half (two and a half kilometers)
before
turning west again and running to the southwest corner of the
island.
This creates a relatively broad coastal plain suitable for
airfield
construction. The escarpment is coral with numerous caves, some of
which are quite large.
The Japanese
occupied the island in the spring of 1942 and built an airfield on
the coastal plain west of
Mokmer (136.107E
1.189S) capable
of operating bomber aircraft. 222
Regiment from 36
Division was brought in from China in late 1943 to garrison
the island. By 1944 there were additional airstrips at Bosnik (136.080E
1.173S) and Sorido (136.061E
1.162S), and the whole airfield complex was protected by
substantial concentrations of dual-purpose and antiaircraft guns. 19
Naval Guard Force was sent to the island in May 1944,
just in time for the Battle of Biak.
Following their invasion of Hollandia, the Americans discovered that it would take many months to make the airfields at Lake Sentani capable of supporting heavy bombers. Aerial reconnaissance revealed that Biak was the nearest promising location for such airfields along MacArthur's line of advance. Aircraft based here would be well situated to support Nimitz' landings on the Marianas and Palau. MacArthur therefore ordered 6 Army (Krueger) to execute an expedited assault schedule on 10 May 1944, with a preliminary assault at Wakde on 17 May to secure airfields for local air cover and an assault on Biak ten days later. The landings were to be carried out by Hurricane Force, built around 41 Division (Fuller), minus one regimental combat team, with the naval forces commanded by Fechteler. 41 Division was reinforced with most of a tank company, additional antiaircraft and artillery, and three airfield engineer battalions.
The landings were planned in considerable haste, both to ensure
the airfields would be in operation by the time of the Marianas invasion on 15
June and to ensure that momentum would not be lost for MacArthur's
drive on the Philippines.
Fuller was under considerable pressure to ensure that the
airfields would be secured by 10 June.
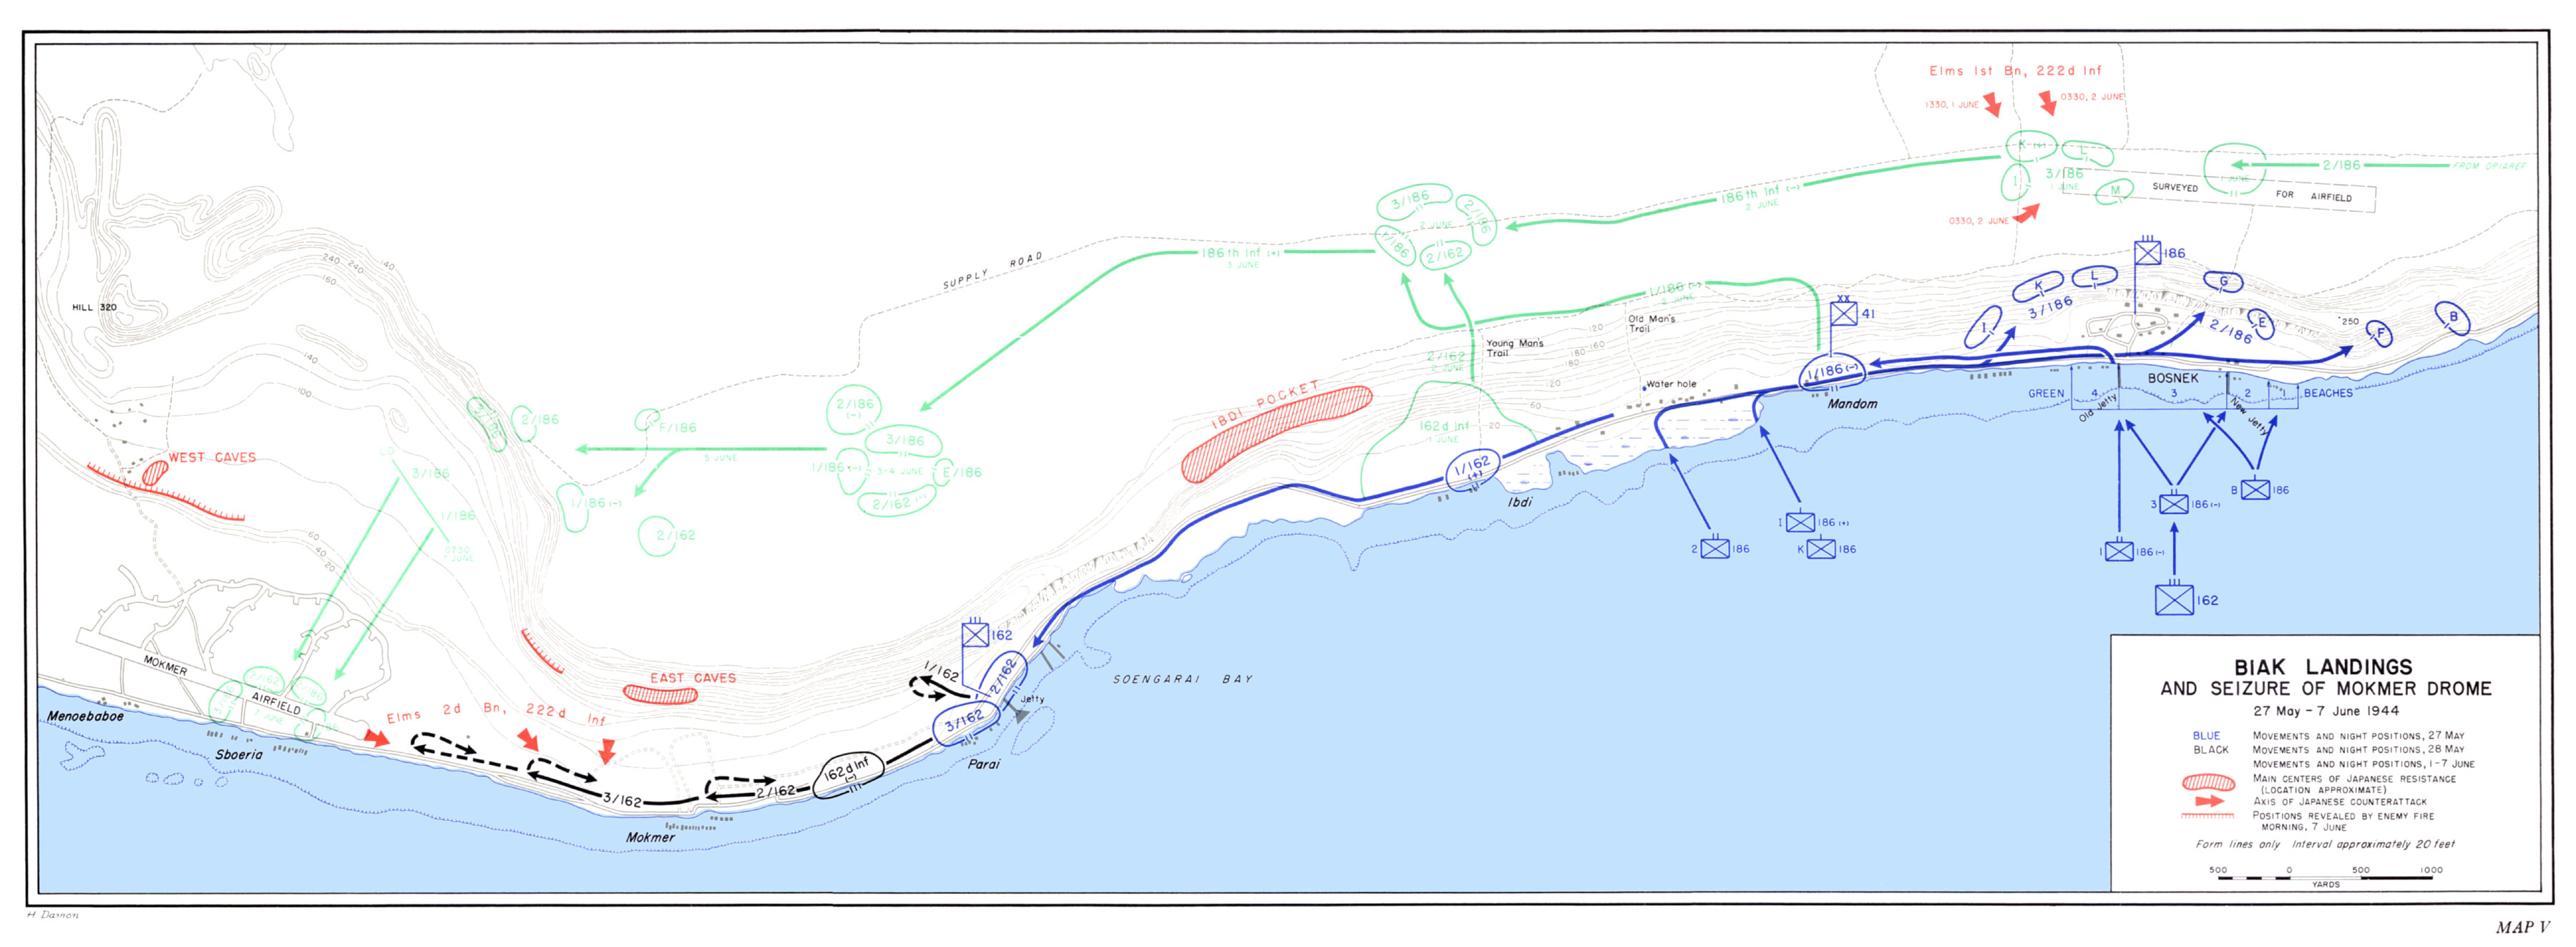
Aerial reconnaissance showed that the reef offshore of Mokmer was unfavorable for the passage of landing craft, while the coast further east towards Parai was heavily fortified and the terrain between Parai and Bosnik was mostly mangrove swamp that afforded little room for maneuver. The decision was therefore made to land at Bosnik. However, this meant that the landing force would have to advance a considerable distance along the coast road at the foot of the escarpment to reach the airfields at Mokmer. Because conventional landing craft would not be able to cross the reef even at Bosnik, the landing plan called for six LSTs to launch 63 LVTs and 25 DUKWs to bring the first four waves ashore. Subsequent echelons would land at the jetties from 15 LCIs. Engineers and their equipment would be landed on the reef early in the invasion from eight LCTs to prepare beaching ramps for LSTs carrying tanks.
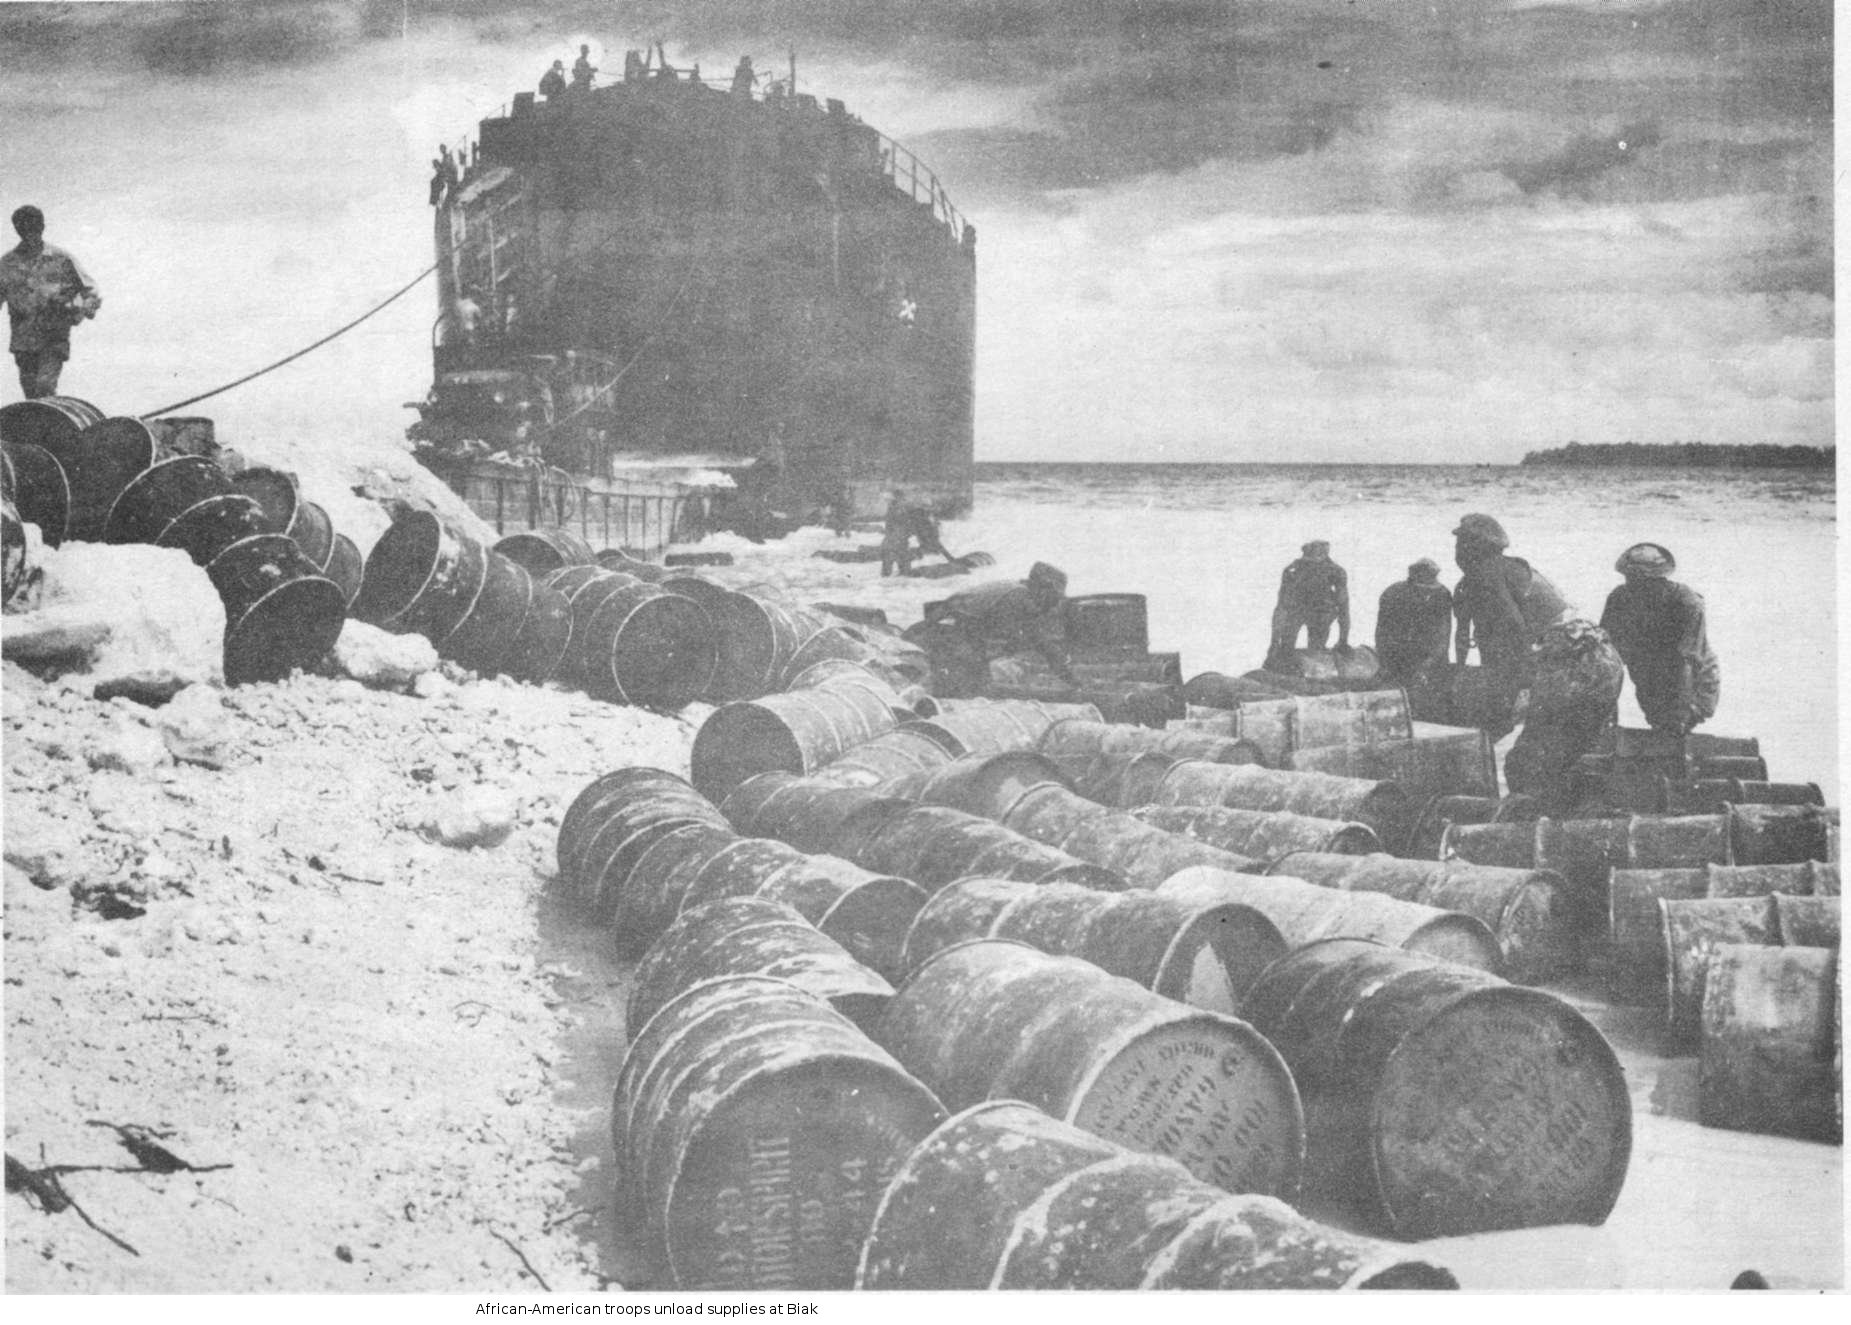
The LVTs were manned by 542 Engineer Boat and Shore Regiment
while
the DUKWs were manned by African-American
troops. The DUKW drivers were hastily trained to operate out of
LSTs at
the rehearsal held at Hollandia on 23 May 1944. They performed
well in
the actual landing in spite of considerable confusion.
Preliminary air strikes were carried out by both 5 and 13 Air
Forces
from Nadzab and the Admiralties on 17 May
1944.
A total of 99 B-24 Liberators
participated in these raids. Strikes continued almost daily until
the
landing date, and were joined the last three days by A-20s based on Hollandia.
Other
strikes were directed at Japanese airfields in the Vogelkop
Peninsula
west of Biak by Liberators from Darwin.
Landings. The landing force embarked most of 41 Division
on 25 May 1944 and
sailed that evening. It was joined next morning by the cruiser forces under Crutchley and Berkey. Fighter
cover was provided by 5 Air Force from Wakde.
Fechteler did not expect to achieve surprise,
but the Japanese reconnaissance
aircraft that detected his force the next day was not itself
detected, and
Fechteler incorrectly believed he had achieved surprise after all.
The Japanese had expected an assault on Biak following the
invasion
of Hollandia, but not so quickly. Biak was originally planned to
be an important
link in the Japanese perimeter, but the Japanese high command
vacillated badly over whether to attempt to hold Biak or let it be
sacrificed to buy time while a stronger perimeter was established
further west. On 9 May 1944 Imperial General Headquarters
announced that the perimeter was to be pulled back to Sorong, then changed its mind
two days
after the Allied landings and ordered a powerful naval response.
The Biak garrison consisted of 11,000 troops of whom 4000
were combat trained. These were mostly from 222 Regiment under Colonel
Kuzume Naoyuki and included a company of light tanks. The
remaining troops included artillery,
engineers, and 28 Special Base Force
with about 1500
sailors. Kuzume expected the landings to take place near Mokmer
and
concentrated his forces accordingly. The invasion of Wakde on 17
May prompted Kuzume to end work on the airfields and begin
extensive fortification work.
Emphasis was put on the high ground north and northwest of Mokmer
airfield with the intent to deny the Allies the use of the
airfield for
as long as possible. Fortifications included four 4.7"
dual-purpose guns and a 6" coastal defense gun close to the
beach.
Other artillery, mortars,
and automatic weapons were deployed on the
escarpment behind Mokmer, with the strongest position in a set of
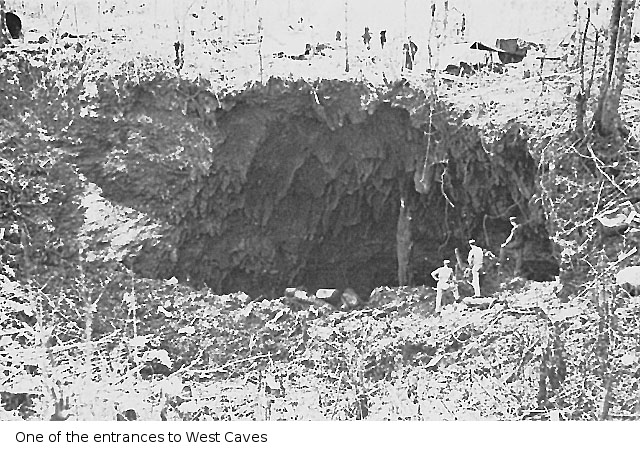
limestone caves 1200 yards (1100 m) north of Mokmer airstrip. The
Allies later discovered that these "West Caves" were centered
around
three sumps, the largest of which was 80' (25m) deep and 100' (30
m)
across. West Caves had room for a thousand
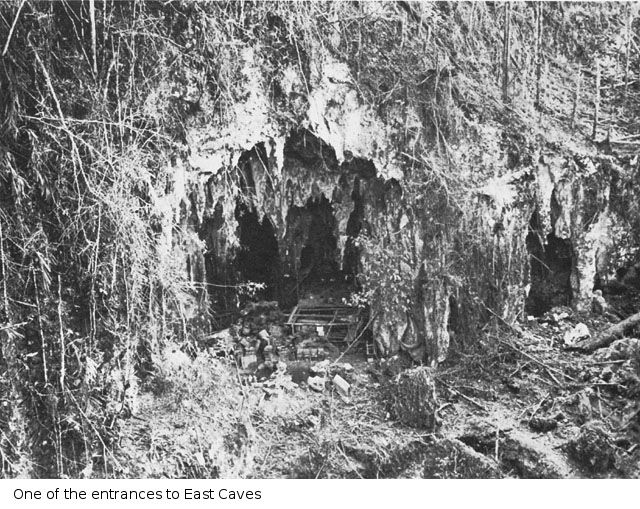
men. Another strong point was located in a smaller cave system
("East
Caves") directly
north of Mokmer village, east of the airstrip, while a third
strong point with pillboxes
was located just west of Parai ("Ibdi Pocket"). The latter two
strong points were
serendipitously located in ideal positions to ambush the American
advance along the coast.
Elements of 41 Division (Fuller)
began landing at
0629
on 27 May 1944. Opposition at Bosnik was light except for a
troublesome 4.7" gun situated in the Mokmer strong point that
damaged a destroyer
and was not permanently
silenced for several days. However, the weather was dead
calm,
and the preliminary bombardment by ships and aircraft of 13 Air
Force
soon obscured the landing area with smoke and dust. Some 400
rounds of
8" (203mm), 1000 rounds of 6" (152mm), 3740 rounds of 5" (127mm)
and
1000 rounds of 4.7" (119mm) ammunition was allocated for the area
around the airfields and another 4900 rounds of 5" and 4.7"
ammunition
were allocated for the landing beaches at Bosnik. The initial five
waves were caught in a 2 to 3 knot current, and landed about two
miles
(3 km) west of the planned landing beach before destroyer Kalk
located the stone jetties on radar
and discovered the mistake. The first wave found itself in a
mangrove swamp but quickly
regrouped, and the
sixth and subsequent waves were directed to the correct beach. The
jetties were found to be in good condition and the remainder of
the
landing went according to plan. By nightfall, about 12,000 troops,
12
tanks, 18 artillery pieces, 500 vehicles, and 1400 tons of supplies were ashore. 186
Regiment
was able to advance from the swamp to the coastal road and 162
Regiment
was ashore on the correct beaches.
The initial confusion during the landings led to the first
controversy of the battle. The commander of 186 Regiment, finding
himself on the coast well west of Bosnik, recommended that his
regiment
swap missions with 162 Regiment, so that 162 Regiment would secure
Bosnik while 186 Regiment raced west towards the airfield. Fuller
rejected the recommendation, feeling that this would compound the
confusion.186 Regiment moved east to secure the beachhead
while 162 Regiment drove west through their lines and began a
rapid advance
along the coastal road towards Mokmer, reaching Parai before
digging in for the night.
Japanese aircraft put in a modest appearance during the first day. Four fighters appeared over the airstrips at 1100 but quickly retreated. Two fighters and four bombers appeared late in the afternoon and succeeded in hitting an LST with bombs that proved to be duds. Three of the bombers were shot down, but one succeeded in crashing into SC-699, which was set on fire and suffered two dead and eight wounded before the fires were put out and the submarine chaser salvaged.
Opposition was so light the first day that Barbey speculated that the Japanese had evacuated the island. This was far from the case. Although the Japanese had spotted the invasion convoy, they were caught out of position and relatively unprepared for the attack. 2/222 Regiment was in place in the East Caves, but the other units were mostly scattered across the inland plateau. The command situation was further confused by the presence of Lieutenant General Numata Takazo, chief of staff of 2 Area Army, and Rear Admiral Senda Sadatoshi, who were both on an inspection trip from the area headquarters at Manokwari. Numata apparently directed Kuzume to abandon his plans for a defense in depth and carry out counterattacks in accordance with the traditional Japanese emphasis on the offensive. Numata left the island on 15 June, after which Kuzume reverted to his strategy of defense in depth. Senda remained on the island and shared the fate of the garrison, placing himself under Kuzume's tactical command.
Counterattack at Mokmer. MacArthur
had discounted accurate intelligence
showing 11,000 Japanese troops and light tanks on
the island, believing there were not more than 4400 defenders. The
intelligence was confirmed when 162 Regiment began to close
on the airfield on the morning of 28 May 1944. The forward
elements had
gotten within 200 yards of Mokmer airfield when the Japanese
defenders
suddenly
opened fire from the East Caves and Ibai Pocket, ambushing the
American column. Elements of 2/222 Regiment attacked from
the west and north and soon had 3/162 Regiment trapped
in a perimeter 200 yards deep and 500 yards long. 1/222 Regiment
attempted to outflank the Japanese by advancing along the ridge
from
Parai but were stopped by fire from East Caves. A platoon of Sherman
tanks helped drive back an attack supported by Japanese tanks, but
1
and 2 Battalions were unable to break through to relieve 3
Battalion.
Supplies had to be brought in, and casualties evacuated, by
landing craft.
The naval support officer with 162 Regiment was killed around noon,
which greatly hindered cooperation with destroyers offshore. At
1600
Fuller ordered 3 Battalion to pull back behind 2 Battalion's
lines.
Four of the Shermans covered the withdrawal, which was completed
by
1900.
Destroyer
gunfire was unsuccessful in driving the Japanese back during the
night, and the Japanese moved 1 Battalion, 222 Regiment to
West Caves from its bivouacs to the north and prepared to throw
all of 2 and 3 Battalions against the Americans
the next morning. The counterattack was supported by
light
tanks, but these were completely outclassed by the Shermans, which
knocked out seven of the Japanese tanks while the Japanese infantry
took heavy casualties. However, by noon the Japanese had cut the
coastal road at Parai and it was clear that 162 Regiment was in an
untenable
position. The American tanks were able to cover the evacuation of
2
Battalion in LVTs while the
remainder of 162 Regiment cleared the roadblock at Parai and moved
back to Ibdi (136.190E
1.178S).
Seizing Mokmer Airfield. Fuller called for reinforcements
for an attack to clear the
escarpment. He was given two battalions of 163
Regiment
from Wakde, and 503
Parachute Regiment began moving to Hollandia
in case it was also need. During the two days it took to bring up
the
two infantry battalions in LCIs, 162 Regiment regrouped and
rested,
except for patrol activity that identified the Ibdi Pocket and
found
two trails across the escarpment. The Japanese also regrouped.
Although
some 800 men of 3/222 Regiment remained largely idle in
the Ibdi Pocket, Kuzume moved naval troops and a mortar company in
the East Caves, reorganized most of 2/222 Regiment around
West Caves, and pulled 1/222 Regiment back to a position
well north of Bosnik.
The American attack
resumed on 1 June 1944, with 186 Regiment advancing west along the
inland
plateau while 162 Regiment resumed its drive along the coast. 1/222
Regiment
attempted a counterattack that night against the northern flank of
186
Regiment, but this was beaten off with heavy losses, with the
Japanese
battalion
commander among the dead. The Japanese survivors continued
withdrawing
before 186 Regiment and would ultimately end up at West Caves.
Thereafter 186 Regiment was more seriously hindered by terrain and
lack
of fresh water supplies than with the Japanese. (At one point, a
tropical downpour was all that prevented the advance from bogging
down
for lack of water.) Meanwhile 162 Regiment had recognized that the
Ibdi
Pocket was a major strong point.
After a pause on 3 and 4 June to await the outcome of Operation
KON
(see below), the advance resumed.
By 6 June, 186 Regiment was preparing to advance along the
terrace
north of Mokmer airfield to clear any Japanese positions
overlooking
the airfield. However, Fuller, who was under pressure from Krueger
to
get at least one airfield operational as soon as possible, ordered
the
regiment to prepare
to move south immediately and seize the airfield and a beachhead
around
it. Because
of inadequate patrolling by one of his battalions, the regimental
commander failed to recognize that he was in a good position to
outflank strong Japanese positions on the ridge north of Mokmer
airfield.
Instead, 186 Regiment headed directly to the airfield, under cover
of
an intense artillery barrage, and after occupying the field found
itself under fire from formidable Japanese fortifications on the
ridge
to the north. There followed an artillery duel in which some 40%
of the
Japanese guns were silenced, but the remainder kept the airfield
from
being put into operation. Furthermore, 186 Regiment had had to
abandon
its tenuous supply line back across the ridge and the inland
plateau to
Bosnik, and the Japanese at Ibdi Pocket and the Parai defile had
kept
162 Regiment from
clearing the coastal road. Additional supplies had to be run in by
landing craft under Japanese fire, which was possible only after
infantry with tank support had cleared the Japanese fortifications
along the beach south of Mokmer airfield.
The battle for Biak now became a battle of attrition. Kuzume had 1 and 2 Battalions, 222 Regiment; 19 Naval Guard Force; and most of his Army service troops and heavy weapons at West Caves and the ridge north of Mokmer, some naval troops and mortars at East Caves, and 3/222 Regiment in the Ibdi Pocket. Fuller ordered most of 3/162 Regiment moved by landing craft to the Parai jetty, from which it was to move east and, presumably, take the Japanese at the Parai defile from the rear. Instead, the battalion was hit by fire from East Caves and called for reinforcements of artillery and tanks. Frustrated with the Japanese resistance at Ibdi, Fuller decided to leave a single company to contain the Ibdi Pocket while 162 Regiment cleared the Parai defile, opened the coastal road, and moved west to join 186 Regiment at Mokmer airfield. The Ibdi Pocket would be left for 163 Regiment to reduce when it arrived.
U.S. Army. Via ibiblio.org
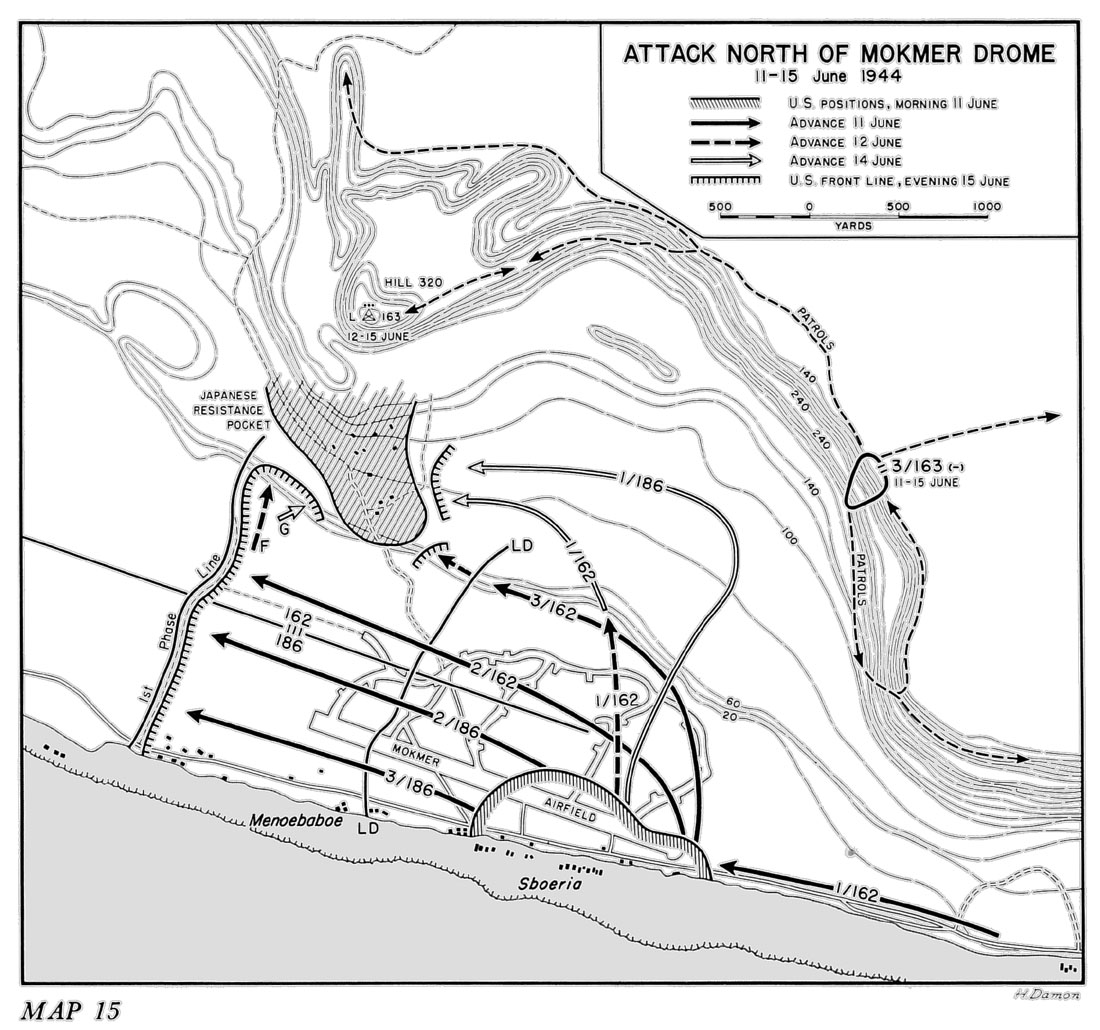
Clearing the West Caves. On 11 June Fuller launched a
major
attack by both 162 and 186 Regiments to the west from Mokmer
airfield.
Each regiment put two battalions into the attack and held the
third
back at Mokmer airfield as reserves.
Meanwhile 3/163 Regiment patrolled along the ridge to the north
and northeast. Three
of the assault battalions advanced against very light opposition,
but the
fourth and northernmost battalion, 3/162 Regiment, ran into stiff
opposition along the terrace almost at once. The battalion had
stumbled
onto West Caves, and liberated Javanese
laborers confirmed the presence of the Japanese stronghold.
Company L,
163 Regiment, had meanwhile
established an observation post on Hill 320, directly north of
West
Caves, and the observation post reported large concentrations of
Japanese artillery around West Caves. Concerned by the resistance
his
men were facing, Fuller requested (and was given) the use of 34 Regiment.
On 12 June engineers began work on Mokmer airfield, repairing
2300
feet of runway by the evening of 13 June in spite of harassing
mortar
and artillery fire. Meanwhile, because of the delay in taking the
airfields, Army
engineers explored the Paidado Islands and determined that Owi had
excellent terrain for an airfield. Construction on Owi began on 9
June, but the
field would not be not ready for fighters until 17 June.
On 14 June the two reserve battalions were ordered to attempt to
outflank the
Japanese positions to the north. One of the battalions drove
almost to the periphery of the
West Caves, and Kuzume responded with a counterattack on the
morning of 15 June. This was thrown back by bazooka teams and
artillery but spoiled the American's own plans for an attack that
day.
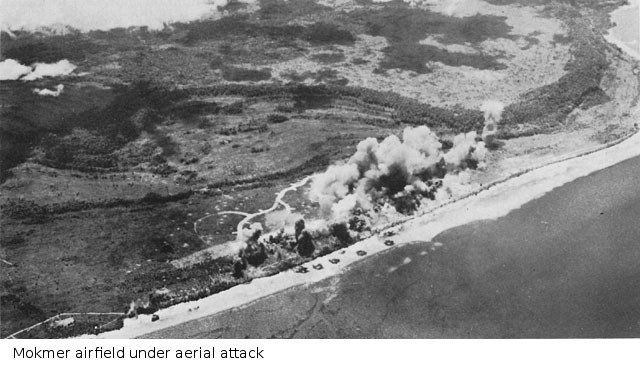
By now MacArthur's patience had run out, and on 15 June Fuller was relieved by Eichelberger. Krueger's instructions were for Eichelberger to take command of Hurricane Force and leave Fuller in command of 41 Division. However, Fuller felt he had lost the confidence of MacArthur and Krueger and requested relief from his division command and reassignment outside Southwest Pacific Area. Doe took command of 41 Division. Eichelberger renewed the attack on 16 June, and by the evening of 17 June two battalions were on high ground overlooking West Caves. After a pause to regroup, the bulk of both 162 and 186 Regiments were thrown against West Caves, which were isolated by nightfall on 19 June. However, the strong point was not reduced until 27 June, after the Americans had employed drums of gasoline, hand grenades, direct fire from tanks, and demolition charges against the stubbornly entrenched Japanese. A large force of Japanese attempted unsuccessfully to break out on the night of 21-22 June, while the fate of Colonel Kuzume himself is uncertain; some reports claimed he committed ceremonial suicide immediately after the breakout attempt, while others claimed he was killed in action or committed suicide some days later. However, as the Americans closed the ring on West Caves, their engineers were finally able to work unhindered on Mokmer airfield, and it began operating fighters on 22 June.
Meanwhile Borokoe and Sorido airfields were occupied by 34 Regiment, which had arrived on Biak on 18 June. 34 Regiment participated only briefly in the battle, going back into 6 Army reserve on 30 June, by which time the entire area north of the airfields had been mopped up. There was brief fierce resistance around a cul-de-sac northwest of Hill 320 dubbed The Teardrop, but this was cleared by 25 June.
U.S. Army. Via ibiblio.org
East Cave and the Ibdi Pocket. Meanwhile the Americans had
renewed the assault on the strong points at East Caves and the
Ibdi
Pocket. East Caves was occupied by about 1000 troops, mostly
engineers
and service troops with a very thin leavening of mortar crews and
riflemen from 222 Regiment. The Japanese here had fired
intermittently on the airfields starting on 7 June, and American
patrols
had identified some of the Japanese positions, but the Americans
considered it more urgent to reduce the West Caves and had left
the
East Caves to be neutralized by artillery and mortars. From 7 to
10
June, more than 1000 shells had been fired on the positions. By 13
June
the American artillery and patrols had suppressed fire from the
East
Caves sufficiently that the coastal road was finally open to truck
traffic. Harassing fire continued until 27 June, and included a
number
of skip-bombing sorties by B-25s
from Mokmer airfield on 23 or 24 June.
Fire from the caves on 27 June was sufficiently troublesome to American engineers constructing a jetty near Mokmer village that mortars and artillery were again brought in to suppress the Japanese guns. Some 1600 rounds were fired into the caves, and the Americans increased their patrols into the area. On 3 July, engineers and infantry from Mokmer airfield moved into the East Caves under cover of tank fire and began blasting shut the caves. The Americans broke into the main positions on 5 July to find that most of the troops had already slipped away. However, a few survivors remained in the area until 20 July, when the Americans responded to an ambush of Australian souvenir seekers by sending in tanks and infantry to thoroughly mop up the position.
The attack on the Ibdi Pocket had begun on 1 June but had made
only
slow progress. However, the Parai Defile was finally cleared
on
12 June, and the newly arrived
163 Regiment took over responsibility for clearing the rest of the
Ibdi
Pocket while 162 Regiment moved west to join 186 Regiment at
Mokmer
airfield. Between 12 June and 20 June, 163 Regiment carefully
scouted the escarpment, then launched a major attack. This met
stubborn
resistance, and by 28 June the
exhausted infantry was back to patrolling for targets for
artillery and
air bombardment. From 21 June to 10 July, at least 40,000
artillery and mortar shells were fired on targets in the Pocket,
and on
10 July a patrol reported
that the Japanese defenders were considerably reduced and that the
heavy bombardment had stripped much of the cover from the Japanese
positions. The assault was renewed the next day by infantry with
bazookas and flamethrowers
and heavy tank, artillery, and air support, and on 22 July all
organized resistance had ceased. Mopping up continued until 25
July.
On 28 June 2 Army had ordered the remains of Biak
Garrison to withdraw into the wilds of the island and
prepare for guerrilla
warfare. Some 4000 Japanese troops were at large on the island,
most of whom began making their way to Wardo Bay (135.824E
1.031S)
on the west coast, and the Americans turned to mopping up these
troops
before they could reorganize. Patrols were sent far north of
the
escarpment, and on 2 August, 2/162 Regiment landed at Korim
Bay (136.042E
0.912S), on the northeast coast of Biak,
and moved south to make contact with 3/163 on 15 August. 1/186
Regiment
landed at Wardo Bay on 17 August. By 20 August the island was
considered secured.
The Americans suffered casualties of 474 dead or missing and 2428 wounded during the battle. An epidemic of scrub typhus contributed another 1000 casualties, while another 3500 troops were diagnosed with "fevers of undetermined origin." The Japanese lost about 4700 dead and another 220 prisoners.
The Japanese Navy high command reacted strongly to the Biak
invasion,
which threatened to disrupt plans for a decisive battle in the
central
Pacific (A-Go.) Ozawa's Mobile Fleet, the main
striking
power of the Japanese Navy, had already assembled at Tawi Tawi in anticipation of
the
battle. However, the Japanese Army had written off Biak, and the
Navy
had allocated only the 18 aircraft of 23 Air Flotilla (Ito) at Sorong to repel any attack on
Biak.
The Navy began
concentrating its land-based air power in western New Guinea on 28
May
1944, ordering an additional 70 fighters and 20 bombers from Japan
and
the Marianas to join 23 Air
Flotilla.
Another 20 bombers, 8 reconnaissance aircraft, and 48 fighters
were
redeployed from the Carolines on 31 May. By then orders had been
hastily prepared for Operation KON to relieve Biak.
The Japanese
assembled a strong force around three heavy cruisers, a light cruiser, eight
destroyers, two minesweepers,
and battleship Fuso
to transport the 2500 men of the Army's
2 Amphibious Brigade
from Zamboanga to Biak.
Since only one transport
(a
Japanese LST) was available, most the troops were embarked on the
warships. The troops embarked on 31 May and expected to debark at
Biak
on 3 June. Air cover was to be provided by and additional troops
were
to be brought in on barges from Manokwari
by Southwest Area Fleet.
KON kicked off with a large Japanese air raid against a group of
8
LSTs unloading at Bosnik on the afternoon of 2 June 1944. The
Japanese
mustered 54 aircraft for the raid and encountered no Allied
fighter
opposition due to inclement weather
over Wakde and Hollandia. However, antiaircraft fire from ship and
shore was extremely heavy and the Japanese lost 12 aircraft while
inflicting only slight damage on one LST.
That night the Japanese surface force, divided into three groups, set out for Biak. By noon the next day they were under observation by American Liberators. The loss of surprise, combined with mistaken intelligence reporting an American carrier off Biak, prompted Toyoda to suspend the operation. Fuso, two heavy cruisers, and two destroyers returned to Davao, only to have destroyer Kazagumo sunk by submarine Hake at the harbor approaches. The remaining ships proceeded to Sorong, disembarking their troops on 4 June 1944. Unknown to the Japanese, the American reconnaissance was directed by Ultra decrypts.
The Japanese staged a second raid against Biak on 3 June 1944.
Three
destroyers, eight LCTs, and four LCIs off Bosnik were attacked by
32 Zeros and 19 bombers. The
attackers
were detected on radar at 1100
and
the ships were able to avoid serious damage by violent maneuvers.
Allied fighters arrived at 1125 (after being delayed by weather)
and
drove off the remaining Japanese aircraft. The Japanese lost 11
aircraft but were promptly reinforced by another 70 aircraft from
the
Marianas.
By then Kinkaid had
concluded that the Japanese meant to make a major naval effort to
relieve Biak. Crutchley was ordered to refuel, then take Berkey's
cruiser group under his command, and the combined cruiser force
had
reached a point 25 miles north of eastern Biak by 1900 on 4 June
1944.
All other Allied forces were ordered to clear the area. The
Japanese
had sighted the Allied surface force, and they launched a raid
that
arrived at 1740. One light cruiser was slightly damaged.
Crutchley had intelligence that the Japanese meant to land on the
west coast of Biak, and he chose to sweep the south and west
coasts of
the island, barely avoiding a friendly
fire incident when he passed the American shore batteries at
Bosnik. No Japanese surface force was encountered and Crutchley
retraced his course back to his patrol station northeast of Biak.
Here
he was attacked by four Japanese night torpedo bombers, which
inflicted no damage. However, the Japanese launched a second night
raid
by two bombers against Wakde that caught over a hundred Allied
aircraft
parked closely together on the runway. This raid inflicted very
heavy
damage and put the airfield out of action for several days. So
embarrassing was the episode that the official U.S. Air Force
history
barely mentions the raid and quotes no casualties, but at least
two-thirds of the aircraft on the island were put out of action.
The Japanese made a second attempt to run in reinforcements on
three
landing barges towed by six
destroyers. Two cruisers
remained off the western tip of New Guinea to await developments
while 23 Air Flotilla
was directed to
provide fighter cover. The reinforcement flotilla embarked 600
troops
at Sorong and sailed for Biak at midnight on 7 June. However, it
was
spotted by Allied aircraft at 1245 the next day. In a low-level
strafing attack by 10 B-25s,
the
Allied aircraft sank destroyer Harusame and slightly damaged
three others. Sakonju
pressed on with the five surviving
destroyers, but at 1900 he received a report that an Allied task
force
was racing to intercept him. Again,
Ultra decrypts had warned the Allies.
Crutchley had been delayed by maneuvers to evade Japanese
snoopers,
and his force did not arrive off the west coast of Biak until 2200
on 8
June 1944. Shortly thereafter a PB4Y spotted Sakonju's force 60
miles
(100 km) to the north-northwest. Crutchley ordered a turn to the
north
to cross the Japanese "T", but one of his destroyer divisions,
DesDiv
42, ignored the order and raced towards the Japanese. The two
forces
sighted each other on radar at about 2320, and Sakonju promptly
launched torpedoes and
fled. The
commander of DesDiv 42 radioed a warning to Crutchley, which was
confirmed when one of the "fish" passed close astern of cruiser Boise.
By then Crutchley's remaining destroyers were also in hot pursuit
of
the Japanese. Though no torpedo hits were inflicted on the Allies,
they
were unable to catch
the fleeing Japanese force, although the two forces came close
enough
to exchange gunfire and for the Japanese to launch another wave of
torpedoes. The Allies finally gave up the pursuit at 0230, lest
they be
mistaken for Japanese ships by their own aircraft when daylight
came.
The Japanese had cast off the three landing barges early in the
action. They were fired on by the American destroyers in passing,
but
the barges apparently made it to shore and landed a few
reinforcements
on Biak. However, the majority of the 600 troops in the
reinforcement
group were taken back to Sorong aboard the Japanese destroyers.
Finally, by 11 June 1944, the Japanese assembled an armada off Halmahera that included both Yamato and Musashi. This powerful force was scheduled to arrive at Biak on 15 June, deliver a heavy bombardment, and land its troops, but this operation was called off on 12 June when heavy air strikes against the Marianas indicated that Spruance would soon begin his landings there. It has been suggested that the Japanese would have done better to stay with their Kon plan, which would probably have inflicted a serious defeat on the weak American naval forces off Biak, rather than send the super battleships north to a battle to which they contributed little. As it was, 23 Air Flotilla got in a final shot before being withdrawn to Palau, inflicting serious damage on destroyer Kalk in a raid by four aircraft on the morning of 12 June.
The failure of Kon was costly for the Japanese. In
addition
to their naval losses, the diversion of so much land-based air
power to
western New Guinea seriously disrupted Japanese plans for A-Go
and contributed to the debacle of the Battle of the Philippine Sea.
Most of the pilots diverted to provide air cover for Kon
promptly came down with malaria
or other tropical diseases and were unable to participate in
either Kon or A-Go as a result.
The Japanese subsequently managed to slip perhaps 1100 troops in
barges from Noemfoor through
the
Allied blockade to Biak. These were mostly drawn from 219,
221,
and 222 Regiments and most landed at Korim Bay, from which
they made their way to the West Caves strong point.
During the battle, a Japanese naval radio unit ran into an American patrol and lost several code books. This prompted the Japanese to make emergency changes in their radio procedures, which slowed down their communications just as the Battle of the Philippine Sea was getting under way.
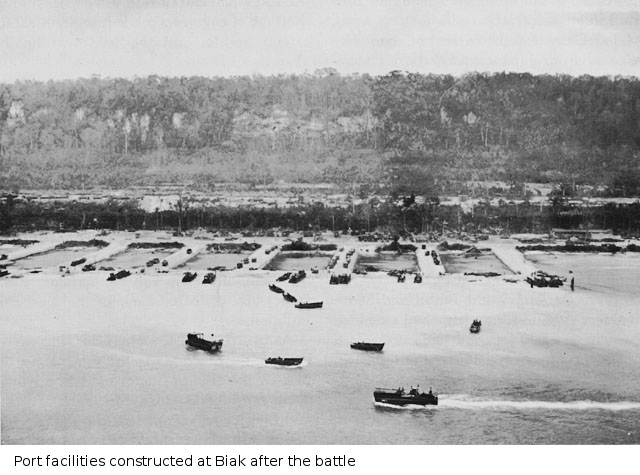
Engineers had begun improving the facilities at Bosnik on the
first
day of the landing. On 30 May 1944 a naval demolition team blasted
a 5
foot (1.5 m) deep channel through the reef to allow LCMs and LCVPs to land directly on
the
beach. By 17 June an airstrip had been completed on Owi and two
squadrons of P-38s
from 8
Fighter Group arrived
on 21 June. On 22 June
the first fighters were operating from Mokmer airstrip. By 12
July
the Owi airfield had a 7000' (2130 m) runway and a second
was completed on 20 August. The airfield eventually had 20,000'
(6100
m) of taxiways and 130 hardstands.
Mokmer was first put in operation on 22 June and by 1 August the runway was extended to 7000' (2130 m), with 27,000' (8230 m) of taxiways and 122 hardstands. A 4000' (1200m) runway was completed for transport aircraft at Borokoe by 1 August and this was extended to 5500' (1680 m) by 20 August. Sorido was on less suitable ground, and while a 4000' (1200 m) runway was briefly in use, the airfield was quickly abandoned. Unfortunately, none of these airfields was ready in time to give significant support to the Marianas invasion.
The south coast of Biak had eight LST ramps, two floading docks for Liberty ships, and five
jetties by 20 August. The area thus became a major base for the
Allies in the Southwest Pacific.
| Southwest
Pacific
Area (MacArthur)
|
||||||
| |
7
Fleet (Kinkaid) |
|||||
| |
Task
Force 77 (Barbey) |
|||||
| |
DD Swenson |
|||||
| Task
Group 77.2 Attack Group (Fechteler)
|
41
Division (Fuller)
less 163
Regimental
Combat Team 603 Tank Company (12 M4 Sherman tanks) Two antiaircraft battalions Two artillery battalions Three aviation engineer battalions |
|||||
| DD Reid |
||||||
| Transports |
||||||
| APD Herbert | ||||||
| APD Kilty | ||||||
| APD Ward | ||||||
| APD Crosby | ||||||
| APD Schley | ||||||
| 15 LCI 6 LST |
||||||
| Screen |
||||||
| DD Hobby | ||||||
| DD Nicholson | ||||||
| DD Wilkes | ||||||
| DD Grayson | ||||||
| DD Gillespie | ||||||
| DD Kalk | ||||||
| DD Stockton | ||||||
| DD Roe |
||||||
| DD Welles | ||||||
| DD Sampson |
||||||
| DD Warrington | ||||||
| DD Balch |
||||||
| Special
Service
Vessels |
||||||
| 5 SC 2 LCI |
||||||
| Destroyer
Squadron
2 |
||||||
| DD Morris |
||||||
| DD Anderson | ||||||
| DD Hughes | ||||||
| DD Mustin | ||||||
| DD Russell | ||||||
| DD Ellet |
||||||
| DD Lansdowne |
||||||
| DD Lardner | ||||||
| Task
Force 74 Covering Group "A" (Crutchley) |
||||||
| CA Australia |
||||||
| CA Shropshire |
||||||
| DD Warramunga |
||||||
| DD Arunta | ||||||
| DD Ammen | ||||||
| DD Mullany | ||||||
| Task
Force 75 Covering Force "B" (Berkey) |
||||||
| CL Phoenix |
||||||
| CL Nashville | ||||||
| CL Boise | ||||||
| Destroyer
Squadron
24 |
||||||
| |
DD Hutchins | |||||
| DD Bache | ||||||
| DD Daly | ||||||
| DD Abner
Read |
||||||
| DD Bush | ||||||
| Task Force 73 Aircraft Seventh Fleet | ||||||
| Task Group 73.1 Seeadler Harbor Group | ||||||
| AV Tangier | ||||||
| AVP Heron | ||||||
| AVP San Pablo | ||||||
| |
VP-33 | 13 PBY-5 |
||||
| VP-52 | 13 PBY-5 | |||||
| VB-106 | 11 PB4Y-1 Liberator |
|||||
| Task Group 73.2 Langemak Bay Group | ||||||
| AVP Half Moon | ||||||
| VP-34 | 10 PBY-5 | |||||
| 2
Area Army (Anami)
|
||||
| |
Biak
Detachment |
11,400 men, of whom about
4000 were combat trained. |
||
| |
222
Regiment |
3400 men |
||
| |
Tank
company |
10 Type 95 light tanks |
||
| 17 Airfield
Construction Unit 107 Airfield Construction Unit 108 Airfield Construction Unit |
500 men each |
|||
| 28 Naval Special Base
Force (Senda)
|
1500 men |
|||
| 19 Naval Guard Unit |
125 men. Only naval unit on island with
combat training. |
|||
 |
 |
 |
 |
 U.S. Army |
 U.S. Army |
 U.S. Army |
U.S. Army |
 U.S. Army |
References
Smith
(1953; accessed 2013-6-22)
The Pacific War Online Encyclopedia © 2007, 2009-2010, 2013 by Kent G. Budge. Index