 The Pacific War Online Encyclopedia
|
| Previous: Copra | Table of Contents | Next: Cordova |
The Coral Sea lies between Australia to the west, New Guinea and the Solomon Islands to the north, and the New Hebrides and New Caledonia to the east. It is a beautiful, usually calm body of water. The most direct shipping route from the United States to Australia passes through this area, and as a result the Japanese attempted to seize Port Moresby and Tulagi in order to isolate Australia. This lead to the Battle of the Coral Sea, May 7-8, 1942, the first major carrier battle of the Pacific War.
Following the successful conclusion of the Japanese Centrifugal Offensive
on 8 March 1942, Japanese planners began to feel that there was no
need to pause to consolidate their conquests and build up their
defense perimeter as originally planned. Losses had been so light
that the Japanese began to look for new worlds to
conquer instead.
Attention soon focused on cutting the supply lines to Australia by seizing southern New Guinea and advancing to New Caledonia, Fiji, and Samoa. Combined Fleet commander Yamamoto further stretched an already overly ambitious strategy by insisting on taking Midway and the western Aleutians immediately following the New Guinea operation, as a way to lure the American Pacific Fleet to its destruction. All these targets were part of the original Japanese war plan, but on a much less ambitious schedule.
Preparations. The
accelerated schedule meant that most of the carriers of 1 Air Fleet would not
be able to participate in the New Guinea operation. After five
months of intensive operations, from the Pearl Harbor raid to the Indian Ocean raid, 1 Air Fleet badly needed to
pause for refit and replenishment of its air groups. Only Shokaku and Zuikaku could be
ready in time for the New Guinea operation. Meanwhile, the other
four would prepare for the Midway operation. Neither Yamamoto and
his staff nor the Navy
General Staff anticipated any serious difficulties
with either operation.
However, the Americans had broken into the Japanese naval codes and were forewarned of the Japanese move. The earliest clue was that Kaga began to exchange messages with 4 Fleet, an unusual pattern that suggested the carrier would soon be operating in 4 Fleet's area. (This was correct at the time, though Kaga was later dropped from the Japanese order of battle for the operation.) Jack Fletcher was dispatched with Task Force 17 (Yorktown) from Tongatabu on 27 April. He joined Fitch's Task Force 11 (Lexington) at Point Butternut, 300 miles (480 km) southeast of Guadalcanal, on the afternoon of 1 May. Halsey was just returning from the Doolittle raid and was immediately sent to the Coral Sea with the Enterprise and Hornet, but did not arrive in time for the battle.
Inoue, commanding 4 Fleet, came up with a
complex plan for Operation MO, with several moving parts. This
invited defeat in detail,
which was very nearly what took place. Inoue relied on achieving surprise and was contemptuous
of American naval power. Indeed, in many respects, the plans for
Operation MO suffered from the same flaws that were evident in the
plans for the Midway operation. In the first phase of Operation
MO, the Support Force (Marumo), consisting of
a couple of old light
cruisers and some gunboats,
would escort seaplane
carrier Kamikawa Maru to
establish a series of seaplane
bases in the northern Solomons. These would cover the final
advance on Tulagi by Tulagi
Invasion Force (Shima).
Marumo would then establish seaplane bases south of New Britain to help cover
the movement against Port Moresby. The Japanese time table called
for six flying boats and
nine seaplanes to arrive at the Shortland Islands on
28 April and additional seaplanes to begin operating out of Thousand Ships Bay
on 2 May. Tulagi itself would be invaded before dawn on 3 May and
was expected to fall within a day. Additional air support would be
provided by light carrier
Shoho under Goto Aritomo.
In the next phase, flying boats would advance to Tulagi and provide cover for Takagi's Striking Force (Shokaku and Zuikaku) to making a flanking move around the eastern Solomons and enter the Coral Sea from the east. Historians from Morison (1949) on have often characterized Takagi's wide left hook as an attempt to ambush the American carriers, with Shoho as bait, and with the land-based air in Rabaul acting as the anvil against which Takagi would hammer the Americans. However, Lundstrom (2006) has pointed out that Inoue did not expect to encounter American carriers until Operation MO was nearly complete. The purpose of Takagi's flanking movement was to avoid American air searches, which were concentrated in the northern Coral Sea, and allow Takagi to surprise and destroy the Allied land-based air forces at Townsville and other northeastern Australian airfields. Inoue, the Japanese Billy Mitchell, feared land-based aircraft much more than he feared American carrier aviation, and he believed the movement to Port Moresby would be dangerously exposed even with friendly carrier air cover. The Townsville strikes were to take place at dawn on 7 May, after which Takagi would move take up position in the center of the Coral Sea and await developments.
However, on 29 April 1942, Yamamoto intervened to cancel the
Townsville strike and order Takagi to be on the lookout for the
American carriers. The Striking
Group's left hook maneuver remained unaltered although
its original purpose was no longer relevant.
Meanwhile Kajioka
would sail from Rabaul on 4 May with Port Moresby Invasion Group, consisting of his 6 Destroyer Squadron
and 11 transports. He
would be met by Goto returning from covering the Tulagi invasion
and would be also covered by seaplanes from Deboyne Island, where a
seaplane base was to be set up by 6 May, and Cape Rodney (148.364E
10.182S), where the base was to be established by 8 May. The
assault on Port Moresby itself was scheduled for 10 May.
Once Port Moresby was secured, Takagi and Shima would join with forces from the Marshalls to seize Ocean Island and Nauru, then Takagi and Goto would hurry back to Japan to prepare for the Midway operation.
Fletcher had intelligence indicating
that the Japanese had at least three, and possibly as many as
five, carriers in the area. He also had a healthy respect for
land-based air operating out of Rabaul. He therefore planned to
keep his carriers just outside of Japanese air search range and
wait for an opportunity to pounce on any Japanese force that moved
out from under the Japanese air umbrella. He wisely chose to merge
his task force and Fitch's, but because the two carriers had
vastly different turning radii, he expected the carriers to evade
independently if attacked, with the screen instructed to divide
between the two carriers. Fletcher also designated two surface
attack groups, TG 17.2 under Kinkaid and TG 17.3
under Crace. He resisted
the temptation to shift his headquarters to a cruiser so that he
could lead any surface attack personally, judging the
communications facilities inadequate. Fitch was designated as the
air group commander and would retain a screen of four destroyers.
This plan was completely orthodox for the time, strongly
resembling American prewar fleet exercises, and was meant to be
flexible.
Both sides were supported by land-based air, but neither carrier task force commander had direct control of the land-based air units.
The Battle. The Allies
were aware that the Japanese plan called for an invasion of
Tulagi, and accordingly the Australians pulled out their tiny
garrison on 1 May 1942, the same day that Fletcher rendezvoused
with Fitch. Fletcher then refueled each task force in turn,
declining to refuel simultaneously in dangerous waters. He planned
to empty Tippecanoe and retain Neosho in reserve. Logistics were still
uncertain at this point in the war, which would continue to
influence Fletcher's decisions. Fueling did not go well and Fitch
reported he would not be completed before 4 May. Fletcher, with
intelligence indicating increased Japanese activity in the
Solomons, decided to move further north and await Fitch there.
Land-bases reconnaissance
aircraft failed to detect Marumo's Support Force off New Georgia or Goto's Covering Force closing north
of Choiseul, and Fletcher
did not expect trouble before Fitch could rejoin him.
Two days later, Shima's Tulagi
Invasion Force took possession of Tulagi and began
setting up a seaplane base, all according to schedule. However,
Takagi was delayed by poor weather
that interfered with a ferry of 16 carrier aircraft to Rabaul. The
carefully timed MO operation was already beginning to come apart,
and on account of a secondary task that Takagi should never have
been burdened with
Fletcher got word of the Tulagi invasion at 1830 on 3 May, just
as he was preparing for the overnight run to rendezvous with Fitch
to the northwest. He was then 400 miles (640 km) south of Tulagi
but his ships had ample fuel for an overnight dash north to launch
strikes against Tulagi from the southwest. Radio silence hindered
the two carrier commanders from coordinating their activities at
this point in the battle; unknown to Fletcher, Fitch had finished
refueling ahead of schedule and was just 60 miles (100 km) to his
east. Fletcher sent Neosho
to meet Fitch and order him to a new rendezvous at Point Corn, 325
miles (520 km) south of Guadalcanal, while Task Force 17 carried
out the strike against Tulagi.
Fletcher launched a full deck load by 0702 on 4 May. Takagi, with the main Japanese carrier force, was still north of Bougainville and out of range of the action. However, in spite of the lack of Japanese air cover, and a front that concealed the approaching American aircraft until they were almost on top of their targets, the American attack accomplished little except alerting the Japanese that American carriers were in the area. The aging destroyer Kikuzuki was bombed and driven aground, a total loss, and two small minesweepers were also sunk. Minesweeper Tama Maru was torpedoed. Three more attack waves accomplished little more than the destruction of five Mavis flying boats, but this at least ensured that the Japanese carrier force would have little support from shore-based reconnaissance. This was particularly important given that the Japanese carrier strike force did not have any of the Tone-class seaplane cruisers to provide the usual seaplane reconnaissance. American losses were limited to a single Devastator forced down on the south coast of Guadalcanal, from which the aircrew were rescued by Hammann. Fletcher briefly considered detaching two of his cruisers to clean up any survivors at Tulagi, but thought better of the order, which would have left the ships unprotected against Takagi's approaching carriers.
The next day, 5 May 1942, Fletcher rejoined Fitch and began
topping off his fuel bunkers. An H6K "Mavis" from Rabaul spotted the force before
being shot down, but, incredibly, 25 Air Flotilla did not
report this to Inoue. The American task forces were left
unmolested to finish refueling before shaping course towards Port
Moresby, leaving Neosho
and Sims at what Fletcher assumed was a place
of relative safety. Meanwhile, Takagi's force also refueled before
entering Coral Sea from the east. Fletcher was aware that an
invasion force was on the way to Port Moresby and that it was
supported by a carrier force, but he had no idea of Takagi's
whereabouts: It was Takagi's turn to be concealed by the cold
front. Intelligence suggested Takagi was off Bougainville, and in
any case it was natural for Fletcher to assume the Japanese would
be closing on Port Moresby, their principal objective. The code
breakers had also intercepted Yamamoto's April 29 message calling
off the Townsville strike, but could only break part of the
message and thought Yamamoto was ordering the strike. All these considerations
led Fletcher to move west and focus his attention west and north,
leaving him dangerously vulnerable to being blindsided by Takagi.
Had Takagi been on schedule, the situation might have turned out
very poorly for the Americans.
On 6 May the two main carrier forces continued to sail
undetected, but Shoho
was bombed by a force of B-17s that failed
to hit their target.
On 7 May, both sides mistakenly launched full strikes against minor targets after searching in the wrong direction. Takagi had decided to search the area south and west of his force, believing Fletcher to be further south than he was, and Takagi's pilots mistook Fletcher's service force for a carrier task force. Takagi immediately launched a full strike which, after determining that there were no carriers in the target area, proceeded to sink destroyer Sims and cripple tanker Neosho. The Neosho's navigator was badly rattled and miscalculated his navigational fix, with the result that the tanker was not located for four days. 123 survivors were taken off and the ship scuttled, and another four survivors on rafts were rescued six days later.
Fletcher had send Crace with his cruiser force ahead at 0538 on 7
May to attack Port Moresby
Invasion Group as it exited Jomard
Passage southeast of New Guinea. This decision that has been
criticized for needlessly weakening Fletcher's antiaircraft screen, but
Fletcher was thinking of prewar tactical exercises in which
opposing carriers quickly neutralized each other. If the upcoming
carrier battle ended in such a draw, Crace would still be in a
position to stop the Port Moresby invasion. Crace supported the
decision in a letter written in 1957, and Fletcher's antiaircraft
expert, Schindler, told Lundstrom (2006) in 1972 that the
contribution of Crace's ships to the antiaircraft screen was of
little significance.
Crace was spotted and attacked by both Japanese and American
land-based aircraft; fortunately for the Allies, neither attack
did any damage (though the Japanese raid placed two bombs uncomfortably close to Australia),
and Crace's antiaircraft accounted for five Japanese bombers. Meanwhile, Fletcher
had sent his search planes north, missing Takagi to his east, and
one scout discovered the two old cruisers of Marumo's Support Force. His report was
mistakenly encoded to indicate two large carriers. Fletcher
launched a full strike, which was already in the air when the
mistake was discovered. According to one witness, when the scout
responsible for the miscoded report arrived back at Task Force 17,
Fletcher briefly lost his composure and shouted, "Young man, do
you know what you have done? You have just cost the United States
two carriers!"
Fletcher quickly decided to let the strike proceed north in hopes
that it could be redirected to a better target if one was sighted,
rather than bring the strike back on board and leave his carriers
vulnerable while incurring a lengthy delay before being able to
strike again. The strike chanced upon Shoho and her
escorts, and the light carrier was smothered under a hail of bombs and torpedoes from the 96 planes
in the American strike. The Americans lost two aircraft, and Yorktown
was left with just 14 aerial
torpedoes in her magazines. The remaining ships of the Covering Group fled north
without even rescuing
survivors. Kajioka could hear the explosions just over the
horizon and began to withdraw to the northwest as well. Inoue
ordered Kajioka's Port Moresby
Invasion Group to continue on this course until the
Americans had been properly dealt with. As it turned out, this was
the closest the invasion force ever got to Port Moresby.
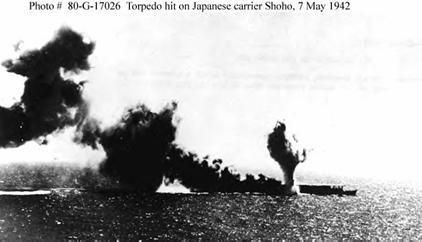
Shoho under attack. Naval Historical Center.
At this point, Fletcher still did not know Takagi's whereabouts,
but his own location had finally reached the Japanese commander.
Takagi launched a dusk strike of twelve Vals and fifteen Kates, but these were unable
to locate the Americans, who were once again under the weather
front. On their return, the Japanese planes were jumped by
American fighters, which
shot down nine Japanese aircraft at the cost of two fighters. The
surviving Japanese aircraft became so confused that they
jettisoned their ordnance and attempted to land on the American
carriers, thinking they were Japanese. Because Hara's best aircrew
had been assigned to this dangerous dusk mission, the losses were
more severe than the numbers alone would indicate.
Meanwhile, Fitch's radar
operator observed aircraft circling 30 miles (50 km) to the east
and disappearing one by one, leading him to conclude that he was
seeing the Japanese landing circle and Takagi's force was just 30
miles away. However, this information did not reach Fletcher for
two and a half hours, and postwar analysis of the two force tracks
shows that Takagi was never closer than one hundred miles (160
km). Lundstrom (2006) speculates that the circling Japanese
aircraft were experiencing interference by the U.S. fighter
director transmissions with their homing signals. Sherman later
criticized Fletcher for not launching a night attack with one of
his torpedo squadrons, but there is no evidence anyone made the
suggestion at the time, and darkness, bad weather, and the
difficulty of spotting the squadron on the darkened flight decks
(which would probably have required launching some of the fighters
and dive bombers just
to clear the deck) argue against such a move. Fletcher briefly
considered a surface attack, but decided to keep his force
together for the next day's battle, a decision in which both
Kinkaid and later Nimitz
fully concurred. Takagi, for his part, never even considered a
night surface attack.
That night Fletcher continued slowly west. Aware that the
Japanese could maneuver during the night so as to be in almost any
direction by morning, Fletcher ordered that a circular dawn
search, covering the entire 360 degrees, out to a maximum of 125
miles (200 km). This required a full squadron (18 SBDs). Fletcher retained
16 F4Fs for combat air
patrol and eight more SBDs for anti-torpedo-plane patrol, and
ordered that the search planes be used to augment the
anti-torpedo-plane patrol after they returned from their search.
This left Fletcher with 75 aircraft for his strike. Takagi in turn
was ordered by Inoue to take up a position 125 miles southeast of
the Louisiades by dawn, which put him north of Fletcher. Knowing
the Americans were almost certainly to his south, Takagi was able
to search the southern sector with just seven aircraft.
At 0822 the next day, 8 May 1942, one of Takagi's search planes located the Americans. At almost exactly the same time (0820), an American search plane found the Japanese. The Japanese had their strike in the air by 0930. After launching his strike, Takagi raced south towards the Americans, a blunder that brought his force within striking distance of the shorter-ranged American carrier aircraft. Fitch began launching the American strike at 0847, and Fletcher ordered the task force to steam for the Japanese in order to shorten the return flight. The Japanese strike consisted of 69 aircraft with well-trained crews, versus the 75 aircraft with less experienced crews in the American strike. Furthermore, the American force was now well south of the weather front and sailing in bright sunshine, while the Japanese force was within the cover of the front. The only clear advantage possessed by the Americans was radar.
The American strike ran into bad weather, which concealed Zuikaku,
but which also aided the American approach to Shokaku. The
American aircrews performed rather poorly, failing to hit the ship
with any torpedoes and scoring only three bomb hits. The American
Mark 13 torpedoes
were so slow that the Japanese carrier was able to outrun them.
The three bomb hits rendered Shokaku
incapable of launching aircraft, but the fires were quickly put out and there was no
damage below the waterline. The strike cost the Americans eight
aircraft and the Japanese two defending Zeros.
The Japanese attack was more successful. Although the Japanese strike was detected 70 miles (110 km) out, the fighter director was inexperienced and only nine Wildcats, which were low on fuel, were covering the force. The six at low altitude missed the approaching Japanese torpedo bombers in the clouds, while the three at higher altitude were too low to intercept the Japanese dive bombers. Nine more fighters were launched at once, and twelve dive bombers were pressed into service to repel the Japanese torpedo bombers. Five of these dive bombers were lost to the escorting Zeros, along with three of the fighters. Perhaps ten Japanese attackers were shot down by the American fighters and dive bombers and another three accounted for by antiaircraft, but many more Japanese aircraft were later forced to ditch or were jettisoned from their carriers after landing.
Lexington was caught in an anvil attack (thirteen torpedo planes attacking from both sides of the bow) and was unable to avoid being hit by two torpedoes on her port side. She also took two small bomb hits. Yorktown was able to avoid the torpedoes from the four Kates that attacked her, as well as most of the bombs from the 14 Vals that dived on her, but was hit by a single bomb that did moderate damage. Although Lexington had a slight list (7 degrees) and a flooded fire room, she was still able to make 24.5 knots. Yorktown experienced slight flooding from very near misses, and damage to the uptakes temporarily put three fire rooms out of action and reduced her speed to 24 knots. Both carriers were still capable of flight operations, and Fletcher radioed Nimitz: "First enemy attack completed no vital damage our force" (Lundstrom 2006). It certainly seemed that way at the time.
Both strike leaders were lost, Takahashi Kakuichi for the Japanese and William Ault for the Americans.
The Shokaku's air group
was instructed to land on Zuikaku,
but not all got the word. Of those that reached Zuikaku, 46 were able to
land, but a dozen were jettisoned in the rush to strike the
aircraft below and seven more ditched near the carrier. By 1430
Hara had just nine dive bombers and torpedo bombers available for
a second strike. In addition, some of Takagi's destroyers were
down to just 20 percent of fuel capacity. Believing he had sunk
both American carriers and damaged several other warships, Takagi
turned north at 1500. The order to withdraw was confirmed by Inoue
at 1545.
Fletcher decided not to attempt a second strike. The Lexington air group was very late returning to the carriers, leaving him with less than twenty operational torpedo and dive bombers; the bad weather near the targets might make them difficult to find; Lexington was vulnerable; and the loss of Neosho meant the fuel situation could quickly become critical. In addition, Yorktown had only seven torpedoes left in her magazines. Fitch and his staff were consulted and concurred in the decision, Fitch lingering just long enough to recover the rest of the Lexington air group.
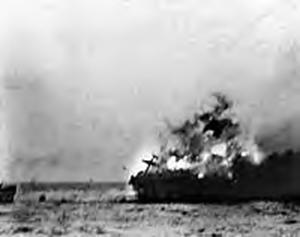
Lexington suffers secondary explosions. Naval Historical Center.
Aftermath. Fletcher
planned to move south-southwest to flank the Port Moresby invasion
convoy (which he did not know had already turned back), to draw
closer to Crace, and to come within cover of land-based aircraft.
He informed Nimitz that he would transfer as many of Lexington's aircraft to Yorktown as possible that
night and send Lexington
back to Pearl Harbor for repairs.
Unfortunately for the Americans, poor damage control led to a buildup of gasoline fumes in the Lexington from aviation gasoline tanks that had been cracked by the torpedo hits. At 1245 on the afternoon of May 8, an explosion ripped through the ship, and fires broke out that could not be brought under control. An even more massive explosion at 1442 caused black smoke to billow out of the hangar deck and the stacks. A third massive explosion at 1600 signaled the end. Though she was still afloat, her captain and the task force commander agreed that saving the crew was more important than saving the ship, and Lexington was scuttled after an orderly evacuation, in spite of a fourth massive explosion shortly after sunset that threw flaming wreckage in all directions. Phelps delivered the coup de grace with five torpedoes 1915, and the ship finally rolled over and sank at 1942. The loss of Lexington allowed the Japanese to claim a tactical victory.
With no naval air cover for the invasion force, with an exaggerated sighting report of Crace's force that turned one of his cruisers into a battleship, and with Allied land-based aircraft active around Port Moresby, Inoue postponed the Port Moresby invasion until 7 July. By then the Japanese had suffered catastrophe at Midway, and the invasion never took place. The failure of the Japanese to seize Port Moresby made the battle a strategic victory for the Americans.
Damaged and with its aerial torpedo magazines nearly empty, Yorktown
withdrew and headed for Bremerton
for repairs. There were some tense moments on 9 May, including a
mistaken report of pursuing Japanese carriers at 0900. Fletcher
reportedly commented that "In spite of what we've been through, it
looks as though we're not going to get away with it. But by God,
we'll go down like Americans" (Lundstrom 2006). He ordered a small
search-strike mission by four dive bombers, which discovered that
the pursuing "carrier" was a flat reef
with waves crashing around it.
Yamamoto was surprised and upset that Inoue had ordered the carriers to retreat, and countermanding orders reached Takagi to pursue the retreating Americans at 0200 on 9 May. However, after a halfhearted attempt to do so, Takagi turned back for good at about 1300 on 10 May.
The loss of Lexington taught the Americans a hard lesson
in the importance of damage control. Later in the war, U.S. ships
damaged far more badly than Lexington at Coral Sea would
be saved through improved damage control techniques. The Americans
also were not well served by their land-based search planes, whose
reports were poorly interpreted and slowly disseminated.
In addition to foiling the Port Moresby invasion, the battle of the Coral Sea put two Japanese carriers out of action for the subsequent battle of Midway. Meanwhile Nimitz, warned by his code breakers that the Japanese were preparing for a large operation in the central Pacific, ordered Yorktown to return to Pearl Harbor rather than continue to Bremerton. Hasty repairs allowed her to play a decisive role at Midway.
| Task Force MO (Inoue; at Rabaul)
|
||||||
| |
Land-Based Air Force (Yamada; at Rabaul)
|
From 25 Air Flotilla |
||||
| At
Rabaul: |
||||||
| 12 A6M Zero 41 D3A Val 3 seaplanes |
||||||
| At Lae: |
||||||
| 6 A6M Zero | ||||||
| At
Shortland: |
||||||
| 3
seaplanes |
||||||
| At Tulagi: |
||||||
| 6
seaplanes |
||||||
| At Truk: |
Not released until 4 May 1942 |
|||||
| 45 D3A Val 45 A6M Zero |
||||||
| Carrier
Striking
Force (Takagi) |
||||||
| CA Myoko |
||||||
| CA Haguro |
||||||
| Carrier Division 5 (Hara) |
||||||
| CV Zuikaku |
||||||
| 21 A6M Zero 21 D3A Val 21 B5N Kate |
||||||
| CV Shokaku |
||||||
| 21 A6M Zero 20 D3A Val 21 B5N Kate |
||||||
| Destroyer
Division
7 |
||||||
| DD Ushio |
||||||
| DD Akebono |
||||||
| Destroyer
Division
27 |
||||||
| DD Ariake |
||||||
| DD Yugure |
||||||
| DD Shiratsuyu |
||||||
| DD Shigure |
||||||
| AO Toho Maru |
||||||
| Invasion
Forces
(Goto)
|
||||||
| Tulagi Invasion Group (Shima) |
||||||
| AM Okinoshima |
Sunk on 4 May |
|||||
| AM Koei Maru |
||||||
| AP Azumasan Maru |
Carrying part of "Kure" Force
and a construction battalion |
|||||
| DD Kikuzuki |
Destroyed on 4 May |
|||||
| DD Yuzuki | ||||||
| SC Toshi Maru #3 |
||||||
| SC Tama Maru #8 |
||||||
| AM Hagoromo Maru |
||||||
| AM Noshiro Maru #2 |
||||||
| AM Tama Maru |
Sunk on 4 May |
|||||
| AMc Wa-1 |
Sunk on 4 May |
|||||
| AMc Wa-1 | Sunk on 4 May |
|||||
| Port Moresby
Invasion Group (Kajioka) |
||||||
| Destroyer Squadron 6 (Kajioka) | ||||||
| CL Yubari | ||||||
| DD Oite |
||||||
| DD Asanage | ||||||
| DD Uzuki |
||||||
| DD Mutsuki | ||||||
| DD Mochizuki | ||||||
| DD Yayoi | ||||||
| Transport
Unit
(Abe) |
||||||
| CM Tsugaru |
||||||
| AM W-20 |
||||||
| 4
Navy AP |
Carrying 3 Kure SNLF and base units | |||||
| |
AP Mogamigawa Maru |
|||||
| AP Akibasan Maru (4607 tons,
12 knots) |
||||||
| AP Chowa Maru |
||||||
| AP Syoka Maru |
||||||
| |
|
|
6
Army AP |
Carrying South Seas Detachment | ||
| AP China Maru (5869 tons, 10 knots) |
||||||
| AP Daifuku Maru |
||||||
| AP Asakasan Maru (8709 tons, 16.5
knots) |
||||||
| AP Marsue Maru |
||||||
| AP Mito Maru (7061 tons, 12.0 knots) |
||||||
| AP Nichibi Maru |
||||||
| AM Hagoromo Maru |
||||||
| AM Noshiro Maru #3 |
||||||
| AM Fumi Maru #2 |
||||||
| AM Seki Maru #3 |
||||||
| AO Goyo Maru (8469 tons, 14.5 knots) | Also transported Navy troops |
|||||
| AO Hoyo Maru |
||||||
| AR Oshima |
||||||
| Support
Group
(Marumo) |
||||||
| Cruiser
Division
18 |
||||||
| CL Tenryu |
||||||
| CL Tatsuta | ||||||
| CVS Kamikawa Maru |
||||||
| PG Keijo Maru |
||||||
| PG Seikai Maru (2693 tons) | ||||||
| PG Nikkai Maru |
||||||
| Covering
Group
(Goto) |
||||||
| CA Aoba | ||||||
| CA Kako | ||||||
| CA Kinugasa | ||||||
| CA Furutaka | ||||||
| CVL Shoho |
||||||
| 12 A6M Zero 9 B5N Kate |
||||||
| DD Sazanami |
||||||
| Submarine
Force |
||||||
| Patrol
Group |
||||||
| SS I-21 |
||||||
| SS I-22 |
||||||
| SS I-24 | ||||||
| SS I-28 | ||||||
| SS I-29 | ||||||
| Raiding
Group |
||||||
| SS Ro-33 |
||||||
| SS Ro-34 | ||||||
| Task
Force 17 (Fletcher) |
|||||
| TG
17.2 Attack Group (Kinkaid) |
|||||
| CA Minneapolis |
|||||
| CA New Orleans |
|||||
| Cruisers,
TF17
(Smith) |
|||||
| CA Astoria |
|||||
| CA Chester |
|||||
| CA Portland |
|||||
| Destoyers,
TF17 |
|||||
| DD Phelps |
|||||
| DD Dewey |
|||||
| DD Farragut | |||||
| DD Aylwin | |||||
| DD Monaghan | |||||
| TG
17.3 Support Group (Crace)
|
|||||
| CA Australia |
|||||
| CA Chicago |
|||||
| CL Hobart |
|||||
| DD Perkins |
|||||
| DD Walke |
|||||
| TG
17.5 Carrier Group (Fitch) |
|||||
| CV Lexington |
|||||
| |
|
|
23 F4F Wildcat 36 SBD Dauntless 12 TBD Devastator |
||
| CV Yorktown |
|||||
| 21 F4F Wildcat 38 SBD Dauntless 13 TBD Devastator |
|||||
| Destroyer
Screen |
|||||
| DD Morris |
|||||
| DD Anderson | |||||
| DD Hammann | |||||
| DD Russell | |||||
| TG
17.6 Fueling Group |
|||||
| AO Neosho |
|||||
| AO Tippecanoe |
|||||
| DD Sims |
|||||
| DD Worden | |||||
| TG
17.9 Search Group |
|||||
| AV Tangier (at Noumea) |
|||||
| 12 PBY-5 of VP-71 and
VP-72 |
|||||
| Southwest
Pacific
Area (MacArthur) |
|||||
| Allied
Air
Forces (Brett) |
|||||
| 3
Light Bombardment Group (Charters Towers) |
|||||
| 19 B-25 19 A-24 14 A-20 |
|||||
| 22
Medium Bombardment Group (Townsville) |
|||||
| 12 B-25 80 B-26 |
|||||
| 8
Fighter Group |
|||||
| 50 P-39 (Port Moresby) 50 P-39 (Townsville) |
|||||
| 19
Heavy Bombardment Group (Cloncurry) |
|||||
| 48 B-17 |
|||||
| 49
Fighter Group (Darwin) |
|||||
| 90 P-40 |
|||||
| 35
Fighter Group (Sydney) |
|||||
| 100 P-39 | |||||
| Task
Force 42 Eastern Australia Submarine Group (Rockwell) |
|||||
| Task
Group 42.1 |
|||||
| AS Griffin |
|||||
| Submarine
Division
53 |
|||||
| SS S-42 |
|||||
| SS S-43 | |||||
| SS S-44 | |||||
| SS S-45 | |||||
| SS S-46 | |||||
| SS S-47 | |||||
| Submarine
Division
201 |
|||||
| SS S-37 | |||||
| SS S-38 | |||||
| SS S-39 | |||||
| SS S-40 | |||||
| SS S-41 | |||||
References
The Pacific War Online Encyclopedia © 2007, 2009-2010, 2013, 2016 by Kent G. Budge. Index