 The Pacific War Online Encyclopedia
|
| Previous: Botolan | Table of Contents | Next: Boulder Dam |
 |
U.S. Marine Corps. Via ibiblio.org |
Bougainville is the largest island of the Solomon Islands
chain, about 130 miles (210 km) long and 30 miles (50 km) wide,
with an
area of about 3800 square miles (9800 km2). It is
located
near the northwestern end of
the chain, 190 miles (300 km) east of Rabaul.
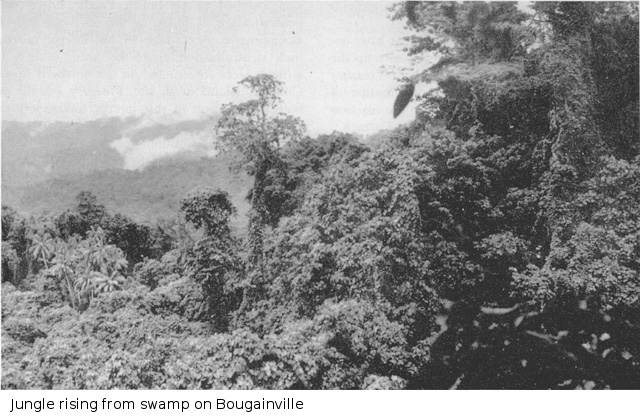
It is a mountainous island,
dominated by the Emperor and Crown Prince
ranges, with two active volcanoes. The tallest of these (Mount
Balbi)
reaches to 10,171 feet (3100 meters)
in height. The lower slopes and coastal plains are covered in
dense jungle. The island was
discovered by
the Spanish in the
16th century and named after the Sieur de Bougainville in 1767.
With an average annual precipitation of around 100 inches (250 cm) the island is wet year-round. However, during the winter months the southeast winds bring slightly drier conditions than during the northwest winds of the summer months. Malaria and other tropical diseases are prevalent.
In
late 1941, there was a decent anchorage
with
a small landing for loading copra
at Buin (155.694E
6.752S), near the
southern end of the island, and a grass airstrip. A 1400' (430m)
airstrip had been completed on Buka Island (154.675E
5.42S)
at Buka Passage, the narrow strip of water between Buka and
Bougainville, which was also the British administrative center.
There
were several native
trails, mostly along the coast, but only the trail around the
northwest
coast of the island was usable by motor
vehicles. The population was
about 54,000 natives
speaking about 18 different languages, but only 100 Europeans and
100
Asians (mostly Chinese).
Bougainville was one of the few
places in
the South Pacific where there were credible reports that
headhunting
still took
place.
European women and children were ordered evacuated on 12 December 1941, and the remaining Europeans were ordered evacuated on 18 December. However, many of the European residents refused evacuation, including a sizable fraction of the missionaries on the island, who felt bound to remain at their posts. Many of the Europeans and most of the Chinese would be evacuated later and with much greater difficulty by submarine. Among those who remained were Jack Read and Paul Mason, who became part of the "Ferdinand" coast watcher organization and transmitted vital early warnings of Japanese air raids against Henderson Field during the Guadalcanal campaign.
Japanese
troops landed in
the area around Buka Passage on 30 March 1942, seizing the
airfield as a useful satellite to the bases at Rabaul. Occupation of the rest
of the rest of the island was leisurely; for example, Kieta
was not occupied until July. The Japanese initially made little
effort
to hunt down the coast watchers, who operated almost unhindered
during
the most crucial part of the Guadalcanal campaign.
The natives on Bougainville were more cooperative with the Japanese than in other parts of the Solomons. There were a number of reasons for this. The evacuation of the European population proved deeply disturbing to the native population, who rioted at Kieta on 23 January 1942 and were brought under control only by the efforts of one of the German residents who had refused evacuation. The influence of German missionaries and the fact that the Japanese had so easily driven out the Allies also had their effect on the attitude of the natives. Japanese pressure on the coast watchers became unbearable, and they were evacuated from the northeast coast in March 1943 by submarines Gato and Guardfish. In addition to the coast watchers, nine women, 27 children, and three nuns were evacuated.
The Buka field was rapidly improved by the Japanese
following the Allied landings at Guadalcanal, and boasted a power
plant, underground fuel tanks, and 2300' (700m) runway surfaced
with a
mixture of crushed coral and
asphalt. By late 1943 the Japanese had completed airfields
at Kahili (155.80E
6.78S), Ballale
(155.88E
6.93S), Kara (155.683E
6.73S), and Bonis (154.68E
5.43S). Another was under construction at Kieta. The field
at Kahili was plagued by rain
and harrassing air raids and was barely usable by late October
1943.

U.S. Army
Planning and Preparations. During 1942, Allied
operations in the Southwest
and South
Pacific were directed at encircling and, ultimately,
capturing the great Japanese base at Rabaul (Operation
CARTWHEEL).
By early 1943 it was clear that this would require establishing a
ring
of air bases around Rabaul, and on 28 February 1943 the Joint
Chiefs of Staff approved a plan (ELKTON) that included the
invasion of Bougainville by Halsey's South
Pacific Force. This would neutralize the Japanese airbases
on the island and allow the Allies to establish their own airbases
to provide fighter cover for
Allied bombing
raids on Rabaul. ELKTON went forward even after the decision was
made
not to invade Rabaul itself, since it was still necessary to
encircle
and neutralize the Japanese base.
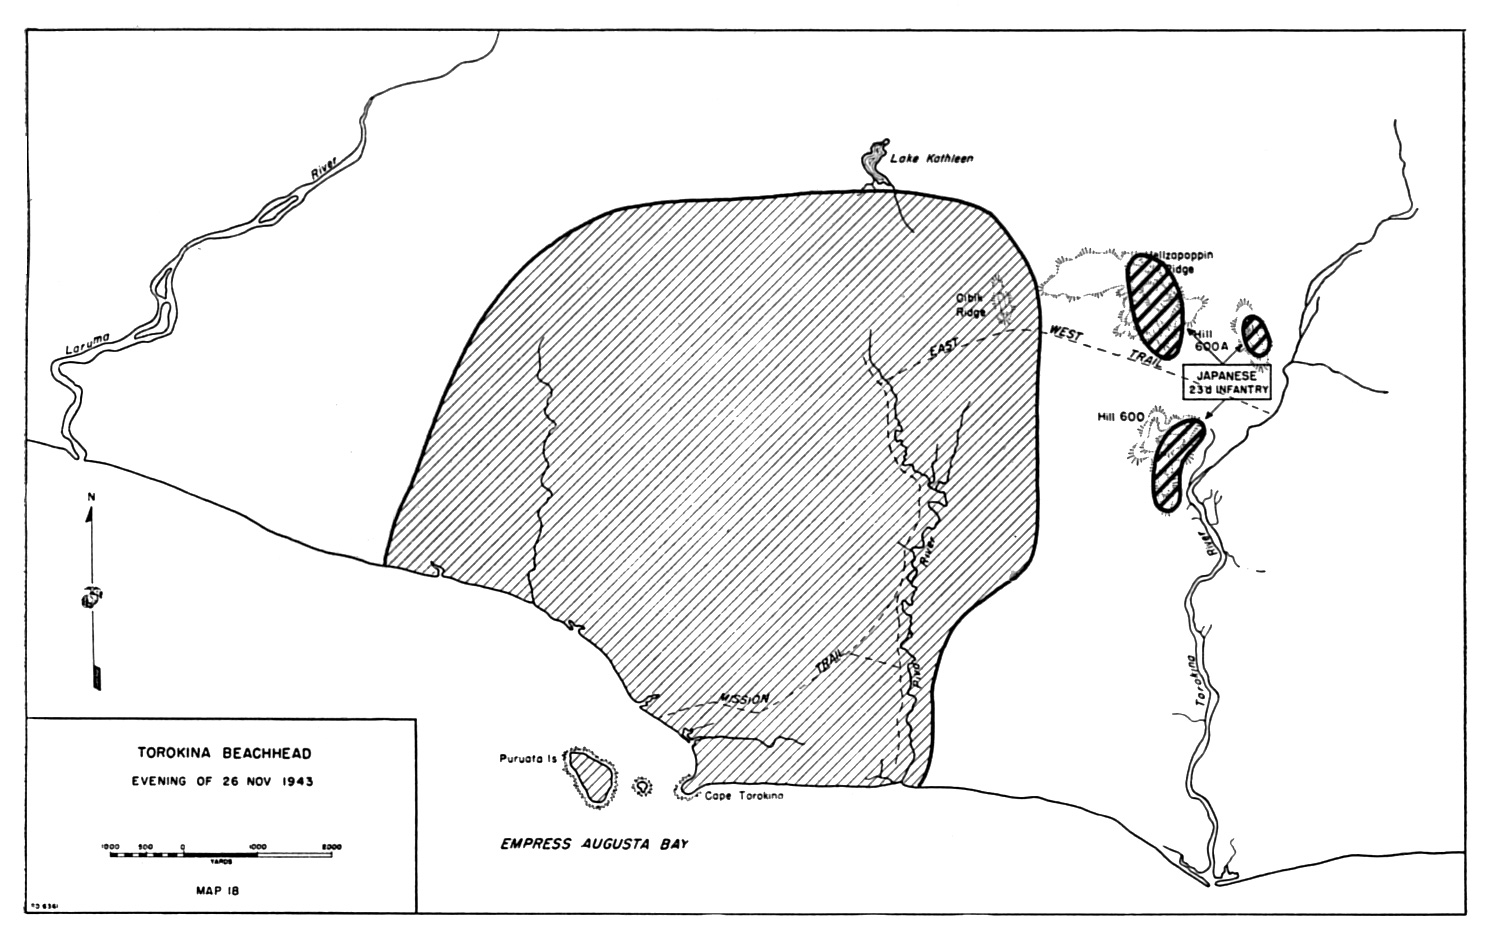
However, by mid-1943, Bougainville was defended by over 25,000 troops of 17 Army (Hyakutake), plus 12,000 Navy personnel. This concentration of Japanese strength in heavily fortified positions caused the Allies to reevaluate their plans, and by early August, Halsey's planners had proposed an invasion of the Shortland Islands in place of Bougainville. However, on 7 September 1943, Halsey's senior commanders recommended canceling the invasion of the Shortlands, which the Japanese had also heavily fortified and which lacked suitable landing beaches. Instead, they proposed landings in the Treasury Islands and at Choiseul Bay (156.403E 6.696S). Depending on the Japanese reaction, the Allies could then advance either from Choiseul Bay to Kieta, on the east coast of Bougainville, or from the Treasury Islands to Empress Augusta Bay (155.124E 6.389S), on the west coast of Bougainville. However, the rapid success of the Vella Lavella operation; pressure from MacArthur to land on Bougainville itself as soon as possible; and lack of available shipping led Halsey to adopt yet another plan. The landing on Choiseul would be reduced to a diversionary raid and the invasion of the Treasury Islands would be followed almost immediately by the landing of 3 Marine Division at Cape Torokina (155.042E 6.246S) at the northern end of Empress Augusta Bay.
This final plan, issued on 15 October 1943, was highly unorthodox. The terrain along most of the coast was coastal swamp, with virtually no road net. However, it was far from the Japanese concentrations in the south, and there were believed to be no more than a thousand Japanese defenders in the area. Allied planners estimated that it would take three months for the Japanese in the south to organize an effective counterattack. By then, the Allies planned to have established a secure perimeter and operational airfields. The other promising landing site was Kieta, but though it appeared to have a better anchorage, it was further from Rabaul, had better communications with the Japanese garrisons to the south, and would have required first securing Choiseul. A reconnaissance in late September by teams landed by submarine found that Kieta was a poorer harbor than originally thought and that the Japanese had all but given up on the airstrip. By contrast, it was found that Cape Torokina had no swamps immediately behind the beach, and soil tests at a coconut plantation east of Cape Torokina indicated that the soil was capable of supporting an airfield.
To alleviate the shipping shortage, a depot was
established on Vella Lavella, within range of LCTs of Cape Torokina. Even
so, the troops coming ashore in the first waves would carry only
two units of fire.
An
unprecedented level of reconnaissance was also carried out,
including aerial reconnaissance, hydrographic surveys by
submarine, and
reconnaissance patrols landed from submarines. To help conceal the
Allied intentions,reconaissance patrols were landed by submarine
on
Santa Isabel, Choiseul, and the Shortlands, as well as Kieta, the
Treasury Islands, and Cape Torokina. The assault force carried out
rehearsals in mid-October at Efate
and in the Guadalcanal
area.
Landings. The Bougainville campaign opened with the assault against the Treasury Islands, which had been scouted by Marine Raiders from submarine Greenling on 22-23 August 1943 and again by PT boats on 21-22 October. Beginning on 27 October 1943, elements of 8 New Zealand Brigade Group landed in three waves commanded by George H. Fort. Resistance was light and the main objective, the anchorage at Blanche Bay, was secured by nightfall. The Japanese were caught off-guard, but mounted a raid by 25 D3A "Vals" that lost 12 aircraft in exchange for damaging destroyer Cony. The Treasury Island landings were followed the next day by the raid on Choiseul, which was carried out by 725 men of 2 Marine Parachute Battalion.
The Japanese were expecting Allied mischief in the Solomons, though they did not anticipate so long a leap. After some delays due to mistaken intelligence indicating an Allied move in the central Pacific, Koga ordered the air groups from his carrier fleet to join 11 Air Fleet at Rabaul for a preemptive attack, RO-go, on Allied shipping and airfields in the Solomons. He also ordered 12 Air Fleet in Japan to prepare to move to Rabaul. By 1 November 1943, the air groups of Zuikaku, Shokaku, and Zuiho, comprising 82 A6M "Zeros", 45 D3A "Vals", 40 B5N "Kates", and six reconnaissance planes, had completed the move.
At the same time 5 Air Force (Kenney) was mounting an air offensive against Rabaul. Photoreconnaissance showed 128 bombers and 145 fighters on Rabaul's airfields on 11 October; the next day, Kenney launched the largest air strike of the Pacific war to that point, consisting of 213 heavy and medium bombers and 125 P-38s. These claimed three merchant ships and many smaller vessels and the destruction of over 100 aircraft on the ground, claims that were likely greatly exaggerated. (Kenney's airmen were as bad as any others in this respect. For example, a raid on 2 November, after the arrival of the Japanese carrier air groups, lost nine fighters and ten bombers but claimed at least 85 Japanese aircraft destroyed and 114,000 tons of shipping sunk. The actual score was 20 aircraft destroyed and 5100 tons of shipping sunk.) However, the raids were successful at diverting attention away from Bougainville and in damaging ground facilities enough to reduce Japanese combat efficiency. However, Kenney's own forces were worn down to the point that on 29 October he could only muster 53 P-38s and 37 B-24s for a raid on Rabaul. The airfields on Bougainville itself were neutralized by Airsols, which flew 3259 sorties against Bougainville in October 1943.
The landings on Bougainville were commanded by "Ping" Wilkinson
at sea and by Roy
Geiger once ashore. The landing force itself
consisted of I
Marine Amphibious Corps under Vandegrift.
Resources
were limited because Nimitz
was about to open the Central Pacific offensive. Halsey had only a
single
carrier group to cover the landings, along with cruiser and destroyer
forces. A second carrier group had been alloted to the theater but
could not
arrive before 7 November. Wilkinson was allocated just 12 APA and AKA,
supplemented by LSTs and other
short-range landing craft.
The assault troops themselves carried just one unit of fire, though
additional ammunition was brought in by attack cargo ships.
| South
Pacific
Force (Halsey) |
|||||
| |
I
Marine Amphibious Corps (Vandegrift)
|
||||
| |
3
Marine
Division (Turnage) |
||||
| 2 Marine Raider
Battalion |
|||||
| 3 Marine Raider
Battalion |
|||||
| 1 Marine Parachute
Battalion |
Arrived 23 November 1943 |
||||
| 8
Brigade Group, 3
New
Zealand
Division |
Assigned to take Treasury
Islands |
||||
| 37
Division (Beightler) |
Arrived 9 November 1943 |
||||
| Americal
Division (Hodge) |
Arrived 15 December 1943 |
||||
| 7
Advance Naval Base Unit |
|||||
| 71
Naval Construction Battalion |
|||||
| III
Amphibious
Force (Wilkinson) |
|||||
| Transport
Division
"A" |
6421 men of 3 Marine
Regiment, reinforced |
||||
| |
APA President
Jackson |
||||
| |
APA President
Adams |
||||
| APA President
Hayes |
|||||
| APA George Clymer |
|||||
| Transport
Division
"B" |
6103 men of 9 Marine
Regiment, reinforced |
||||
| APA American Legion |
|||||
| APA Hunter Liggett |
|||||
| APA Fuller |
Sun 17 November by aircraft |
||||
| APA Crescent City |
|||||
| Transport
Division
"C" |
3 Marine Defense Battalioni
and support troops |
||||
| AKA Alchiba |
|||||
| AKA Alhena |
|||||
| AKA Libra | |||||
| AKA Titania | |||||
| Screen |
|||||
| DD Fullam |
|||||
| DD Guest | |||||
| DD Bennett |
|||||
| DD Hudson | |||||
| DD Anthony | |||||
| DD Wadsworth | |||||
| DD Terry | |||||
| DD Braine | |||||
| DD Sigourney | |||||
| DD Conway | |||||
| DD Renshaw | |||||
| Minecraft
Group |
|||||
| DMS Hopkins |
|||||
| DMS Hovey | |||||
| DMS Dorsey | |||||
| DMS Southard | |||||
| AM Adroit |
|||||
| AM Conflict | |||||
| AM Daring | |||||
| AM Advent | |||||
| 4 YMS |
|||||
| Special
Minelaying
Group |
|||||
| DM Breese |
|||||
| DM Sicard |
|||||
| DM Gamble |
|||||
| Salvage
Group |
|||||
| AT Apache |
|||||
| AT Sioux |
|||||
| Task
Force 39 (Merrill) |
|||||
| Cruiser
Division 12 (Merrill) |
|||||
| CL Montpelier |
|||||
| CL Cleveland | |||||
| CL Columbia | |||||
| CL Denver | |||||
| Destroyer
Division 45 |
|||||
| DD Charles
Ausburne |
|||||
| DD Dyson | |||||
| DD Stanly | |||||
| DD Claxton | |||||
| Destroyer
Division 46 |
|||||
| DD Spence | |||||
| DD Thatcher | |||||
| DD Converse | |||||
| DD Foote | |||||
| Task
Force 38 (Sherman) |
|||||
| CV Saratoga |
|||||
| Air Group 12 | |||||
| |
33 F6F Hellcat | ||||
| 16 TBF Avenger | |||||
| 22 SBD Dauntless | |||||
| CVL Princeton |
|||||
| Air
Group 23 |
|||||
| 19 F6F Hellcat | |||||
| 7 TBF Avenger | |||||
| CLAA
San
Diego |
|||||
| CLAA
San
Juan |
|||||
| 9 DD |
|||||
| AIRSOLS
(Twining) |
|||||
| Barakoma: |
|||||
| 64 F4U Corsair |
|||||
| 6 F4U-2 Corsair | Night fighter squadron |
||||
| 6 PV-1 Ventura |
Night fighter squadron |
||||
| 413
other aircraft |
|||||
| 5 Air
Force (Kenney;
at Dobodura) |
|||||
| 75 B-25 Mitchell |
|||||
| 61 B-24 Liberator |
|||||
| 80 P-38 Lightning |
|||||
| 133
other aircraft |
|||||
| Combined
Fleet (Koga) |
||||
| |
3
Fleet (at Rabaul) |
|||
| |
82 A6M "Zeros" | |||
| 45 D3A "Vals" | ||||
| 40 B5N "Kates" | ||||
| 6
reconnaissance aircraft (likely D4Y1-C
"Judys") |
||||
| 11
Air
Fleet (Kusaka; at
Rabaul) |
||||
| about
200 aircraft |
||||
| 8 Fleet
(Samejima; at
Faisi) |
All warships listed under 8
Fleet were at Rabaul |
|||
| Cruiser
Division 5 (Omori) |
||||
| CA Myoko |
||||
| CA Haguro | ||||
| CL Sendai |
Sunk |
|||
| CL Agano | ||||
| DD Shigure |
||||
| DD Samidare | ||||
| DD Shiratsuyu | ||||
| DD Naganami |
||||
| DD Hatsukaze |
Sunk |
|||
| DD Wakatsuki |
||||
| 5 APD |
||||
| 1
Base
Force (at Faisi) |
5000 men |
|||
| Elements,
Special
Naval Landing Forces |
Remnants of of several SNLF
units totalling about 6800 troops in the area of Buin |
|||
| 8
Area
Army (Imamura;
at Rabaul) |
||||
| 17
Division
(at Rabaul) |
Elements of this division
carried out counterlandings during the campaign. Eventually
the bulk of
53 and 81 Regiments joined the Japanese forces on
Bougainville. |
|||
| 4
South
Seas Garrison Unit |
Roughly a brigade. Joined the
Japanese
forces on Bougainville following the Allied landings. |
|||
| 17 Army (Hyakutake; at Buin) | ||||
| 6 Division (Kanda) | 15,000 men at Buin 5000 at Kieta |
|||
| 38
Independent
Mixed Brigade (Kijima;
at Buka) |
5,000 men |
|||
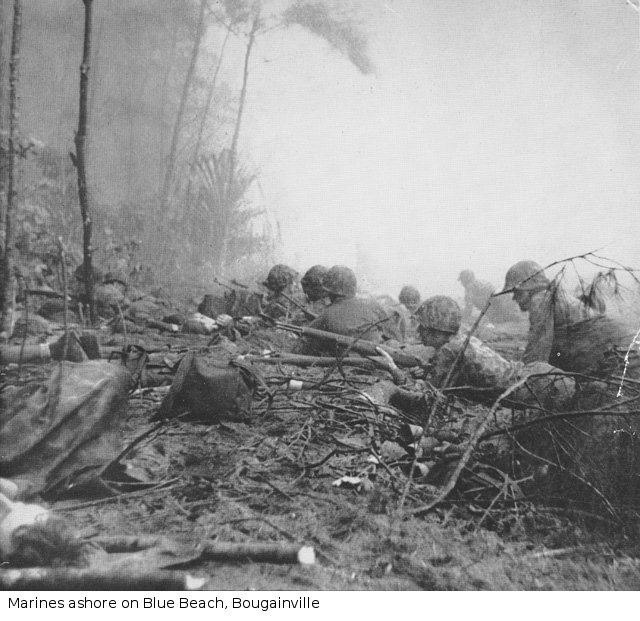
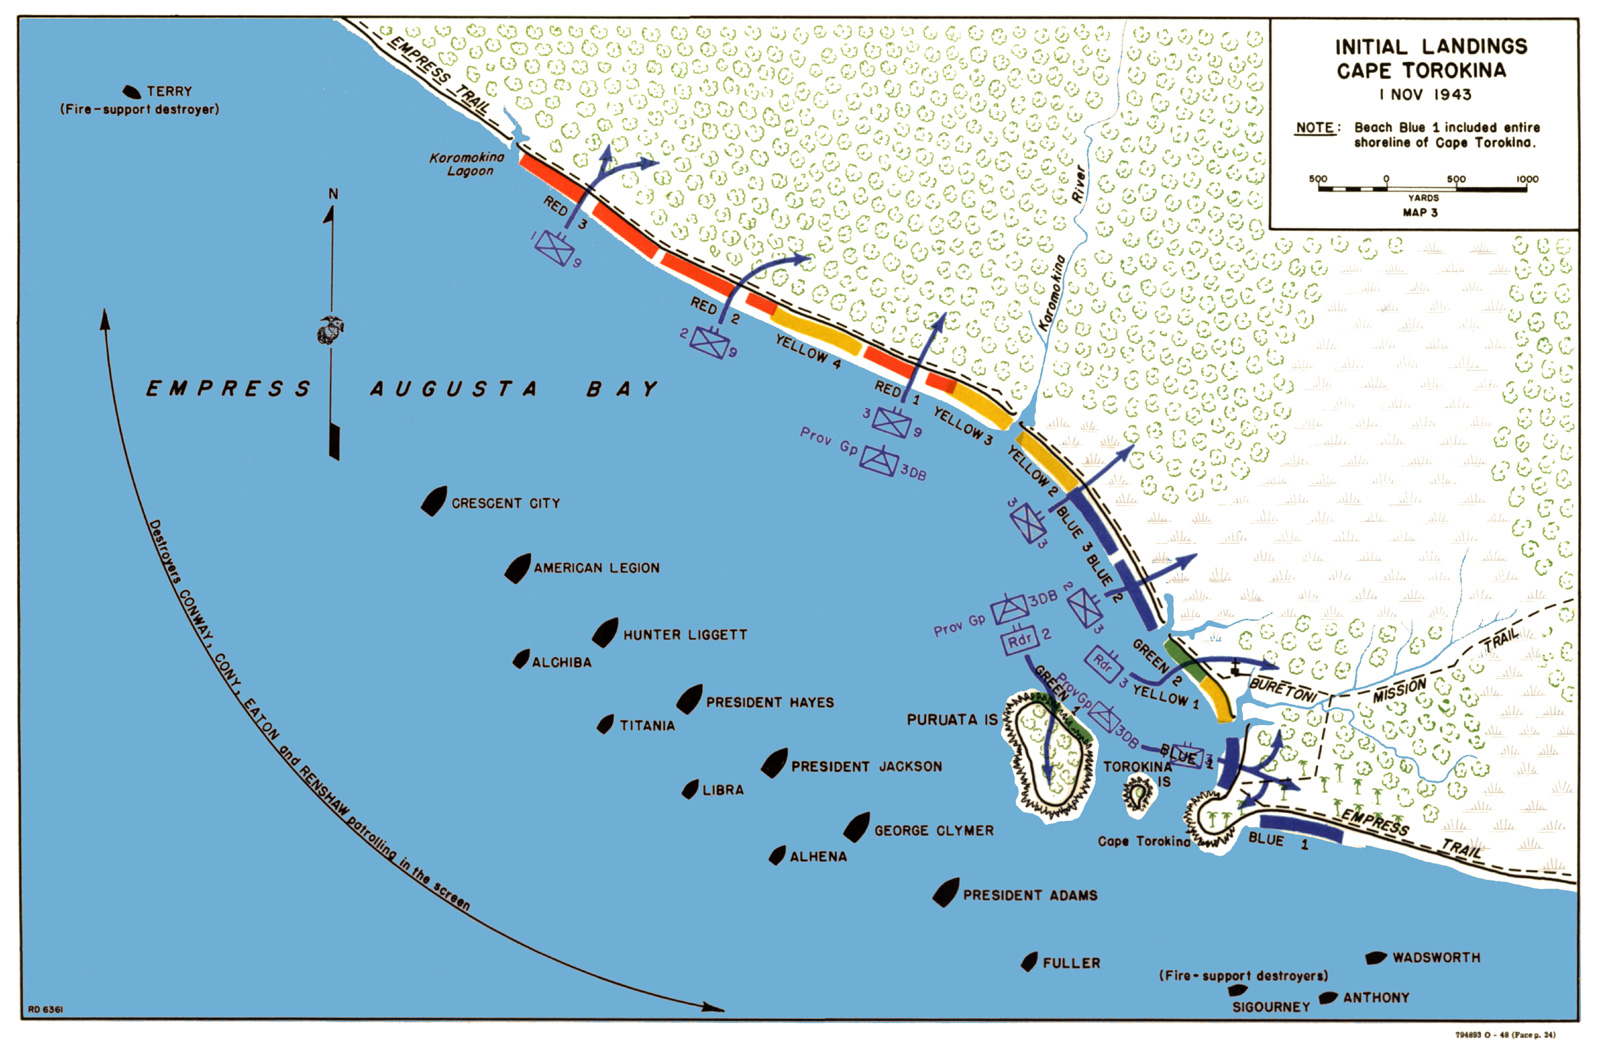
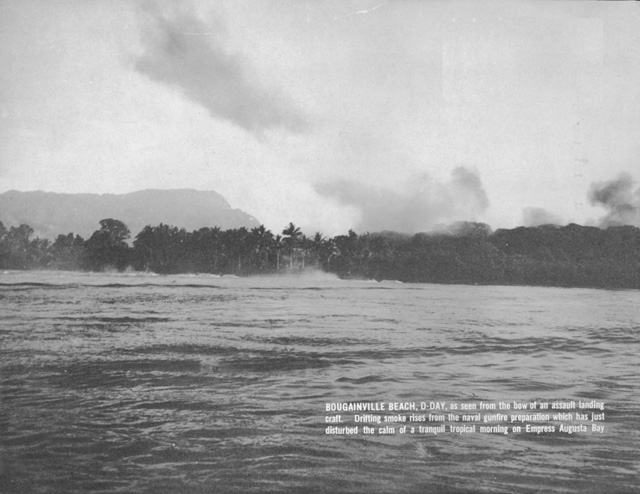
Just after midnight on 1 November 1943, the day of the main landings at Cape Torokina, Merrill's Task Force 39 bombarded Buka for two and a half hours. The force then raced south to bombard the Shortlands. The landings were also covered by Sherman's Task Force 38 (Saratoga and the newly arrived Princeton), which launched air strikes on Buka. The approaches to the landing beaches were poorly charted, but the designated transport area was found to be free of shoals. The landings were extremely well organized and the first assault waves, from 3 Marine Division (Turnage), hit the shore at 0726, just 41 minutes after the transports anchored. Almost eight thousand troops were ashore within a couple of hours. However, heavy surf took a toll of the landing craft, of which over thirty were wrecked during the landings.
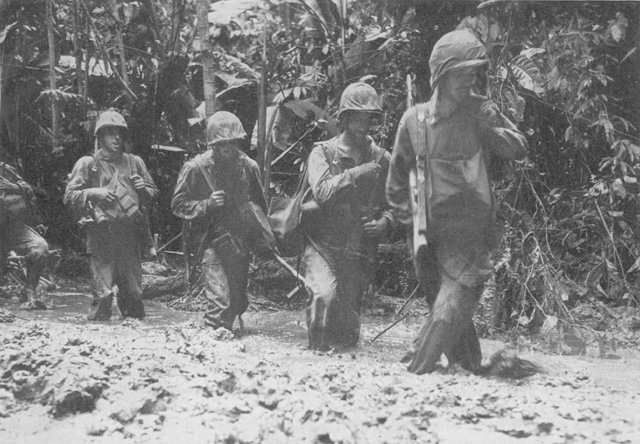
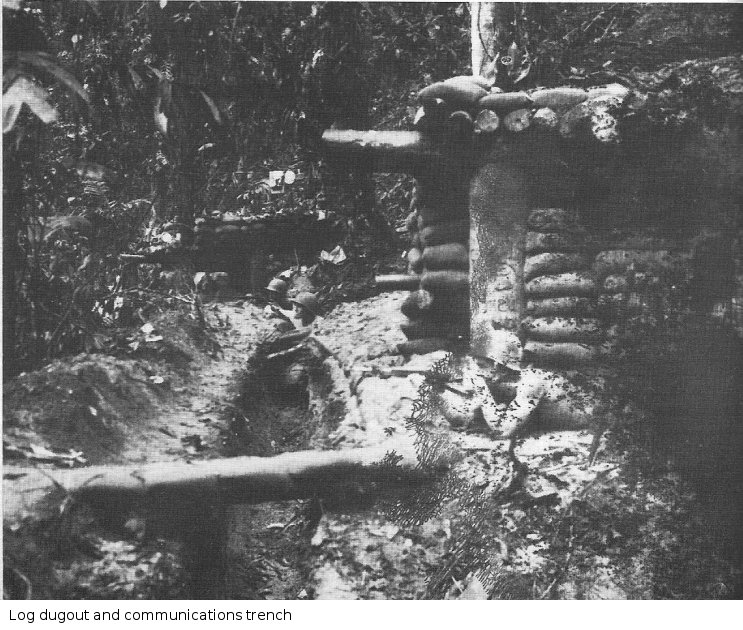
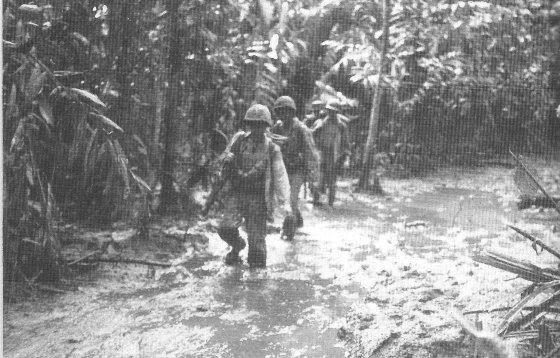
Terrain was a greater obstacle than Japanese resistance
on
the northern beaches. The beach was esssentially a large sand bar
between the ocean and nearly impenetrable swamp, with only
isolated islets of higher ground.
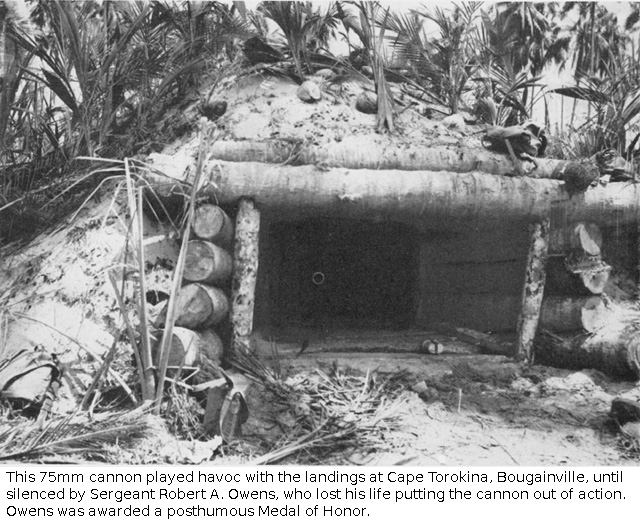
75mm cannon knocked out by Sergeant Robert A. Owens
U.S. Marine Corps. Via ibiblio.org
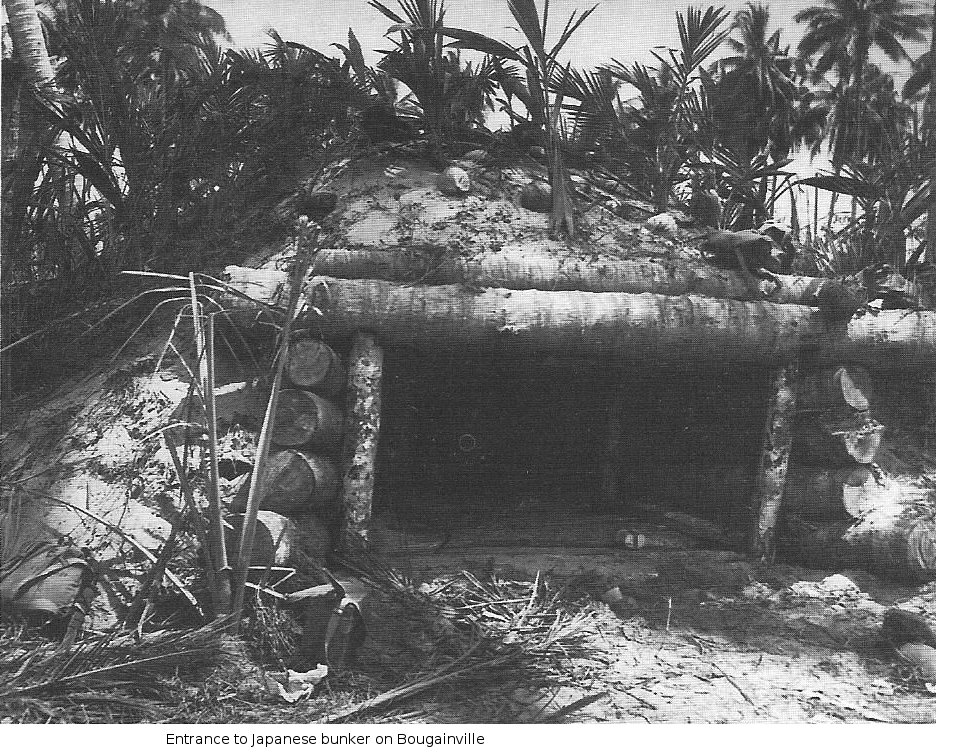
There were only about 270 Japanese from 2 Company,
2 Battalion, 23
Regiment, 6 Division
in
the landing
area, but they were concentrated around Cape Torokina itself and
gave
the southern landings significant difficulty. There were about 25
Japanese pillboxes in this area, and their single 75mm gun,
concealed
in a coconut log and sand
bunker, managed to sink four landing craft and damage several
others.
The LCP containing the
wave commander was one of those hit, and this threw the landing of
1/3
Marine Regiment into serious confusion. Sergeant Robert A.
Owens led an attack that neutralized the gun but
cost him his own life; he was posthumously awarded the Medal of Honor. The 1
Battalion commander, Major Leonard M. Mason, though wounded, was
able to restore order before being evacuated.
It was later noted that the prelanding bombardment had
been almost completely ineffective. The battle of Tarawa
was still three weeks in the future, with its hard lessons on the
necessity of highly accurate naval gunfire from the closest
possible
range. Wilkinson later noted that many ships fired short for over
five minutes before correcting their aim.
Some correspondents, probably accurately, described the southern
landings as "the bloodiest beach in the entire Solomons campaign"
(quoted in Gailey 1991).
3 Marine Raider Battalion was assigned to land on
Puruata
Island, just off Cape Torokina, where there was a platoon of
Japanese
defenders. These resisted fiercely in spite of being heavily
outnumbered,but by 1530 on 2 November the island had been cleared.
Some
29 Japanese were killed at a cost of 5 Marines killed and 32
wounded.
Unloading was interrupted by an air raid at 0735
consisting of 9 "Vals" and 44 "Zeros." Damage was slight. A second
wave
at 1300 by about one hundred carrier aircraft did no worse damage
than
briefly grounding a transport. The Americans claimed some 15
Japanese
aircraft shot down, and the worst consequence of the raids was
that
unloading of supplies was delayed by four hours.
Only 68 of the Japanese defenders escaped the initial Marine advance. Marine casualties were 78 killed and 104 wounded. The dead included the commander of 2 Raider Battalion.
The cargo ships were lightly loaded, not more than
550 tons apiece, to ensure quick discharge of their supplies. By
1730
eight of the ships were fully unloaded, putting 14,000 men and
6200
tons of supplies ashore.
The LVTs of 3 Amphibious
Tractor Battalion
made a particularly critical contibution to moving supplies over
the
swampy ground. Some 29 LVTs were landed on the first day, and
eventually a total of 124 LVTs would be operating with the
Marines. All
transports withdrew at 1800, but the four
with vital cargos still aboard were detached to return and finish
unloading. These ships retreated once again when a scout plane
reported
Japanese warships leaving Rabaul, then returned following the
Allied
victory in the Battle of Empress Augusta Bay.
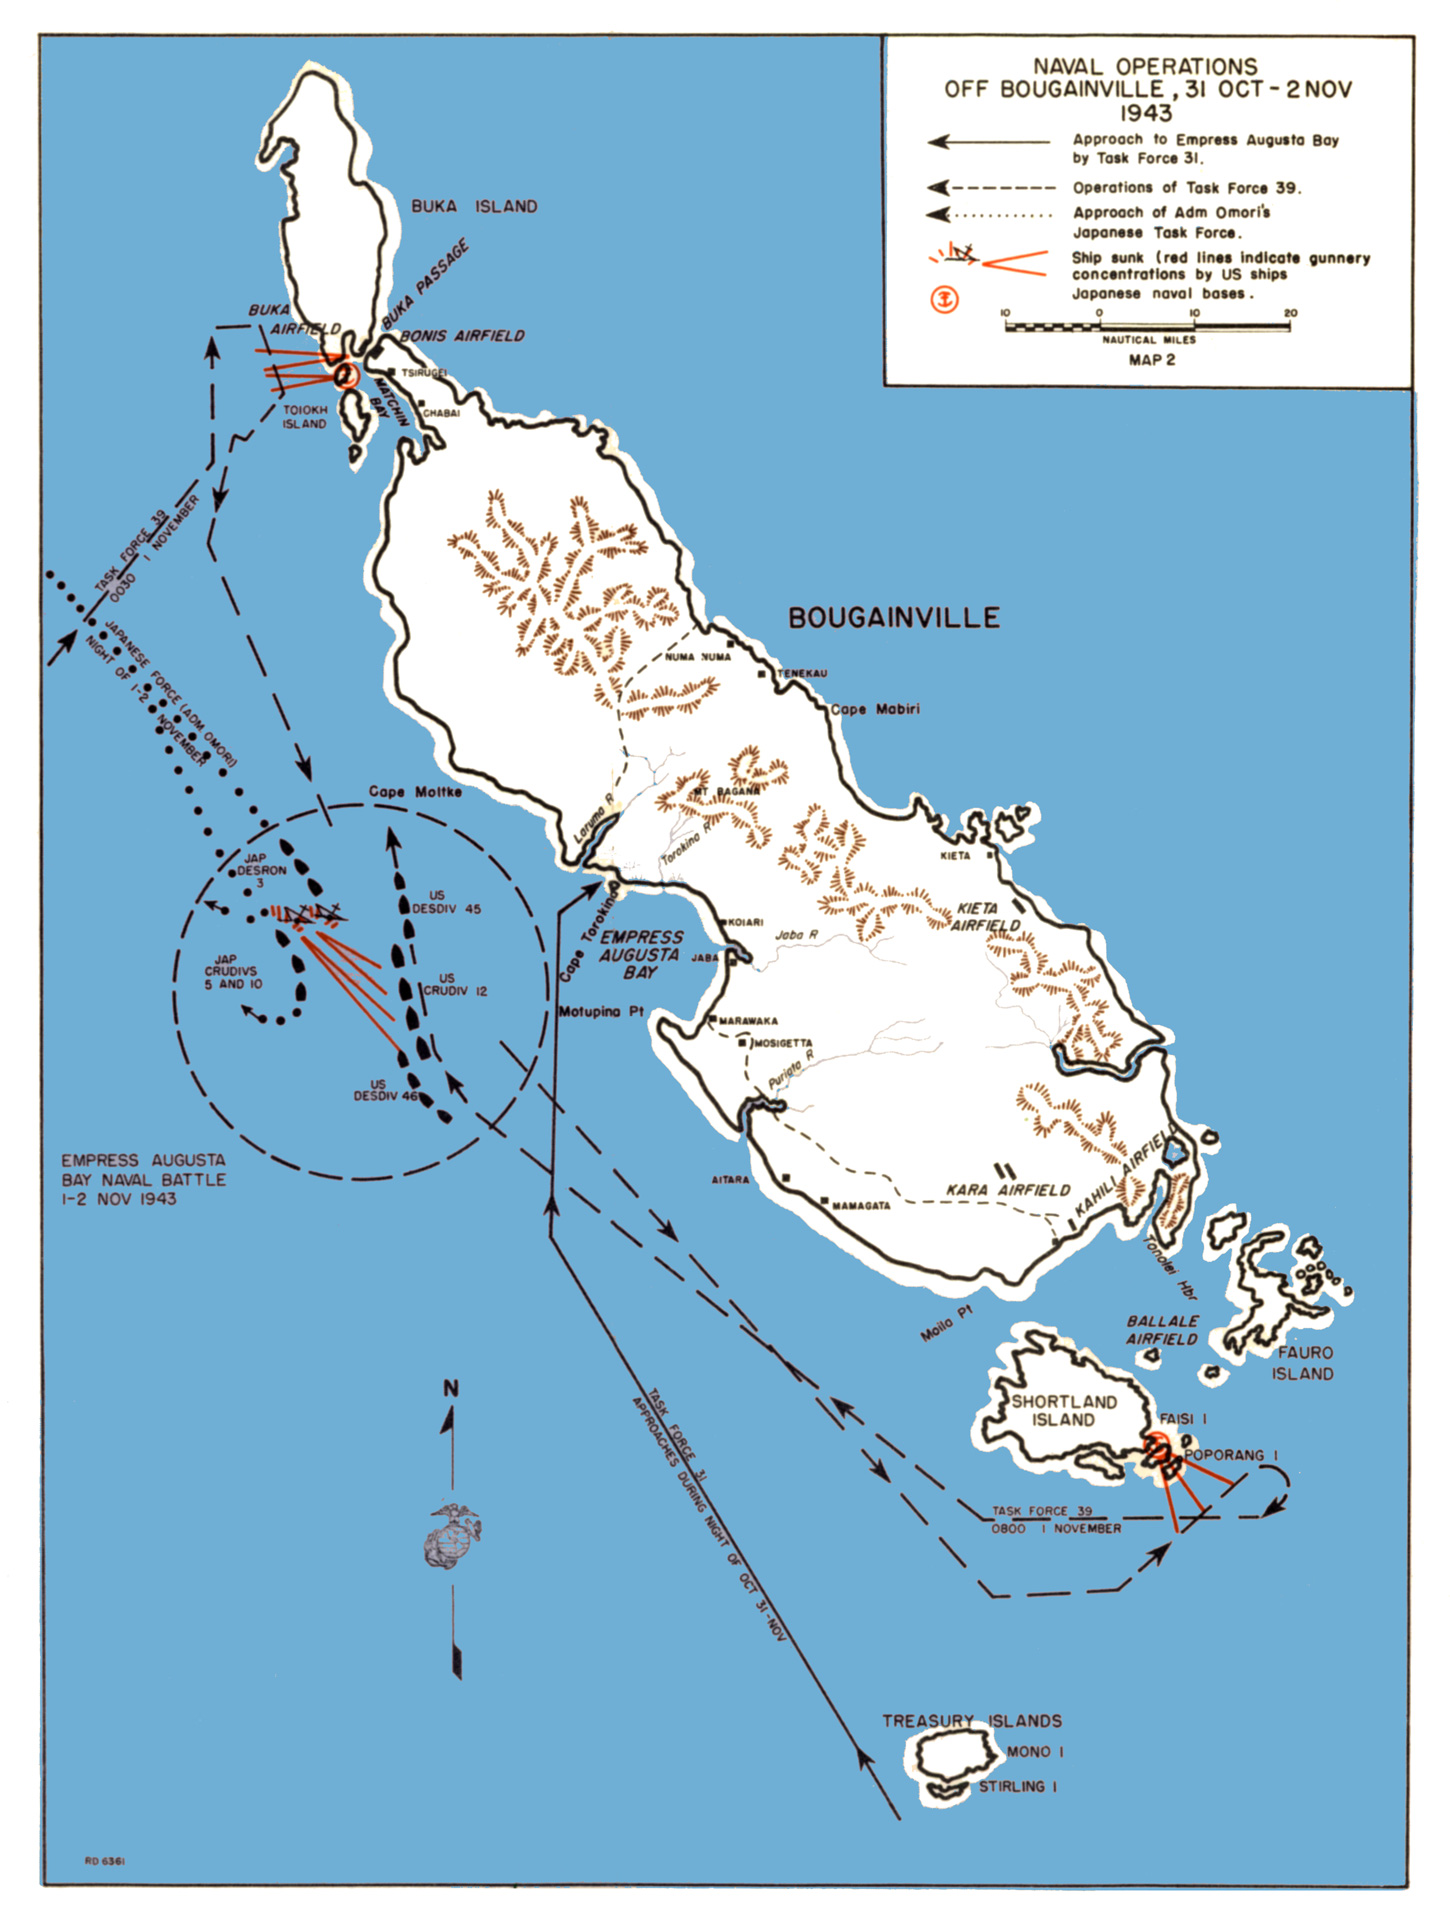
Battle
of Empress Augusta Bay. Though the Americans did not know it, Admiral Omori at Rabaul had
sent out a sweep late on 31 October by a force of two heavy
cruisers,
two light cruisers, and two destroyers, sufficient to have posed a
considerable threat to Wilkinson's invasion force if contact had
been
made. However, the Japanese failed to find the Americans and
returned
to Rabaul to learn that the Americans had already landed at Cape
Torokina.
Omori was promptly dispatched a second time, this time with a force of four cruisers and six destroyers. Omori's force was met by the four cruisers and eight destroyers of Merrill's Task Force 39. Merrill maneuvered to keep out of torpedo range while directing gunfire against the Japanese by radar. The Japanese lost a cruiser and destroyer and their remaining ships were heavily damaged. The Americans had two cruisers and two destroyers damaged. The Japanese retreated without having had an opportunity to attack the invasion transports.
On 4 November the Seabees
of 71
Naval Construction Battalion began work on a 5150' by 200'
(1570m by 60m) fighter airstrip near the coast just southeast of
Cape Torokina. Elements of 53
Naval Construction Battalion and Marine labor parties also
provided assistance.
Rabaul Raids. A second powerful squadron arrived at Rabaul on 4 November, consisting of ten cruisers and ten destroyers under Kurita. In the face of this unexpected threat, Halsey was forced to order Sherman to take the Saratoga and Princeton, the only carriers in the theater, on a raid against Rabaul. Halsey later admitted that he expected to lose one or both carriers, but the Americans achieved surprise and damaged six cruisers and four destroyers at the cost of just ten planes. The American carriers then made a clean escape.
On 11 November 1943, a second raid was mounted by Sherman's group and a second newly arrived carrier group under Montgomery. American losses were again light, but the Japanese found Montgomery's group and mounted a raid by over 100 aircraft. However, between the defending fighters and the formidable American antiaircraft, the Japanese lost over 40 aircraft without scoring a single hit.
Although the damage inflicted by these raids was modest, they were sufficient to convince Koga to withdraw both the heavy cruisers and the carrier air groups that had been sent to Rabaul. The air and surface threat to the Bougainville landings had been largely neutralized.
Expanding the Beachhead. Meanwhile, by 5 November, the landings had secured a beachhead 2000 yards inland at the cost of less than two hundred casualties. A second echelon of troops arrived that same day, covered by Merrill's task force.
The initial Japanese Army response to the landings was sluggish and ineffective. The Army was convinced that the landings were diversionary and the real assault would take place at Buka, and most reinforcements were sent there rather than against the Allied beachhead. However, the Japanese staged a counterlanding in the early hours of 7 November by 850 troops of 17 Division in 21 landing barges brought in by four destroyers. By the time the Marines realized what was happening, the Japanese troops were already coming ashore. The landing took place at Koromokina Lagoon, which was so close to the northern Torokina perimeter that it cut off a company of Marines, who had to be evacuated by a pair of LCTs. A massive artillery barrage on the morning 8 November shattered the Japanese force, inflicting over 300 casualties, and Marines moving into the area found that the survivors had fled into the jungle. A dive bomber strike just beyond the Marine perimeter on 9 November caught the Japanese troops attempting to return to the area; this inflicted further heavy casualties, and the Japanese fled the area for good.
The Marines recovered documents indicating that Imamura,
commanding 8 Area
Army at Rabaul,
planned to land 3000 men in three echelons close to the Marine
perimeter. These men would infiltrate the perimeter while two
battalions of 23 Regiment assembled just east of the Piva
River (155.071E
6.237S) and attacked the eastern Marine perimeter.
However, the destruction of the first landing echelon dissuaded
Imamura
from any further attempts at counterlanding close to the Marine
perimeter.
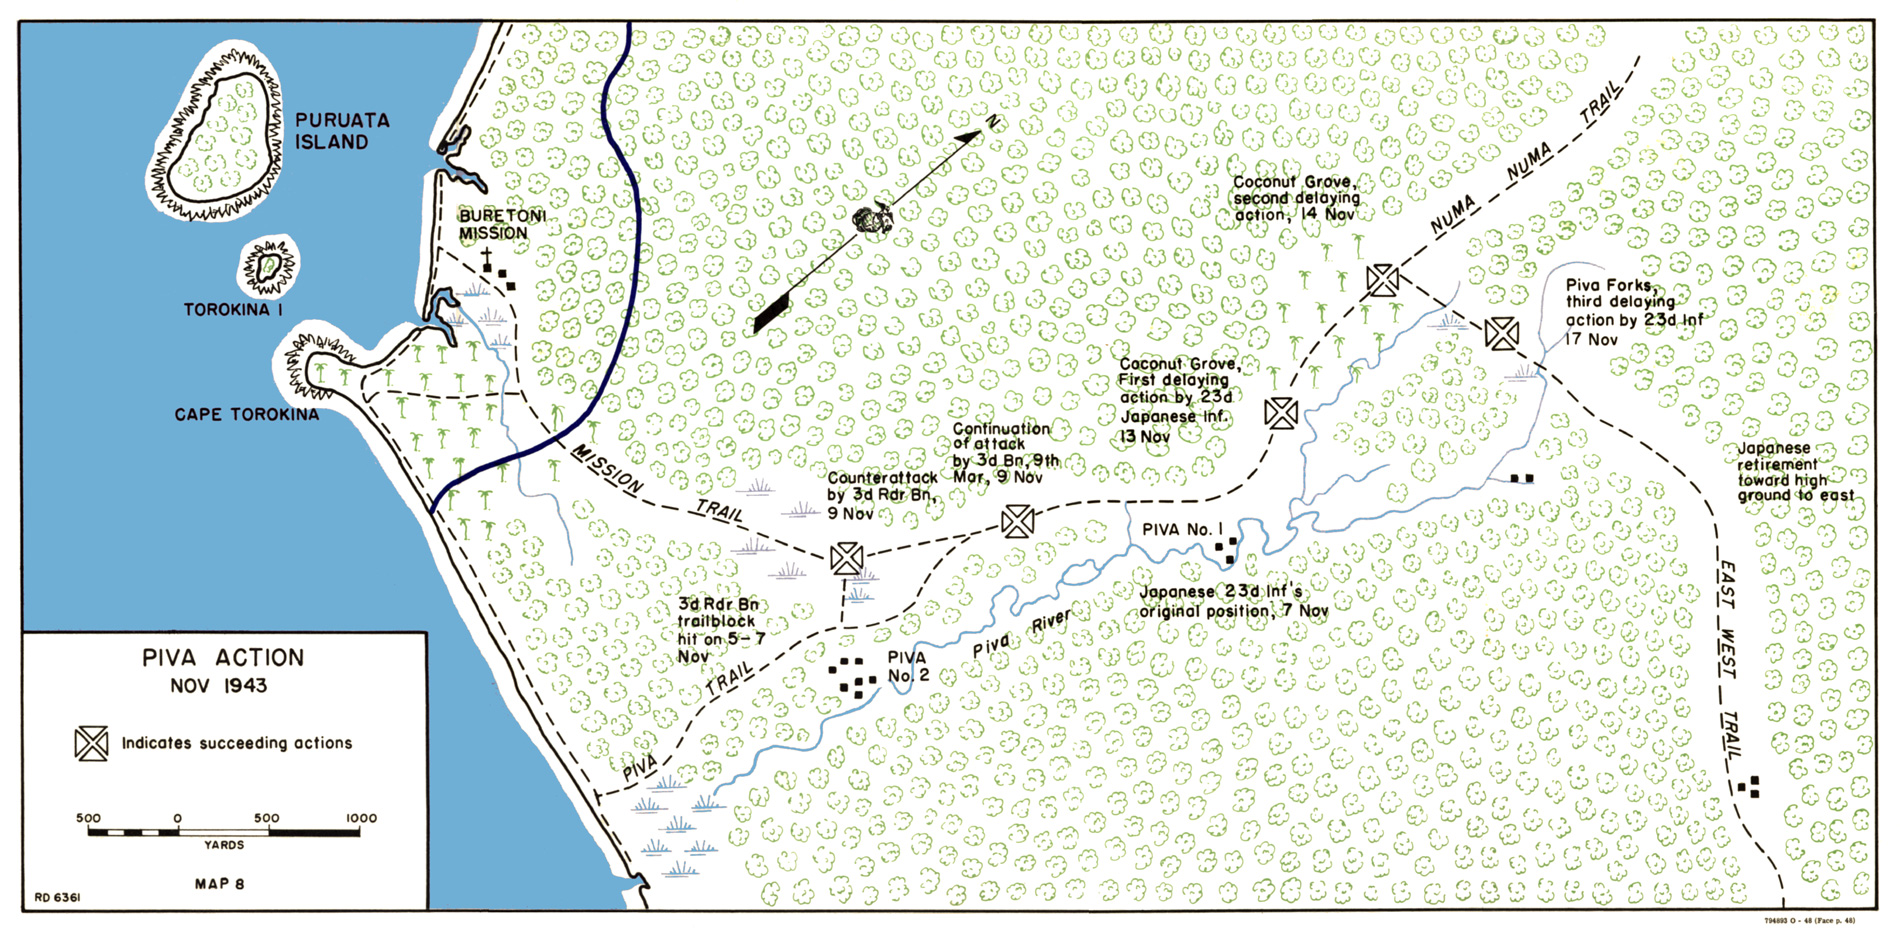
Meanwhile, 23 Regiment made probing attacks on the Marine perimeter on 5 November, encountering a road block manned by elements of 2 Raider Battalion on Mission Trail, the main trail from the Cape Torokinaarea to the east. 23 Regiment launched an attack the roadblock on 7 November, timed to coincide with the counterlanding at Koromokina Lagoon, but was repulsed by the Raiders supported by heavy mortar fire. A second attack by the Japanese on 8 November was preceded by four hours' mortar bombardment, but the Raiders again held, then counterattacked in the early afternoon. By afternoon the next day, Japanese resistance had crumbled, but the Marines halted their advance and dug in around Piva Village (155.070E 6.219S).
During the period 8-13 November 1943 the Japanese
staged three major raids against shipping near Cape Torokina,
making
wildly exaggerated claims of sunken American battleships and
carriers.
In fact, the worst damage was two bomb
hits and a torpedo hit on light
cruiser Birmingham, which was
little
impaired in its fighting capacity, and a torpedo hit on one of the
engine rooms of light cruiser Denver, which
forced
the warship to retire at low speed. These results cost the
Japanese
121 out of the 173 carrier aircraft committed to Rabaul on 1
November 1943,
with 86 aircrew lost.
Similar casualties were suffered by 11 Air Fleet. The Japanese raids did not prevent
37
Division from arriving, beginning on 9 November.
While the Marines were securing their perimeter, Seabees
accompanied by an infantry
patrol had identified good ground for
airstrips near a coconut grove well north of the Marine perimeter.
The
Seabees cleared two 5000' (1520m) strips before returning to the
perimeter. Because the Marines were having some difficulty
expanding
the perimeter in the very difficult terrain, Turnage ordered 2/21
Marine Regiment to move out on 13 November and set up an
outpost at a trail junction near the airfield
site, where the battalion
was to hold until the perimeter could be expanded. However, the
battalion was ambushed by the Japanese rearguard just
as it reached the coconut grove, and by nightfall the forward
elements
had taken heavy casualties and were forced to pull back. The
next morning, the Marines called in air strikes and brought up a
platoon of tanks to support
their advance. The advance soon dissolved into confusion, with
some of the tanks mistakenly firing on friendly positions, but
by late afternoon the Marines had secured the coconut grove.
With the coconut grove secured, the Marines rapidly
expanded their perimeter, reaching Line DOG on 15 November. At
this
point there were 33,861 men and
23,137 tons of supplies in the perimeter, and the Seabees were
working
furiously to build a road network within the perimeter. On 16
November
the first road was completed across the perimeter, and completion
of
the airfield could begin in earnest. However, on 17 November
Japanese aircraft finally inflicted a serious blow against the
Americans, sinking destroyer-transport
McKean with heavy loss of life.
Piva Forks. The initial ground campaign came to an end on 25 November 1943, when the Marines pulverized 23 Regiment (Iwasa) at Piva Forks. The encounter began on 17 November, when a Marine patrol discovered and occupied an unoccupied roadblock on the Numa Numa Trail, which led north from the Piva area. The Japanese attempted to reoccupy to the roadblock on 18 November and were ambushed by the Marines, suffering heavy casualties, including an officer carrying documents of considerable intelligence value. Over the next two days, the Marines secured this part of the perimeter and sent out patrols, which encountered isolated Japanese rearguards and fought some sharp actions.
On 21 November, 3 Raider Battalion spearheaded an advance along the East-West Trail from where it joined the Numa Numa Trail. The battalion crossed the crest of the trail to discover that they were looking down on the main Japanese positions east of the Piva River and astride the East-West Trail. The positition also cut the Japanese supply line to the west. The Marines raced to dig in before Japanese 90mm mortars could register, losing seven killed but holding the position. The next day 2 Raider Battalion relieved 3 Raider Battalion on the trail crest, and the rest of 3 Marine Division moved up to Line EASY while 37 Division took over much of the northern perimeter.
Meanwhile, on 20 November, 2/3 Marine Regiment had
spotted Cibik Ridge (155.076E
6.200S) and, recognizing its importance as high ground,
promptly ordered a platoon to
occupy the ridge. The next morning, the Marines
on the ridge discovered that the Japanese had prepared the ridge
for
defense, but had pulled out for the night to avoid American
artillery
fire. When the Japanese attempted to move back into their
positions, they were met by a hail of American fire. The
platoon commander, Steve Cibik (for whom the Americans would name
the
ridge), called for mortars, and two 60mm mortars soon arrived at
his
position. Over the next two days, the Japanese engaged in mortar
duels
with the Marines while attempting to storm the ridge, but their
attacks
were repulsed. The Marines had secured a crucial position on high
ground overlooking the battlefield. Cibik received the Silver Star
for
his leadership in this action.
2/3 Marine Regiment now made a reconnaissance-in-force
to
the east, only to discover that the Japanese had constructed a
formidable defense line of about 20 pillboxes and that 23
Regiment
was massing for a counterattack. The Marines disengaged with some
difficulty and moved back behind the perimeter, only to be turned
around and thrown back into the line to help repel the Japanese
counterattack. On 21 November, the Japanese attempted to double
envelop
the positions of 1/3 Marine Regiment,but were repulsed by machine
gun
fire that inflicted heavy casualties. One machine gunner claimed
74 of
75 Japanese who advanced against his position.
The next two days were spent preparing for an attack on
23 Regiment, estimated to number 1200 to 1500 men.
37 Division reached its final planned defensive line, Line HOW,
while 3
Marine Regiment assembled its assault force and registered
artillery on
known Japanese positions. The Marines had noted that the Japanese
defenses were located parallel to the high mountains to the north
and
were oriented to the south, leaving them vulnerable to an advance
from
the west.
The attack began on 24 November with the heaviest Marine artillery bombardment so far in the war. Some 5760 rounds were expended over 23 minutes. However, the Japanese had also registered their artillery, and as the Marines were moving up to the line of departure, a Japanese battery twice walked its fire up and down the assembling Marines. The battery was spotted and silenced by Marine counterbattery fire, but not before it had inflicted the heaviest Allied casualties of the campaign. However, the Japanese had also suffered heavily from Marine artillery, and the Marines were able to move forward about 500 yards (460 m) before the Japanese rallied and counterattacked the Marine flank. The Marines met the counterattack head on and destroyed the Japanese flanking force. By the time the Marines reached their objective, 1150 yards (1050 m) in front of their line of departure, all enemy resistance to their front had ceased.
On 24 November, 1/9 Marine Regiment attacked northeast from Cibik Ridge, soon coming under heavy fire from a parallel ridge the Marines dubbed "Grenade Hill." Fighting was at such close quarters that the mortars on Cibik Ridge were unable to fire in support. However, on the morning of 26 November, the Marines found that the Japanese had abandoned Grenade Hill. 23 Regiment had been shattered, with casualties of at least 1196 dead. Marine casualties were 115 dead and wounded. There would be no further serious Japanese attacks on the perimeter until March 1944, though the Japanese would make frequent night air raids against the perimeter. Meanwhile the perimeter was wired and roadblocks established on all routes into the perimeter.
Battle of Cape St. George. In the early hours of 25 November 1943, a Japanese destroyer force that had just landed 920 men at Buka was intercepted by an Allied destroyer force under Arleigh Burke. The Japanese force was divided into a screening column of two destroyers and a transport column of three destroyers, while Burke divided his force into three destroyers under his direct command and two destroyers under B.L. Austin. The Japanese force had already tangled with a group of PT boats off Buka (neither side scored any damage) and Burke raced west to get between the Japanese and their base at Rabaul. It was a moonless night with heavy cloud cover, and radar contact was made with the Japanese almost as soon as Burke had his force in position, at 0141. Initial contact was with the two screening destroyers. Burke steered directly towards the Japanese and launched 15 torpedoes at 0156, then turned sharply to avoid any counterlaunches. Austin was eager to attack the Japanese column from the opposite bow but was ordered off with the one-word message "Nuts!"
The Japanese sighted the Americans just thirty seconds before the torpedoes arrived, giving them little time to maneuver. Onami was obliterated in a massive explosion and Makinami was crippled by a hit amidships. At about this time, Austin sighted the destroyer-transports. Burke ordered Austin to finish off Makinami and went after the second column himself. In a long stern chase, Burke finally closed with the Japanese at 0215, maneuvered on a hunch to dodge their torpedoes, then crippled and sank Yugiri with gunfire. Having lost contact with the other two destroyers, and with dawn fast approaching and Rabaul all too near, Burke raced back east. The battle was over. Burke's force had sunk three Japanese destroyers without suffering a single hit.
| Buka
Reinforcement Echelon |
|||
| |
Transports |
||
| |
DD Amagiri |
||
| DD Yugiri |
Sunk |
||
| DD Uzuki |
|||
| Screen |
|||
| DD Onami |
Sunk |
||
| DD Makinami | Sunk |
||
| Destroyer
Squadron 23 |
|||
| |
Destroyer
Division 45 |
||
| |
DD Charles
Ausburne |
||
| DD Claxton | |||
| DD Dyson | |||
| Destroyer
Division 46 |
|||
| DD Converse | |||
| DD Spence | |||
36
Naval Construction Battalion arrived on 26 November, just as
the Piva area was secured, and began work on the inland bomber
strip, Piva Uncle.
Koiari Raid. On 27 November 1943, Geiger ordered 1 Marine Parachute Battalion and a company of 3 Marine Raider Battalion to conduct a seaborne raid into the Japanese rear to disrupt Japanese comunications and collect intelligence. Little was known about Japanese positions in the area, and when the raiding force came ashore northwest of Koiari (155.177E 6.282S) in th early hours of 29 November, the Raiders were met by a single Japanese officer armed only with a sword, who was apparently expected a Japanese force: The Marine history notes that the officer "began an abruptly terminated conversation with the first Marines ashore". The Marines had landed almost on top of a Japanese supply dump. The raiding force was brought under heavy Japanes fire and was forced to withdraw under covering fire from three destroyers and from 155mm guns in the main Cape Torokina perimeter. The dump was left intact and the Marines suffered 15 killed and 95 wounded, though they claimed to have killed 145 of the Japanese.
Securing the Heights. In early December, Turnage decided to strengthen 3 Marine Division's front by occupying the high ground just west of the Torokina River. The southernmost feature of the high ground, Hill 600 (155.099E 6.216S), was occupied without any particular difficulty, but the Marines moving onto Hill 1000 (155.100E 6.200S) discovered abandoned Japanese fortifications on the eastern spur of the hill. This feature, dubbed "Hellzapoppin Ridge", commanded the Marine lines to the south, and when a patrol was sent to occupy the position on 8 December, they encountered heavy fire from Japanese troops who had reoccupied the position.
Hellzapoppin Ridge proved to be a strong natural fortress, with almost vertical slopes on two sides and heavy forest cover that foiled observation for artillery or air strikes. The Japanese were deeply dug in among the tree roots and had their entire perimeter covered by automatic weapons, leaving no flank to run. Repeated frontal attacks by the Marines were driven back. On 14-15 December a series of Avenger sorties attempted to bomb the Japanese out, but the intial attacks with contact fuses did little more than strip away some of the vegetation. On 18 December, a final flight of six Avengers armed with 48 100 lb (45 kg) delayed fused bombs carried out their strikes individually and deliberately and in careful coordination with the artillery and infantry, which finally cracked the defenses. The Marines lost 12 killed and 23 wounded, while counting over 50 Japanese bodies in the area.
On 22 December an infantry and heavy machine gun platoon moved out to occupy Hill 600A (155.110E 6.206S), east of Helzapoppin Ridge on the west bank of the Torokina River. This was the highest terrain for a considerable distance to the south and east. The Marines soon came under fire from Japanese troops who had moved onto the hill during the night and dug in on the reverse slope. The two platoons were soon reinforced with their entire parent company, but the company commander rashly attempted a double envelopment of the Japanese without adequate reconnaissance. The whole company came under heavy fire and had to retreat. The next day a second company attempted to feel out the Japanese positions, but in spite of artillery support, it was also driven back. The next morning, patrols discovered that the Japanese had pulled out.
On 15 December 1943 Griswold (commander, XIV Corps) had relieved Geiger and Americal Division (Hodge) had begun to replace 3 Marine Division on the perimeter. On 27 December 1943, Merrill took his cruisers and destroyers to bombard Kieta and to try to lure the Japanese out for a fight. The Japanese Navy declined to put in an appearance, but the Americans bombarded Kieta severely enough to put an end to its use as a supply base.
Construction of the coastal fighter strip was completed by 10 December 1943, although the first aircraft to land on the strip, a damaged SBD making an emergency landing, landed on the incomplete strip on 24 November. 10 December also marked the arrival of 77 Naval Construction Battalion to begin work on a second fighter strip, Piva Yoke, that was to be laid out parallel to the inland bomber strip, Piva Uncle. The bomber strip was completed on Christmas Day, 25 December 1943. It would eventually have three taxiways with 35 hardstands and extensive repair and maintenance facilities. Camp facilities were constructed for 7000 ground personnel. The tank farm associated with Piva Yoke and Piva Uncle had one 10,000-barrel (1.6 megaliter) and eighteen 1000-barrel (160,000 liter) tanks.
A PT boat base was also constructed on Puruata Island, with
berthings for 18 boats and LSTs.
Battle of the Perimeter. By the end of the year, with the perimeter secured and the bomber and fighter strips completed, the initial phase of the Bougainville campaign was over. The Americal Division had taken over the eastern perimeter from 3 Marine Division, and VMF-216 and 70 Fighter Squadron were operating out of the airfield. Allied intelligence reported that the Japanese in north Bougainville were digging in around Buka and Bonis airifields and were unlikely to move against the Marine perimeter. The chief threat was thought to be from the south, where the bulk of 6 Division, some 11,000 troops, could move against the perimeter using trails that were well concealed by the jungle canopy.
The Americans carefully prepared the perimeter, building extensive chains of pillboxes and other fortifications, laying out barbed wire and boobytraps, clearing extensive fields of fire, and and installing searchlights. Meanwhile they aggressively patrolled outside the perimeter, where enemy activity was clearly increasing by February 1944.
One particularly celebrated patrol was that by 1 Battalion, Fiji Regiment, which moved out of the perimeter on 28 December 1943 and along the Numa Numa Trail to Ibu (155.084E 5.975S). From here the patrol was to fan out and report on activities on the east coast of Bougainville. Supply was by air drop. The patrol reached Ibu on 2 January, hacked out an airstrip for L-4 observation planes, engaged in a number of firefights with Japanese patrols, and were attacked by a major Japanese force of 14 February. The patrol fought an expert rearguard action back to the perimeter, arriving 19 February and claiming 120 Japanese killed in exchange for one Fijian slightly wounded.
On 27 February the Americans occupied the Magine Islands
(155.121E
6.283S)
in order to prevent the Japanese using them to observe the
American
beach activity and as an American observation post for observing
Japanese activities east of the Torokina River.
Hyakutake had finally awakened to the reality of his situation. He sent his main ground forces (primarily 6 Division) slogging through the jungle to attack the Cape Torokina perimeter. These were not able to finish assembling outside the American perimeter and launch their attack (Operation "TA") until 7 March 1944. By then 37 Division was well dug in and alerted to the coming attack through prisoner interrogations.
As was so often the case during the Pacific War, the
Japanese plan was overly complex. This was unfortunate for the
Japanese, whose superiority in numbers, ability to move under
jungle
cover, and possession of high ground overlooking the American
perimeter
suggests that a concentrated attack at the right point could have
seriously threated the American position. But Hyakutake assumed he
was
up against a single division, rather than two. He was so confident
that
the 15,000 combat troops he committed to the attack could crack
the
perimeter that he had already planned the surrender ceremony, to take
place on 17 March. The men were accordingly issued with just two
weeks' rations for the
attack.
Overall command of the attack was given to Kanda Masatane, commander of 6 Division, who was also given two battalions from 53 Regiment and part of 81 Regiment. Kanda divided his force into three columns. The first column, under Iwasa Shun (the 6 Division infantry group commander), consisted of 23 Regiment, a battalion from 13 Regiment, and supporting elements, totaling about 4150 men. Its objective was Hill 700 (155.084E 6.185S) on the right flank of 37 Division. From this position the Japanese hoped to drive down onto the Piva airfields. The second column was built around 45 Regiment (4300 men) and led by its commander, Colonel Magata Isashi, and it was to strike across the low ground west of Hill 700 and join the assault on the airfields. The third column, consisted of two battalions of 13 Regiment plus a company of engineers (1350 men), led by Colonel Muda Toyhorel, was to take Hill 260 (155.110E 6.206S) and Hill 309 (155.099E 6.216S) and then move on to take Hill 608 and secure Iwasa's flank.
The Japanese had spent most of January and February improvising a road from Mosigetta (155.316E 6.501S) to the assembly areas in the hills north of Torokina. The attack, originally scheduled for 6 March, was postponed to 8 March due to delays in getting the troops in place. It finally opened with an artillery duel in which the Japanese forced the aircraft on the Piva strips to evacuate to Guadalcanal, but otherwise did little damage, while the American guns were joined by 56 SBDs and 36 TBFs that struck the Japanese at Hill 1111 (155.110E 6.170S). The Americans were thoroughly alerted, while the Japanese infantry had not yet arrived at the American perimeter in force.
Hill 700 consisted of two high points separated by a saddle, with the approaches from almost every direction having a slope of 65 to 70 degrees. Beightler did not anticipate an attack on so commanding a position, and the hill was held by just two infantry companies and a heavy weapons company from 2/145 Regiment, albeit well dug in. Shortly after midnight on 9 March, in a pouring rain, 2/23 Regiment attacked the hill and the area to its west but were driven off. Two hours later, Iwasa launched his main attack, throwing 2/23 Regiment and 3/23 Regiment against the saddle. The followup wave by 3/23 Regiment was blown to pieces by American artillery, but the leading wave by 2/23 Regiment reached the American lines, blew apart the barbed wire barriers with bangalore torpedoes, destroyed a pillbox, and secured a lodgement. By dawn the Japanese had a penetration 70 yards (64m) wide and 50 yards (46m) deep, which they continued to expand until noon, capturing seven pillboxes and bringing up heavy weapons to interdict the American supply route south of the hill. Beightler committed 1/145 Regiment to help contain the Japanese, but it took another three days and massive artillery support for the Americans to drive the Japanese off the hill and restore the position. By then Beightler had been forced to commit a second battalion, 2/148 Regiment, while the commander of 145 Regiment had succumbed to combat fatigue. The battle cost the Americans 78 men killed, while at least 309 Japanese corpses were found in the area.
Meanwhile, at dawn on 10 March, the Muda column had struck against Hill 260, which held a small observation post of 2/182 Regiment well outside the main American perimeter. Although the hill had a valuable observation platform built high in a banyan tree, the staff of Americal Division were surprised when Griswold ordered the position held. By then the Japanese had already overrun most of hte American positions, which were concentrated on the south peak of the hill ("South Knob") The Americans occupied the north peak of the hill ("North Knob") but could not dislodge the Japanese, although American artillery destroyed the banyan tree with the observation platform. The Americans gave up their attempts to recapture South Knob on 20 March, leaving the position to be battered by artillery and contained by patrols, and on 28 March a patrol discovered that the Japanse had withdrawn. The struggle cost Americal Division98 dead and 581 wounded, while some 560 Japanese corpses were counted around the position.
Magata's column was slow to attack, which was unfortunate for the Japanese, since the terrain in his sector was flat ground favoring the attackers. The Americans had captured documents revealing Magata's intentions, and the defending 129 Regiment had spent the previous two months building a formidable defense line, with mutually supporting pillboxes protected by double apron barbed wire barriers and minefields and equipped with numerous machine guns, 75mm pack howitzers, and 37mm antitank guns supplied with canister. At 1600 on 11 March, the commander of 129 Regiment ordered his outposts back to the line of pillboxes, and the divisional artillery pounded the area in front of 2/129 Regiment for ten minutes. After dusk a firefight broke out in which the Americans were careful not to reveal their pillbox positions but were unable to prevent Japanese infiltrators from cutting gaps in the barbed wire. Magata attacked at dawn with two battalions and by sheer weight of numbers captured seven pillboxes. 1/129 was moved up from reserve and recaptured two pillboxes, and that evening, searchlights illuminated the low cloud cover while automatic fire was poured into the Japanese positions. The next day, Sherman tanks of 754 Tank Battalion were committed to the fight, and by 14 March the position was restored. Another attack by Magata in the predawn hours of 15 March took a single pillbox before being contained and driven back with the aid of tanks and a strike by 36 aircraft. Yet a third attack on 16 March made little headway. This final attack cost the Japanese 194 dead and one man taken prisoner in exchange for American casualties of 2 dead and 63 wounded.
Kanda now withdrew to regroup, assembling what was left
of
his force to make a final attempt to break through 129 Regiment.
During
the five days that followed, the Americans rebuilt damaged
positions
and buried the Japanese dead. Meanwhile the Allied code breakers
hadintercepted and decoded a message from Hyakutake to Imperial
General Headquarters them of his plan to attack on 23
March. The intercepted message was rushed to Griswold, who was
already dealing with a preliminary assault that had seized a low
ridge
very close to the battalion command post of 2/129 Regiment. The
Japanese penetration was driven back by tanks and infantry on 24
March,
and shortly after noon the Japanese assembly areas opposite 29
Regiment
were hit by the most massive artillery barrage of the Pacific War
to
that point, a counterpreparation
concentration of 14,882 shells. Seven battalions of heavy and
medium
artillery, plus the mortars of 37 Division, participated. Two days
later the Japanese began to retreat to their base at Buin.
Casualties
in the Battle of the Perimeter included 263 Americans
killed and about 5500 Japanese dead. Beightler reflected the mood
of
many Americans when he declared that the Rape of Nanking, in which 6
Division had been a prominent participant, had been avenged.
Part of the reason for the crushing defeat suffered by the Japanese was the poor condition of their troops. American medical personnel who examined Japanese prisoners of war and Japanese dead concluded that90% of the Japanese troops were already suffering from malnutrition, malaria, beri-beri, or other debilitating illnesses. Kanda had taken the same line as Mutaguchi Renya at Imphal, promising his men that they would feast on the American supply dumps once they had broken the American line. It was not to be.
Following the end of the Battle of the Perimeter, Griswold took the view that the Japanese on Bougainville could no longer have any influence on the outcome of the war, and he ordered his division commanders to engage in nothing more than aggressive patrolling. The Japanese were completely cut off from resupply, and by April 1944 their rice ration was cut to 250 grams per day. The rice supply ran out completely in September, and most of Hyakutake's men were put to work on garden plots. Allied pilots took to dropping napalm on the Japanese gardens, and Japanese morale plummeted to the point where desertion was common and there was real danger of mutiny.
With Japanese morale at rock bottom, and the Americans disinclined to stir up trouble pointlessly, a sort of unspoken truce settled over the perimeter (quoted by Gailey 1995):
One night some captured Japanese film of the sinking of the USS Lexington, an aircraft carrier, was being shown along with the regular Hollywood movie at the 37th division theater, possibly at "Loewe's Bougainville." As the Jap planes laid bomb after bomb and torpedo after torpedo into the listing Lexington, there suddenly came shouts of "Banzai! Banzai!" from the tangled but huge branches of a banyan tree on a near side of the rows of seats. A Jap had hidden himself to watch the movie but was overcome with patriotism at the sight of his comrades in the airforce [sic] sending an enemy ship to the bottom! He was pulled from the tree with no trouble and entered the POW compound, perhaps the last victim of the carrier Lexington!
The Australians Take Over. Beginning in October 1944, XIV Corps began to be withdrawn to participate in the Philippines campaign, and the perimeter was taken over by Australian II Corps (Savige). This was composed of 3 Division (Bridgeford; 7, 15, and 29 Brigades) and two independent brigades (11 and 23 Brigades). Savige assumed command of the perimeter on 22 November, and by 12 December all American units had been pulled off the front line.
Blamey and Savige elected to carry out active operations against the Japanese rather than sit idly in the perimeter. The reasons for this controversial decision remain obscure. However, MacArthur had all but shut the Australian Army out of the counteroffensive against Japan, relegating Australian units to secondary operations and garrison duty.Blamey may have felt that the honor of the Australian Army as a first rate fighting force was at stake.
Savige knew that 6 Division, the heart of the
Japanese garrison, was at Buin to the south, and he concentrated
most
of 3 Division on his southern flank. 23 Brigade was ordered to
patrol
aggressively to find the Japanese defenses, and by the time Savige
ordered a general offensive on 23 December, the Australians had
already
made several strong probes into Japanese-held territory. Savige
knew
his force was probably outnumbered, but he was counting on the
poor
morale and dismal physical condition of the Japanese to tip the
balance. In fact, the Japanese were dying of illness and
starvation at
the rate of 3000 per month.
The offensive opened with an attack on Pearl Ridge (155.187E 6.005S) by 25 Battalion on 30 December, which drove five hundred defenders off a strong position in just two days. From here the Australians could observe both coasts of the island. The Australians then installed a 3000' (900m) cable to the ridge and used it to pull a bulldozer to the top to begin construction of a road. The ridge became a major patrol base commanding the central part of the island.
On 31 December, 11 Brigade stepped off for Soraken
Point (154.737E
5.574S)
on the northwest coast of Bougainville, with the ultimate
objective of
driving the Japanese in the northern part of the island into the
Bonis
Peninsula (154.728E
5.449S)
and there destroying them. The brigade advanced rapidly until 19
January, when advance patrols discovered that the Japanese were
dug in
on Tsimba Ridge (154.738E
5.699S).
Savige was reluctant to commit his tanks, and took until 6
February to
finally dislodge the Japanese. On 26 March a combined ground
attack and
amphibious landing forced the Japanese out of Soraken Point and
into
the Bonis Peninsula.
The thousand-man garrison at Kieta was contained by guerrilla forces that controlled much of central Bougainville and claimed over two thousand Japanese killed by the end of the war.
The main effort in the south kicked off on 28 December and was spearheaded by 29 Brigade. The first serious resistance was encountered on the Hupai River (155.237E 6.502S) on 10 January, where the Australians were forced to bring up antitank guns to clear a line of pillboxes. The Australians then rapidly advanced to more open terrain and on 11 February seized Mosigetta (155.317E 6.500S). Anticipating more serious resistance further south, Savige committed his tanks on 17 March, and on 19 March, 25 Battalion cleared a system of pillboxes on its line of advance. Warned by intelligence that Kanda was about to launch a major counteroffensive, the Australians dug in around a terrain feature dubbed Slater's Knoll (155.345E 6.573S). A pair of probing attacks by the Japanese on 27 March were followed by the main assault on 30 March, which struck a single Australian company south of the knoll. Four bayonet charges were beaten off, but only 16 Australians in the position were left unwounded, and the line was pulled back to the knoll. The counteroffensive spent itself on 5 April, when waves of Japanese charged into massed automatic weapons fire and artillery barrages. Out of a force consisting of 2400 of Kanda's freshest troops, at least 620 were killed and another 1000 wounded. Thereafter Kanda reverted to a purely defensive strategy and began moving troops from the Shortlands to Biak.
Meanwhile 11 Brigade in the north was almost a spent
force.
An attempt to flank the Japanese lines with an amphibious landing
on 8
June nearly ended in disaster, and the Australians made no further
attempt to clear the Bonis Peninsula during the remaining weeks of
the
war.
Savige took another two weeks to regroup his forces in
the
south, then resumed a slow advance towards Buin, supported by
massive
air strikes by New Zealand
Corsairs.
By 3 July Savige was ready to launch the final drive towards Buin,
but
drenching rain repeatedly forced him to postpone the offensive,
which
was finally called off on 11 August when word arrived of the
imminent
Japanese capitulation. The
Australians had suffered casualties of 516 killed and 1572 wounded
without driving the Japanese out of Buin.
The Japanese in turn surrendered just 21,090 soldiers and sailors
out
of a force that had started with perhaps 65,000 men.
 |
 |
 |
 |
 |
 USMC |
 USMC |
 USMC |
 USMC |
 USMC |
 NARA |
 NARA |
 NARA |
 NARA |
 NARA |
References
Miller
(1959; accessed 2013-7-26)
Pacific Wreck Database (accessed 2008-4-28)
Rentz
(1946; accessed 2013-7-8)
The Pacific War Online Encyclopedia © 2007-2008,2010-2013 by Kent G. Budge. Index