 The Pacific War Online Encyclopedia
|
| Previous: Leyte | Table of Contents | Next: Li Cheng-hsien |
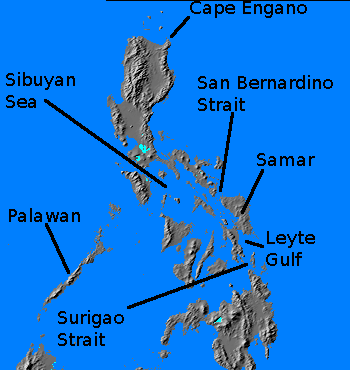
Leyte Gulf is a somewhat exposed anchorage
on the eastern edge of
the Philippines,
with a small
port at Tacloban
on Leyte.
It was the site of an American
invasion
in October 1944 that led to a full-scale naval battle between the U.S.
and Japanese
fleets.
By 12 September 1944, the Allies were firmly established in the Marianas and western New Guinea and were poised to seize Morotai, Peleliu, Yap, and Ulithi. The Philippines had been chosen over Formosa
in July 1944 as the ultimate objective of the Southwest Pacific and
Central Pacific counteroffensives, and their liberation would cut the
remaining sea lanes between Japan and the resources of the Netherlands East Indies.
MacArthur originally planned to invade Mindanao at Sarangani Bay on 25 October 1944, in order to secure airfields from which to cover the invasion of Leyte on 15 November. However, Halsey encountered very little air opposition during his carrier strikes in the area in mid-September 1944, and a pilot from Hornet who had crashed on Leyte and been spirited out by guerrillas reported that there were few Japanese on the island. Halsey proposed Mindanao be bypassed and Leyte seized with naval air cover alone. This suggestion was adopted at the OCTAGON conference on 15 September 1944, and the invasion date for Leyte was advanced to 20 October 1944.
The invasion would be a massive operation, supported by most of the naval power of Kinkaid's 7 Fleet and Halsey's 3 Fleet. Unfortunately, command arrangements for the Leyte campaign were muddled, as the Philippines lay close to the theater boundaries for the Southwest Pacific Area, Pacific Ocean Areas, and China-Burma-India theaters. Although MacArthur commanded Kinkaid's 7 Fleet in immediate support of the landing operations, distant cover was provided by the fast carriers of 3 Fleet, which was the main striking force of Pacific Fleet under Nimitz. There was not even a direct communication channel between Halsey and Kinkaid, and messages relayed through Manus sometimes took hours to arrive. This divided command would have important consequences during the battle. In particular, Halsey was under orders to make the destruction of the Japanese Fleet, not the protection of the amphibious forces, his highest priority.
Another command complication was that the amphibious elements of 3 Fleet were transferred to 7 Fleet for the landings. This
left Halsey with little more than Task Force 38 under his command, and
Halsey could not resist the temptation to bypass the highly competent Mitscher and issue orders directly to the individual task groups within Task Force 38.
The Japanese anticipated that the next Allied move would likely be against either the Philippines, Formosa, or the Ryukyus and, if successful, would cut off Japan's supply of oil. Faced with this looming disaster, the Japanese prepared a set of contingency plans (Sho Go,
"Victory Operation") for committing their entire remaining naval
strength against the Allied move. However, the unexpected swiftness of
the Allied offensive caught the Japanese off-balance and poorly
prepared.
The Japanese contingency plan for the defense of the Philippines, Sho Ichi Go ("Victory Operation One"), was activated on 22 October 1944, when word reached Tokyo that the Americans had begun landings at Leyte. Because of massive attrition at the Battle of the Philippine Sea and over Formosa and a shortage of fuel to complete the training of new pilots, the Japanese had virtually no aircraft or pilots for Ozawa's remaining carriers. However, the Japanese Navy still had powerful surface forces (under Kurita) built around the Yamato and Musashi. These were based at Singapore in order to be close to their fuel supplies, while the carrier forces remained in the Inland Sea to conduct as much pilot training as the fuel supply permitted. In order to give Kurita a chance to reach and destroy the American amphibious force, Ozawa was ordered to deliberately allow his force to be spotted and pursued by Halsey. While Halsey was thus diverted to the north, Kurita was to split his force, taking the main body through San Bernardino Strait north of Leyte Gulf while a detachment under Nishimura would enter Leyte Gulf through Surigao Strait to the south in order to trap the Allied transports between them. Nishimura was to be joined by Shima, who was coming south with a small force of cruisers and destroyers that had eluded a trap set by Halsey off Formosa. Meanwhile, a small detachment from Kurita's fleet was assigned to transport reinforcements from Manila to Leyte.
Because of their lack of carrier aircraft, the Japanese
were forced to rely primarily on land-based aircraft. There were
several hundred aircraft scattered throughout
the Philippines, but serviceability rates were low and not more than
about 200 aircraft participated in the battle. These would be employed
primarily in strikes against the American carriers, rather than as air
cover for the Japanese naval surface forces, because it was believed
that the inexperienced Japanese pilots would have a better chance of
protecting the fleet by disabling the American flight decks than by
attempting to intercept American air strikes. Postwar, staff officers
from 2 Air Fleet claimed that they always kept ten fighters above Kurita's force, but Kurita claimed that he never saw any air cover.
The Japanese plan was overly complex and went badly
from the start. It
relied too heavily on close coordination of widely separated forces who
communications proved highly unreliable during the battle. Furthermore,
the Japanese command structure was at least as muddled as that of
the Allies. Ozawa should have been the overall commander of the
operation, but the reduction of his carrier fleet to adecoy force left
Kurita as commander of the most crucial fleet element. Nishimura was an
unimaginative officer with a death wish who did not get along with
Shima, who commanded the weaker force but was slightly senior. This may
explain why the plan did not call for Shima and Nishimura to join
forces until the last moment. What is harder to understand is why the
Japanese did not assign Shima to carry out the transport mission from
Manila to Leyte in place of a detachment from Kurita's force.
Kurita's force was discovered off Palawan on 23 October 1944 by submarines Darter and Dace, which sank Atago and Maya and severely damaged Takao. Kurita also detailed two destroyers to escort Takao to safety, which took them out of the battle. The American submarine commanders found their approach simplified by the low speed of Kurita's force, just 16 knots, and by Kurita's failure to station any picket destroyers ahead of his main force. Furthermore, Kurita had chosen a narrow passage west of Palawan that was out of range of Allied airreconnaissance but gave him little room for maneuver. The contact report from the American submarines was the first indication to Allied intelligence that the main strength of the Japanese Navy was coming out to contest the Leyte landings. However, Darter ran aground in the poorly charted reefs of Palawan while maneuvering for a second attack (there had been no opportunity for a navigational fix in over 24 hours) and had to be scuttled, her crew being taken off by Dace.
That same day, submarine Bream spotted and torpedoed Aoba with Sakonju's Transport Force. Only
one of the six torpedoes in the salvo hit the cruiser, but this was
sufficient to cripple the cruiser, which was never repaired.
On receiving Darter and Dace's contact report, Halsey immediately alerted the fleet and recalled McCain's Task Group 38.1, which was on its way to Ulithi for rest and replenishment. The next four days saw the largest fleet action in history. Historians have generally divided the battle into four major engagements and a number of lesser engagements.
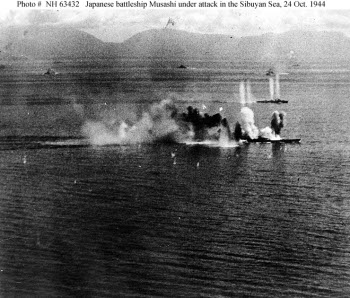
Naval Historical Center #NH 63432
Battle of the Sibuyan
Sea. All through 24 October 1944, Kurita's force was hammered
from the air by
strikes from Halsey's carriers. The giant battleship Musashi
sank after taking 17 bomb hits and
19 torpedo hits. Her commander
attempted to beach her, but she capsized at 1935 with the loss of 1,096 of her
crew. Battleships Yamato and Nagato
each took two bomb hits that inflicted significant damage to their
upper
works, hindering fire control and communications, and heavy cruiser Myoko
took a torpedo hit that damaged two shafts and forced her to withdraw
Fighter protection from land bases was nonexistent, and the
Japanese antiaircraft fire,
while voluminous, was largely ineffective. Just 18 Allied aircraft were
shot down out of 259 sorties against the Japanese force.
At 1600, Kurita
finally reverse course while broadcasting pleas for air cover.
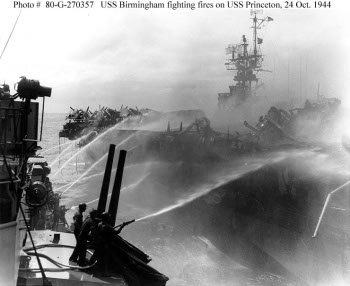
National Archives #80-G-270357
The American carriers also came under attack from
land-based aircraft and Ozawa's small force of carrier aircraft. While
the American combat air patrol was
driving off three Japanese strikes of about 50-60 land-based aircraft,
a single Judy dive bomber broke through the
cloud cover and put its bomb through
the flight deck of light carrier
Princeton. The blast ignited
gasoline in the hangar deck and the flames began detonating torpedoes loaded on TBF Avengers. The crew fought the fire for almost six
hours before the flames reached the torpedo magazine and a massive
explosion blew up the stern of the ship. There were heavy casualties on
cruiser Birmingham, alongside assisting
with firefighting, and Princeton
was scuttled shortly thereafter.
Meanwhile, Ozawa was trying to be detected by the
Americans, unaware that his radio transmitter was malfunctioning and
preventing his radio traffic from being heard by either friend or
foe.
However, he had launched his own strike, which was broken up by the American Hellcats
some 45 miles (70 km) northeast of Sherman's task group. This suggested
to the the Americans that the Japanese carriers were somewhere to the
north, and a search plane finally spotted Ozawa at 1540. Halsey,
overestimating the damage to Kurita's force and believing it was
retiring for good, took off in hot
pursuit of
Ozawa with all his forces. Now it was the Americans whose plans were
thrown into confusion. Halsey had transmitted a contingency plan for
detaching his battle line as Task Force 34 to guard San Bernardino
Strait. However, with Kurita seemingly in retreat, Halsey decided this
was unnecessary. But the original message was the only one seen by
other senior commanders (such as Kinkaid
with 7 Fleet in
Leyte Gulf), and they were left with the
mistaken impression that San Bernardino Strait was being watched.
At 1935 a night reconnaissance
flight from Independence found that
Kurita's force had returned to a course for San Bernardino Strait. It
is unclear why Halsey did not then detach Task Force 34 to cover the
strait. Mitscher, possibly
smarting from having been bypassed all day by Halsey (who issued orders
directly to Mitscher's task group commanders), declined to radio such a
recommendation to Halsey. Three of Halsey's task force commanders also
wondered at the order, and Bogan
went so far as to contact Halsey's staff with the information that the
navigation lights in San Bernardino Strait were lit. He was brushed
off, and made no further protest. Lee,
the battle line commander, correctly deduced that Ozawa's force was a
decoy with little striking power, but his signal to Halsey warning that
Kurita was likely to come out of San Bernardino Strait was also brushed
off. Halsey's failure to guard the strait must be judged one of the
great blunders of the Pacific War.
Battle of Surigao Strait. Nishimura's force was sighted around 0950 on 24 October, but no strikes were launched against him and no further sightings were made that day. However, Kinkaid correctly guessed Nishimura's intentions to come through Surigao Strait during the night. Thinking his rear was covered, Kinkaid ordered Oldendorf to take the heavy units of 7 Fleet to lay an elaborate trap for Nishimura's force. Nishimura's ships were attacked by waves of PT boatsand destroyers even before coming within range of Oldendorf's waiting battle line. Only one Japanese destroyer escaped out of the original force of two battleships, a cruiser, and four destroyers. American losses were limited to one PT boat sunk and several damaged and serious damage to destroyer Albert W. Grant, which was caught in the crossfire between the two forces and hit by shells from both sides. Shima, who had already had a destroyer crippled by the PT boats, encountered the shattered remnants of Nishimura's fleet, suffered a collision between Nachi and Mogami, and prudently withdrew.
Battle off Samar. Meanwhile, Kurita had reversed course again and slipped through San Bernardino Strait, albeit seven hours later than the Japanese had originally planned. He found to his surprise that the strait was unguarded. As dawn broke, his lookouts spotted several escort carriers protected by destroyers and destroyer escorts, which he mistook for fleet carriers protected by cruisers and destroyers. The American ships were completely outgunned and at least twelve knots slower than Kurita’s cruisers, but fought fiercely, and American aircraft in the area made repeated passes against Kurita’s ships even after expending whatever munitions they were carrying. Kurita believed he was up against much stronger forces than was the case, and he retreated back through San Bernardino Strait after sinking three destroyers and an escort carrier. He left one of his own cruisers sinking.
At about the same time, land-based air units carried out
the first kamikaze attacks of
the war, sinking the escort carrier St.
Lo and badly damaging two others.
Battle of Cape Engano. Meanwhile, Halsey was in the process of annihilating Ozawa’s force (he had already sunk Chitose and Chiyoda) when a message reached him from Nimitz in Hawaii. The original message was a simple query: “Where is Task Force 34?” However, Nimitz’ communications technician, perhaps sensing a certain urgency in the query, saw fit to slightly strengthen the message. A further gaffe occurred due to a poor choice of padding: Like all coded U.S. messages, the message had been padded at its beginning and end with phrases that were supposed to be nonsense. The end padding sufficiently resembled part of the message that it was left in place by Halsey’s decoders, and the message ultimately handed to Halsey read: “WHERE IS RPT WHERE IS TASK FORCE 34 XX THE WORLD WONDERS”. Halsey reportedly threw his hat on the deck and started weeping with rage, then returned with his battleship force and one of his carrier task forces to San Bernardino Strait — too late to catch Kurita, although Halsey's carrier task force was able to sink a cruiser and two destroyers from Kurita's fleeing force. It hardly mattered; the Japanese Navy was practically finished as a fighting fleet. Halsey's other two carrier task groups were able to finish off carriers Zuiho and Zuikaku and sink an additional cruiser and two destroyers from Ozawa's force before they, too, were forced to break off the pursuit.
The Battle of Leyte Gulf was a decisive American victory, yet it did not reflect all that well on the Americans, who had overwhelming superiority in numbers. Halsey's blunder (few historians now call it anything else) was the most serious mistake on the American side, but most of the men of 3 Fleet were exhausted from prolonged operations, and it showed. The air strikes against Kurita on 24 October 1944 scored only 45 hits with 259 strike aircraft. On the other hand, the Japanese performance was even worse than that of the Americans. Kurita badly mismanaged the battle off Samar even before giving the command to withdraw, and the Japanese gunfire against the American escort carriers was notably inaccurate. The battle resembled the final round of a heavyweight prize fight, with both boxers exhausted and barely able to remain on their feet.
| 14 Area Army (Yamashita) |
|||||||
| |
35 Army (Suzuki) |
||||||
| |
16 Division (Makino) | ||||||
| Combined Fleet (Toyoda) |
|||||||
| |
Mobile Force (Ozawa) |
||||||
| Main Body (Northern Force) (Ozawa) | |||||||
| Carrier Division 3 (Ozawa) | Combined air strength: 80 A6M Zero, 25 B6N Jill, 4 B5N Kate, 7 D4Y Judy |
||||||
| CV Zuikaku CVL Zuiho CVL Chitose CVL Chiyoda 80 A6M Zero 25 B6N "Jill" 4 B5N "Kate" 7 D4Y "Judy" |
Sunk Sunk Sunk Sunk |
||||||
| Carrier Division 4 (Matsuda) |
|||||||
| CVBB Hyuga CVBB Ise |
|||||||
| Destroyer Division 61 |
|||||||
| DD Hatsuzuki DD Akitsuki DD Wakatsuki DD Shimotsuki |
Sunk Sunk On loan from Destroyer Division 41 |
||||||
| Escort Squadron 31 (Edo) |
|||||||
| CL Isuzu |
|||||||
| Destroyer Division 43 |
|||||||
| DE Maki DE Kiri DE Kuwa DE Sugi |
|||||||
| CL Oyodo CL Tama |
Sunk |
||||||
| Supply Unit |
|||||||
| DD Akikaze CD-22 CD-29 CD-31 CD-33 CD-43 CD-132 AO Jinei Maru AO Takane Maru |
Sunk |
||||||
| First Striking Force (Kurita) |
|||||||
| Force "A" (Center Force) (Kurita) | |||||||
| |
First Section (Kurita) | ||||||
| |
|
Battleship Division 1 (Ugaki) |
|||||
| BB Yamato BB Musashi BB Nagato |
Sunk |
||||||
| Cruiser Division 4 (Kurita) | |||||||
| CA Atago CA Takao CA Chokai CA Maya |
Sunk Severely damaged Sunk Sunk |
||||||
| Cruiser Division 5 (Hashimoto) |
|||||||
| CA Myoko CA Haguro |
|||||||
| Destroyer Squadron 2 (Hayakawa) |
|||||||
| CL Noshiro DD Shimakaze |
Sunk |
||||||
| Destroyer Division 2 |
|||||||
| DD Hayashimo DD Akishimo |
Sunk |
||||||
| Destroyer Division 31 |
|||||||
| DD Kishinami DD Okinami DD Naganami DD Asashimo |
|||||||
| Destroyer Division 32 |
|||||||
| DD Hamanami DD Fujinami |
Sunk |
||||||
| Second Section (Suzuki) |
|||||||
| Battleship Division 3 (Suzuki) | |||||||
| BB Kongo BB Haruna |
|||||||
| Cruiser Division 7 (Shiraishi) |
|||||||
| CA Kumano CA Suzuya CA Chikuma CA Tone |
Sunk Sunk |
||||||
| Destroyer Squadron 10 (Kimura) |
|||||||
| CL Yahagi DD Nowaki DD Kiyoshimo |
Sunk |
||||||
| Destroyer Division 17 |
|||||||
| DD Urakaze DD Yukikaze DD Hamakaze DD Isokaze |
|||||||
| Force "C" (Van of Southern Force) (Nishimura) |
|||||||
| Battleship Division 2 (Nishimura) |
|||||||
| BB Yamashiro BB Fuso CA Mogami |
Sunk Sunk Sunk |
||||||
| Destroyer Division 4 |
|||||||
| DD Michishio DD Asagumo DD Yamagumo DD Shigure |
Sunk Sunk Sunk On loan from Destroyer Squadron 2 |
||||||
| Southwest Area Force (Mikawa; at Manila) |
|||||||
| Second Striking Force (Rear of Southern Force) (Shima) |
|||||||
| Cruiser Division 21 (Shima) |
|||||||
| CA Nachi CA Ashigara |
|||||||
| Destroyer Squadron 1 (Kimura) |
|||||||
| CL Abukuma |
Sunk |
||||||
| Destroyer Division 7 |
|||||||
| DD Akebono DD Ushio |
|||||||
| Destroyer Division 18 |
|||||||
| DD Kasumi DD Shiranuhi |
Sunk |
||||||
| Destroyer Division 21 |
|||||||
| DD Wakaba DD Hatsushimo DD Hatsuharu |
Sunk |
||||||
| Troop Transport Unit (Sakonju) |
|||||||
| Cruiser Division 16 (Sakonju) | |||||||
| CA Aoba CL Kinu DD Uranami APD T-6 LS T-101 LS T-102 LS T-131 |
Severely damaged Sunk Sunk Sunk |
||||||
| Fifth Base Air Force and First Air Fleet (Onishi; at Clark) |
Adequate records were never found from which to reconstruct the order of battle for Japanese land-based air forces. Most sources simply speak of several hundred land-based aircraft in the Philippines. During the air battles of 24 October, the American carrier groups were raided by a total of perhaps 200-300 aircraft, but these include Ozawa's carrier aircraft. There were additional kamikaze raids during the Battle of Samar. | ||||||
| 6 Fleet (Miwa) |
|||||||
| AS Tsukushi Maru |
|||||||
| 1 Submarine Force (Miwa) | |||||||
| "A" Division |
|||||||
| SS I-26 SS I-45 SS I-53 SS I-54 SS I-56 |
Sunk Sunk Sunk |
||||||
| "B" Division |
|||||||
| SS I-38 SS I-41 SS I-44 SS I-46 SS Ro-41 SS Ro-43 SS Ro-46 |
|||||||
| "C" Division |
|||||||
| SS Ro-109 SS Ro-112 |
|||||||
| Ulithi Attack Group |
|||||||
| SS I-36 SS I-37 SS I-47 |
Sunk |
||||||
| Southwest Pacific Area (MacArthur) |
||||||||
| |
6 Army (Krueger; in Wasatch) |
|||||||
| |
X Corps (Sibert; in Blue Ridge) | |||||||
| 24 Division (Irving) | ||||||||
| 1 Cavalry Division (Mudge) | ||||||||
| XXIV Corps (Hodge) | ||||||||
| 7 Division (Arnold) | ||||||||
| 96 Division (Bradley) | ||||||||
| 7 Fleet (Kinkaid; in Wasatch) |
||||||||
| Task Force 77 (Kinkaid; in Wasatch) | ||||||||
| Task Group 77.1 Fleet Flagship Group (Kinkaid; in Wasatch) | ||||||||
| AGC Wasatch CL Nashville DD Ammen DD Mullany DD Abner Read DD Bush |
||||||||
| Task Force 78 Northern Attack Force (Barbey) |
Embarking X Corps (Sibert) |
|||||||
| Task Group 78.1 Palo Attack Group (Barbey) | Embarking 24 Division (Irving) minus 21 Regimental Combat Team |
|||||||
| AGC Blue Ridge |
||||||||
| Transport Unit |
||||||||
| Transport Division 24 |
||||||||
| APA Du Page APA Fuller APA Elmore APA Wayne AKA Aquarius AP John Land LSD Gunston Hall |
||||||||
| Transport Division 6 |
||||||||
| APA Fayette APA Ormsby APA Leedstown AKA Titania AK Hercules LSD Epping Forest LSD Carter Hall |
||||||||
| Screen |
||||||||
| DD John Rodgers DD Murray DD Harrison DD McKee 3 PC 1 SC 2 LCI(G) 5 LCI(R) 9 LCI 3 PCE 1 FP 3 LSM AT Apache AT Quapah |
||||||||
| LST Group 20 |
||||||||
| 12 LST |
||||||||
| Task Group 78.2 San Ricardo Attack Group (Fechteler) |
Embarking 1 Cavalry Division (Mudge) |
|||||||
| APA Fremont |
||||||||
| Transport Unit |
||||||||
| Transport Division 32 |
||||||||
| APA Harris APA Barnstable AP Herald of the Morning AKA Arneb LSD White Marsh |
||||||||
| Transport Division 20 |
||||||||
| APA Leonard Wood APA Pierce APA James O'Hara AP La Salle AKA Electra LSD Oak Hill 9 LSM |
||||||||
| Destroyer Screen |
||||||||
| DD Fletcher DD La Vallette DD Jenkins DD Anderson 4 PC 1 SC 2 LCI(G) 6 LCI(R) AT Sonoma |
Sunk |
|||||||
| LST Flotilla 7 |
||||||||
| 14 LST | ||||||||
| Fire Support Unit North (Weyler) |
||||||||
| BB Mississippi BB Maryland BB West Virginia DD Cony DD Aulick DD Sigourney |
||||||||
| Task Group 78.3 Panaon Attack Group (Struble) |
Embarking 21 Regimental Combat Team, 24 Division |
|||||||
| DD Hughes LSI Kanimbla LSI Manoora LSI Westralia CM Ariadne |
||||||||
| Escorts |
||||||||
| DD Schroeder DD Sigsbee DD Ringgold DD Dashiell |
||||||||
| Control and Support Unit |
||||||||
| 2 PC 2 LCI(G) 2 LCI(R) 1 LCI(D) |
||||||||
| Task Group 78.4 Dinagat Attack Group (Struble) |
Embarking 6 Ranger Battalion and Company B, 21 Regiment |
|||||||
| APD Kilty APD Schley APD Ward APD Herbert APD Crosby AT Chickasaw |
||||||||
| Escorts |
||||||||
| DD Lang DD Stack PF Gallup DE Bisbee |
||||||||
| Task Group 78.6 Reinforcement Group One |
Arriving 22 October 1944 |
|||||||
| APA Crescent City APA Warren APA Windsor APA Callaway APA Leon APA Sumter AP Storm King AK Jupiter ARL Achilles 4 other AK 12 LCI |
||||||||
| LST Flotilla 8 |
||||||||
| 32 LST | ||||||||
| Escort |
||||||||
| Destroyer Squadron 2 |
||||||||
| DD Morris DD Howorth DD Stevens DD Mustin PF Carson City PF Burlington |
||||||||
| Task Group 78.7 Reinforcement Group Two |
Arriving 24 October 1944 |
|||||||
| LST Flotilla 14 |
||||||||
| 33 LST | ||||||||
| 24 cargo ships, mostly Liberty Ships |
||||||||
| Destroyer Squadron 21 |
||||||||
| DD Nicholas DD O'Bannon DD Hopewell DD Taylor PF Muskogee PF San Pedro |
||||||||
| Task Group 78.8 Reinforcement Group Three |
Arriving 29 October 1944 |
|||||||
| 6 LST 19 Liberty and Victory ships |
||||||||
| Destroyer Squadron 5 |
||||||||
| DD Flusser DD Mahan DD Drayton DD Smith DD Lamson PF Eugene PF El Paso PF Van Buren PF Orange |
||||||||
| Task Force 79 Souther Task Force (Wilkinson) |
Embarking XXIV Corps (Hodge) |
|||||||
| AGC Mount Olympus |
||||||||
| Task Group 79.1 Attack Group "Able" (Conolly) |
Embarking 7 Division (Arnold) |
|||||||
| AGC Appalachian |
||||||||
| Task Group 79.3 Transport Group "Able" |
||||||||
| Transport Division 7 |
||||||||
| APA Cavalier APA J. Franklin Bell APA Feland AP Golden City AKA Thuban LSD Lindenwald |
||||||||
| Transport Division 30 |
||||||||
| APA Knox APA Calvert APA Custer APH Rixey AKA Chara LSD Ashland |
||||||||
| Transport Division 38 |
||||||||
| APA Lamar APA Alpine APA Heywood AP Starlight AP Monitor AK Alshain |
||||||||
| Transport Division "X-Ray" |
||||||||
| APA George Clymer APA President Hayes AK Mercury |
||||||||
| Screen |
||||||||
| Destroyer Squadron 48 |
||||||||
| DD Erben DD Walker DD Hale DD Abbot DD Black DD Chauncey DD Braine DD Gansevoort |
||||||||
| Task Group 79.5 LST Flotilla 16 |
||||||||
| 31 LST | ||||||||
| Task Group 79.11 Destroyer Screen for LST and LCI of "Able" and "Baker" |
||||||||
| Destroyer Squadron 54 |
||||||||
| DD Remey DD Mertz DD Monssen DD McDermut DD McGowan DD McNair DD Melvin |
||||||||
| 3 PCE(R) |
||||||||
| Control Vessels |
||||||||
| DD Stembel 3 PC 3 PC(S) 3 SC |
||||||||
| LCI Gunboat Unit |
||||||||
| 18 LCI(G) | ||||||||
| Salvage and Firefighting Unit |
||||||||
| 2 LCI(L) | ||||||||
| LCT Unit |
||||||||
| 12 LCT |
||||||||
| Task Group 79.2 Attack Group "Baker" (Royal) |
Embarking 96 Division (Bradley) |
|||||||
| AGC Rocky Mount |
||||||||
| Task Group 79.4 Transport Group "Baker" |
||||||||
| Transport Division 10 |
||||||||
| APA Clay APA Arthur Middleton APA Baxter APA William P. Biddle APA George F. Elliott AKA Capricornus Vehicle Landing Ship Catskill |
||||||||
| Transport Division 18 |
||||||||
| APA Cambria APA Monrovia APA Frederick Funston AP War Hawk AKA Alcyone LSD Casa Grande LSD Rushmore |
||||||||
| Transport Division 28 |
||||||||
| APA Bolivar APA Sheridan APA Doyen AP Comet AKA Almaack AK Auriga LSD Belle Grove |
||||||||
| Destroyer Screen |
||||||||
| Destroyer Squadron 49 |
||||||||
| DD Picking DD Sproston DD Fletcher DD Isherwood DD Charles J. Badger DD Halligan DD Haraden DD Twiggs DD MacDonough |
||||||||
| LST Flotilla 3 |
||||||||
| DD Luce 24 LST |
||||||||
| Control Unit | ||||||||
| 3 PC 4 SC 3 YMS |
||||||||
| LCI Flotilla 14 |
||||||||
| 4 LCI(M) 4 LCI(E) 9 LCI(G) 2 LCI(L) |
||||||||
| LSM Unit |
||||||||
| 6 LSM | ||||||||
| LCT Unit |
||||||||
| 11 LCT | ||||||||
| Fire Support Unit South (Oldendorf; in Louisville) |
||||||||
| Battleship Division 2 (Chandler) |
||||||||
| BB Tennessee BB California BB Pennsylvania |
||||||||
| Cruiser Division 4 (Oldendorf) |
||||||||
| CA Louisville CA Portland CA Minneapolis |
||||||||
| Cruiser Division 9 (Ainsworth) |
||||||||
| CL Honolulu |
||||||||
| Cruiser Division 12 (Hayler) |
||||||||
| CL Denver CL Columbia |
||||||||
| Destroyer Screen |
||||||||
| Destroyer Squadron 56 |
||||||||
| DD Leutze DD Newcomb DD Bennion DD Heywood L. Edwards DD Richard P. Leary |
||||||||
| Destroyer Division 112 |
||||||||
| DD Robinson DD Ross DD Albert W. Grant DD Bryant DD Halford DD Claxton DD Thorn DD Welles |
Severely damaged by friendly fire |
|||||||
| Task Group 77.4 Escort Carrier Group (T.L. Sprague) |
||||||||
| "Taffy 1" (T.L. Sprague) | ||||||||
| CVE Sangamon |
||||||||
| Air Group 37: 12 F6F-3 Hellcat, 5 F6F-5 Hellcat 9 TBM-1C Avenger |
||||||||
| CVE Sangamon | ||||||||
| Air Group 60: 22 F6F-3 Hellcat 9 TBM-1C Avenger |
||||||||
| CVE Sangamon | ||||||||
| Air Group 35: 22 F6F-3 Hellcat 9 TBM-1C Avenger |
||||||||
| CVE Santee | ||||||||
| Air Group 26: 24 FM-2 Wildcat 6 TBF-1C Avenger, 3 TBM-1C Avenger |
||||||||
| Carrier Division 28 (Henderson) |
||||||||
| CVE Saginaw Bay |
||||||||
| VC-78: 15 FM-2 Wildcat, 12 TBM-1C Avenger |
||||||||
| CVE Petrof Bay | ||||||||
| VC-76: 16 FM-2 Wildcat, 10 TBM-1C Avenger | ||||||||
| Screen |
||||||||
| DD McCord DD Trathen DD Hazelwood DE Edmonds DE Richard S. Bull DE Richard M. Rowell DE Eversole DE Coolbaugh |
Sunk |
|||||||
| "Taffy 2" (Stump) |
||||||||
| CVE Natoma Bay |
||||||||
| VC-81: 16 FM-2 Wildcat, 12 TBM-1C Avenger | ||||||||
| CVE Manila Bay | ||||||||
| VC-80: 16 FM-2 Wildcat, 12 TBM-1C Avenger | ||||||||
| Carrier Division 27 (Sample) |
||||||||
| CVE Marcus Island |
||||||||
| VC-21: 12 FM-2 Wildcat, 11 TBM-1C Avenger | ||||||||
| CVE Kadashan Bay |
||||||||
| VC-20: 15 FM-2 Wildcat, 11 TBM-1C Avenger | ||||||||
| CVE Savo Island |
||||||||
| VC-27: 16 FM-2 Wildcat, 12 TBM-1C Avenger | ||||||||
| CVE Ommaney Bay |
||||||||
| VC-75: 16 FM-2 Wildcat, 11 TBM-1C Avenger | ||||||||
| Screen |
||||||||
| DD Haggard DD Franks DD Hailey DE Richard W. Suesens DE Abercrombie DE Oberrender DE LeRay Wilson DE Walter C. Wann |
||||||||
| "Taffy 3" (C.A.F. Sprague) |
||||||||
| CVE Kadashan Bay | ||||||||
| VC-68: 16 FM-2 Wildcat, 12 TBM-1C Avenger | ||||||||
| CVE St. Lo |
Sunk |
|||||||
| VC-65: 17 FM-2 Wildcat, 12 TBM-1C Avenger | ||||||||
| CVE White Plains |
||||||||
| VC-4: 16 FM-2 Wildcat, 12 TBM-1C Avenger | ||||||||
| CVE Kalinin Bay |
||||||||
| VC-3: 16 FM-2 Wildcat, 1 TBF-1C Avenger, 11 TBM-1C Avenger | ||||||||
| Carrier Division 26 (Ofstie) |
||||||||
| CVE Kitkun Bay |
Damaged |
|||||||
| VC-4: 14 FM-2 Wildcat, 12 TBM-1C Avenger | ||||||||
| CVE Gambier Bay | Sunk |
|||||||
| VC-10: 18 FM-2 Wildcat, 12 TBM-1C Avenger | ||||||||
| Screen |
||||||||
| DD Hoel DD Heermann DD Johnston DE Dennis DE John C. Butler DE Raymond DE Samuel B. Roberts |
Sunk Sunk Sunk |
|||||||
| Task Group 77.3 Close Covering Group (Berkey) | ||||||||
| CL Phoenix CL Boise CA Australia CA Shropshire |
||||||||
| Destroyer Screen | ||||||||
| Destroyer Squadron 24 | ||||||||
| DD Hutchins DD Bache DD Beale DD Daly DD Killen DD Arunta DD Warramunga |
||||||||
| Task Group 77.5 Minesweeping and Hydrographic Group |
||||||||
| DMS Hovey DM Preble DM Breese APD Sands AM Token AM Tumult AM Velocity AM Zeal AM Requisite AM Pursuit AM Revenge AM Sage AM Salute AM Saunter AM Scout AM Scrimmage AM Sentry DMS Southard DMS Chandler DMS Long DMS Hamilton DMS Howard DMS Palmer 26 YMS PF Gascoyne HDML-1074 |
||||||||
| Task Group 77.6 Beach Demolition Group |
||||||||
| APD Talbot APD Manley APD Goldsborough APD Kane APD Brooks APD Belknap APD Overton APD Humphreys APD Rathburne APD George E. Badger APD Clemson |
Embarking UDT 3, 4, 5, 6, 8, 9, and 10 |
|||||||
| Task Group 73.7 Seaplane Tenders, San Pedro Bay |
||||||||
| AVP San Carlos AVP Half Moon |
||||||||
| Patrol Squadron 34 |
||||||||
| 12 PBY-5 Catalina |
||||||||
| Task Group 70.1 Motor Torpedo Boat Squadrons Seventh Fleet |
||||||||
| AGP Oyster Bay AGP Wachapreague AGP Willoughby 39 PT deployed in 13 sections |
One sunk |
|||||||
| Task Group 77.7 Service Force (Glover) |
||||||||
| Fueling at Sea Unit |
||||||||
| AO Saranac AO Ashtabula AO Salamonie AO Suamico AOG Kishwaukee AO Schuylkill AO Tallulah AE Mazama AE Durham Victory AE Iran Victory AE Bluefield Victory AE Canada Victory |
||||||||
| Escort Unit |
||||||||
| DE Whitehurst DE Witter DE Bowers |
||||||||
| Kossol Roads Unit |
||||||||
| AO Chepachet 2 merchant AO DE Willmarth |
||||||||
| Leyte Gulf Unit |
||||||||
| IX Arethusa IX Caribou IX Mink IX Panda IX Porcupine AO Bishopdale AW Severn AKN Indus AN Teak AN Silverbell AN Satinleaf ARL Achilles ARS Cable ARB Midas ARD-19 AE Murzim AE Poyang AE Yunnan AF Arequipa AF Calamaries AF Mizar AF Octans AK Crux AK Ganymede AK Triangulum AKS Pollux AKS Acubens AK Merkur AH Mercy AH Comfort |
||||||||
| Task Force 71 |
||||||||
| Task Group 71.1 Supporting Submarines Seventh Fleet |
||||||||
|
SS Darter SS Dace SS Angler SS Bluegill SS Bream SS Raton SS Guitarro |
Scuttled after grounding |
|||||||
| Pacific Fleet (Nimitz) |
||||||||
| 3 Fleet (Halsey; on BB New Jersey) |
||||||||
| Task Force 38 Fast Carrier Force (Mitscher; on CV Lexington) |
||||||||
| |
Task Group 38.1 (McCain) |
|||||||
| | CV Wasp | |||||||
| | VF-14: 30 F6F-3 Hellcat, 3 F6F-3N Hellcat, 2 F6F-3P Hellcat, 7 F6F-5 Hellcat, 1 F6F-5N Hellcat VB-14: 3 F6F-3 Hellcat, 7 F6F-5 Hellcat, 25 SB2C-3 Helldiver VT-14: 5 TBF-1C Avenger, 1 TBF-1D Avenger, 11 TBM-1C Avenger, 1 TBM-1D Avenger | |||||||
| CV Hornet |
||||||||
| VF-11: 11 F6F-3 Hellcat, 2 F6F-3N Hellcat, 1 F6F-3P Hellcat, 21 F6F-5 Hellcat, 2 F6F-5N Hellcat, 3 F6F-5P Hellcat VB-11: 25 SB2C-3 Helldiver VT-11: 1 TBM-1C Avenger, 17 TBM-1C Avenger |
||||||||
| CVL Monterey | ||||||||
| VF-28: 21 F6F-5 Hellcat, 1 F6F-5P Hellcat VT-28: 9 TBM-1C Avenger |
||||||||
| CVL Cowpens | ||||||||
| VF-22: 25 F6F-5 Hellcat, 1 F6F-5P Hellcat VT-22: 9 TBM-1C Avenger |
||||||||
| Cruiser Division 6 (Joy) |
||||||||
| CA Wichita |
||||||||
| Cruiser Division 10 (Wiltse) |
||||||||
| CA Boston |
||||||||
| Cruiser Division 5 (Smith) |
||||||||
| CA Chester CA Pensacola CA Salt Lake City |
||||||||
| Screen |
||||||||
| Destroyer Squadron 46 |
||||||||
| DD Izard DD Charrette DD Conner DD Bell DD Burns |
||||||||
| Destroyer Division 100 |
||||||||
| DD Cogswell DD Caperton DD Ingersoll DD Knapp |
||||||||
| Destroyer Division 92 |
||||||||
| DD Boyd DD Cowell |
||||||||
| Destroyer Squadron 12 |
||||||||
| DD McCalla DD Grayson DD Brown DD Woodworth |
||||||||
| Destroyer Squadron 4 |
||||||||
| DD Dunlap DD Fanning DD Case DD Cummings DD Cassin DD Downes |
||||||||
| Task Group 38.2 (Bogan) |
||||||||
| CV Intrepid | ||||||||
| VF-18: 5 F6F-3N Hellcat, 36 F6F-5 Hellcat, 3 F6F-5P Hellcat VB-18: 28 SB2C-3 Helldiver VT-18: 18 TBM-1C Avenger |
||||||||
| CV Hancock | ||||||||
| VF-7: 37 F6F-5 Hellcat, 4 F6F-5N Hellcat VB-7: 30 SB2C-3 Helldiver, 12 SB2C-3E Helldiver VT-7: 18 TBM-1C Avenger |
||||||||
| CV Bunker Hill |
||||||||
| VF-8: 27 F6F-3 Hellcat, 14 F6F-5 Hellcat, 4 F6F-3N Hellcat, 4 F6F-5N Hellcat VB-8: 17 SB2C-1C Helldiver, 3 SBF-1 Helldiver, 4 SBW-1 Helldiver VT-8: 17 TBM-1C Avenger, 2 TBM-1D Avenger |
||||||||
| CVL Cowpens | ||||||||
| VF-29: 3 F6F-3 Hellcat, 18 F6F-5 Hellcat VT-29: 1 TBF-1C Avenger, 8 TBM-1C Avenger |
||||||||
| CVL Independence | Night air group carrier |
|||||||
| VF-41: 3 F6F-3 Hellcat, 2 F6F-5 Hellcat, 14 F6F-5N Hellcat VT-41: 8 TBM-1D Avenger |
||||||||
| Battleship Division 7 (Badger) |
||||||||
| BB Iowa BB New Jersey |
||||||||
| Cruiser Division 14 (Whiting) |
||||||||
| CL Vincennes CL Miami CLAA San Diego CLAA Oakland |
||||||||
| Screen | ||||||||
| Destroyer Squadron 52 |
||||||||
| DD Miller DD The Sullivans DD Stephen Potter DD Tingey |
||||||||
| Destroyer Division 104 |
||||||||
| DD Hickox DD Hunt DD Lewis Hancock DD Marshall |
||||||||
| Destroyer Squadron 50 |
||||||||
| DD Halsey Powell DD Cushing DD Colahan DD Uhlmann DD Benham |
||||||||
| Destroyer Division 106 |
||||||||
| DD Stockham DD Wedderburn DD Twining DD Yarnall |
||||||||
| Task Group 38.3 (Sherman) |
||||||||
| CV Essex | ||||||||
| VF-15: 22 F6F-3 Hellcat, 3 F6F-3N Hellcat, 2 F6F-3P Hellcat, 23 F6F-5 Hellcat, 1 F6F-5N Hellcat VB-15: 25 SB2C-3 Helldiver VT-15: 15 TBF-1C Avenger, 5 TBM-1C Avenger |
||||||||
| CV Lexington | ||||||||
| VF-19: 14 F6F-3 Hellcat, 2 F6F-3N Hellcat, 1 F6F-3P Hellcat, 22 F6F-5 Hellcat, 1 F6F-5N Hellcat, 1 F6F-5P Hellcat VB-19: 30 SB2C-3 Helldiver VT-19: 18 TBM-1C Avenger |
||||||||
| CVL Princeton | Sunk |
|||||||
| VF-27: 18 F6F-3 Hellcat, 7 F6F-5 Hellcat VT-27: 9 TBM-1C Avenger |
||||||||
| CVL Langley | ||||||||
| VF-44: 19 F6F-3 Hellcat, 6 F6F-5 Hellcat VT-44: 9 TBM-1C Avenger |
||||||||
| Battleships, Pacific Fleet (Lee) |
||||||||
| BB Washington |
||||||||
| Battleship Division 8 (Davis) |
||||||||
| BB Massachusetts |
||||||||
| Battleship Division 9 (Hanson) |
||||||||
| BB South Dakota BB Alabama |
||||||||
| Cruiser Division 13 (DuBose) |
||||||||
| CL Santa Fe CL Mobile CL Birmingham CLAA Reno |
Damaged |
|||||||
| Screen |
||||||||
| Destroyer Squadron 50 |
||||||||
| DD Clarence K. Bronson DD Cotten DD Dortch DD Healy |
||||||||
| Destroyer Squadron 55 |
||||||||
| DD Porterfield DD Callaghan DD Cassin Young DD Irwin DD Preston |
||||||||
| Destroyer Division 110 |
||||||||
| DD Laws DD Longshaw DD Morrison DD Pritchett |
||||||||
| Task Group 38.4 (Davison) |
||||||||
| CV Franklin | ||||||||
| VF-13: 1 F6F-3 Hellcat, 3 F6F-3N Hellcat, 30 F6F-5 Hellcat, 1 F6F-5N Hellcat, 4 F6F-5P Hellcat VB-13: 31 SB2C-3 Helldiver VT-13: 18 TBM-1C Avenger |
||||||||
| CV Enterprise |
||||||||
| VF-20: 4 F6F-3N Hellcat, 36 F6F-5 Hellcat VB-20: 34 SB2C-3 Helldiver VT-20: 19 TBM-1C Avenger |
||||||||
| CVL San Jacinto |
||||||||
| VF-51: 24 F6F-3 Hellcat, 5 F6F-5 Hellcat VT-51: 5 TBM-1C Avenger |
||||||||
| CVL Belleau Wood |
||||||||
| VF-21: 24 F6F-5 Hellcat, 1 F6F-5P Hellcat VT-21: 9 TBM-1C Avenger |
||||||||
| CA New Orleans CL Biloxi |
||||||||
| Screen |
||||||||
| Destroyer Squadron 6 |
||||||||
| DD Gridley DD Helm DD McCall |
||||||||
| Destroyer Division 12 |
||||||||
| DD Mugford DD Bagley DD Patterson DD Ralph Talbot |
||||||||
| Destroyer Division 24 |
||||||||
| DD Wilkes DD Nicholson DD Swanson |
||||||||
| TG 30.8 At Sea Logistics Group Third Fleet |
||||||||
| AO Atascosa AO Aucilla AO Cache AO Caliente AO Chicopee AO Chikaskia AO Cimarron AO Escambia AO Guadalupe AO Kankakee AO Kaskaskia AO Kennebago AO Lackawanna AO Manatee AO Marias AO Mascoma AO Merrimack AO Millicoma AO Mississinewa AO Tappahannock AO Nantahala AO Neches AO Neosho AO Niobrara AO Pamanset AO Patuxent AO Pecos AO Platte AO Sabine AO Saugatuck AO Sebec AO Taluga AO Monongahela AO Tomahawk CVE Altamaha CVE Barnes CVE Sitkoh Bay CVE Cape Esperance CVE Nassau CVE Kwajalein CVE Shipley Bay CVE Steamer Bay CVE Nehenta Bay CVE Sargent Bay CVE Rudyerd Bay |
Sunk |
|||||||
| Screen |
||||||||
| Destroyer Division 102 |
||||||||
| DD Aylwin DD Capps DD Dale DD David W. Taylor |
||||||||
| Destroyer Squadron 1 |
||||||||
| DD Dewey DD Dyson DD Evans DD Farragut DD Hailey |
||||||||
| Destroyer Squadron 51 |
||||||||
|
DD Hall DD Hobby DD Hull DD John D. Henley DD Monaghan DD Paul Hamilton DD Thatcher DD Thorn DD Welles |
||||||||
| Destroyer Escorts |
||||||||
| DE Acree DE Bangust DE Crowley DE Donaldson DE Elden DE Halloran DE Hilbert DE Kyne DE Lake DE Lamons DE Levy DE Lyman DE McConnell DE Mitchell DE O'Neill DE Osterhaus DE Parks DE Rall DE Reynolds DE Riddle DE Samuel S. Miles DE Stern DE Swearer DE Waterman DE Weaver DE Wesson |
||||||||
| Fleet Tugs |
||||||||
| AT Hitchiti AT Jicarilla AT Mataco AT Menominee AT Molala AT Munsee AT Pawnee AT Sioux AT Tekesta AT Zuni |
||||||||
| Ammunition Ships |
||||||||
| AE Mount Hood AE Sangay AE Mauna Loa AK Australia Victory AE Shasta AE Lassen |
Exploded from unknown causes during the operation |
|||||||
| December echelon |
||||||||
| AK Provo Victory AK Elmira Victory AK Boulder Victory AE Ranier AE Mount Baker AE Nitro AK Alamosa |
||||||||
| Task Force 17 Supporting Submarines Pacific Fleet (Lockwood) |
||||||||
| SS Tang SS Sterlet SS Barbel SS Snook |
Sunk |
|||||||
| "Clarey's Crushers" |
||||||||
| SS Pintado SS Jallao SS Atule |
||||||||
| "Roach's Raiders" |
||||||||
| SS Haddock SS Halibut SS Tuna |
||||||||
| "Banister's Beagles" |
||||||||
| SS Sawfish SS Drum SS Icefish |
||||||||
| "Blakely's Behemoths" |
||||||||
| SS Shark SS Blackfish SS Seadragon |
Sunk |
|||||||
| "Coye's Coyotes" |
||||||||
| SS Silversides SS Salmon SS Trigger |
||||||||
| "Wogan's Wolves" |
||||||||
| SS Besugo SS Ronquil SS Gabilan |
||||||||
References
Hornfischer
(2004)
Morison
(1958)
Naval War College (accessed 2012-11-2)
The Pacific War Online Encyclopedia © 2007-2009, 2012 by Kent G. Budge. Index